Golden Crunch Delight Perfectly Fried Ice Cream That Wont Melt
- The Magic of Thermal Contrast: Why This Fried Ice Cream Recipe Works
- Setting the Stage: Understanding the Culinary Illusion
- Assembling Your Arctic Core & Crunchy Exterior Components
- Phase One: Deep Freezing for Ultimate Structural Integrity
- The High-Speed Frying Technique for Perfect Fried Ice Cream
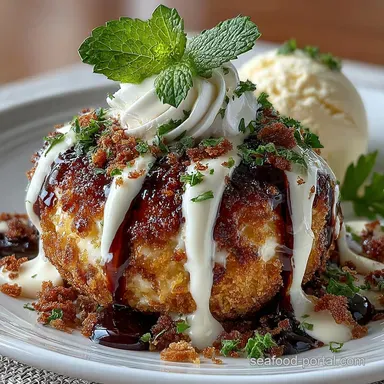
- Serving Up the Showstopper: Garnishes and Presentation
- Troubleshooting Common Failures in Homemade Fried Ice Cream
- Creative Variations Beyond the Classic Cinnamon Coating
- Nutritional Insights and Planning Ahead
- Recipe FAQs
- 📝 Recipe Card
The Magic of Thermal Contrast: Why This Fried Ice Cream Recipe Works
There is a peculiar, almost defiant joy in eating something simultaneously scalding hot and profoundly frozen. That sensory paradox is the very essence of a successful Fried Ice Cream Dessert .
When executed correctly, this culinary marvel offers a satisfying, shatteringly crisp exterior that gives way to an untouched, arctic core. Understanding why this happens the physics behind the magic is the first step toward mastering the Fried Ice Cream Recipe .
It is not simply about dunking a frozen item into hot oil; it requires meticulous temperature staging. We are aiming to cook the batter coating faster than the ice cream core can melt.
The key relies on the insulating power of the coating itself, built up layer by layer, which must be super chilled before it ever encounters the heat. This controlled process ensures that the final product remains the show stopping delight it is meant to be.
Setting the Stage: Understanding the Culinary Illusion
The creation of authentic Mexican Fried Ice Cream relies on exploiting the insulating properties of dense, ultra frozen matter. When perfectly prepared, the coating forms an instant, impenetrable barrier.
The heat transfer from the 375° F oil to the frozen surface is so rapid that the very outer layer of the ice cream solidifies momentarily against the crust, creating a temporary shield that prevents full meltdown during the necessary brief frying time.
This delicate balance between speed and temperature control is what separates a soggy disappointment from a triumphant Postre Mexicano .
Beyond the Freezer Burn: Achieving Arctic Core Consistency
To achieve that perfect, non-melty center, patience during the chilling phases is non-negotiable. Simply putting scoops in the freezer for an hour or two won't suffice. We need the interior of the ice cream balls to reach a temperature approaching absolute solidity we aim for rock hard.
This initial stage, requiring several hours of deep freezing, is where you solidify the structure. When the ice cream is this cold, it can withstand the shock of hot oil for a full 60 to 90 seconds without compromising the integrity of the interior.
If you are working with a premium, dense vanilla base, you give yourself the best possible chance for success.
A Quick Look at the History of Hot-Meets Cold Desserts
While the Fried Ice Cream Dessert is famously associated with Mexican cuisine and it is certainly a beloved staple in Tex-Mex restaurants the concept of flash frying frozen desserts is not exclusively confined to one culture.
Similar techniques can be traced back to 19th-century American cookbooks, and even earlier concepts involving frozen puddings dipped in hot batter existed in various European settings.
Regardless of its exact Fried Ice Cream Origin , the modern iteration we are focused on today has found its most vibrant home, often incorporating warm spices like cinnamon that beautifully complement the cold vanilla.
Assembling Your Arctic Core & Crunchy Exterior Components
Success in How to make fried ice cream hinges on the quality and preparation of your components before they even see the fryer. We require three distinct stations for coating, along with the star ingredient: ice cream.
For this recipe serving six people, you’ll need about 1.5 quarts of premium vanilla bean ice cream. The coating is what provides the necessary thermal armor.
Selecting the Creamiest Ice Cream Base for Frying
Choose the densest, highest fat content ice cream you can find; artisanal or premium brands often work better than lighter, airier supermarket varieties. Less air trapped in the ice cream means less internal space for expansion and melting when briefly heated.
Work swiftly when scooping your portions the goal is to minimize the time the ice cream spends at room temperature. Once portioned into six uniform balls, they must immediately go into the coldest section of your freezer.
The Secret Blend: Mastering the Cinnamon Sugar Dredge Mix
The crunchy exterior coating is where flavor meets texture. We build this by preparing three separate shallow bowls for a classic triple dipping process. The final, crucial dry mix should combine 2 cups of finely crushed Corn Flakes Fried Ice Cream texture material, typically mixed with Panko breadcrumbs for an enhanced crisp.
To this, we introduce the warmth: 2 tablespoons of granulated sugar and 1 teaspoon of ground cinnamon. A pinch of salt balances the sweetness perfectly. This blend is what creates that classic spiced shell.
Tools of the Trade: Ensuring Safety and Success in the Kitchen
Frying requires respect for high temperatures. You absolutely must have a sturdy, deep pot or Dutch Oven capable of holding a good volume of oil (about 4 cups). More critical than the pot itself is a reliable deep fry or candy thermometer. Guessing the oil temperature is the fastest route to failure here.
Plus,, have a sturdy ice cream scoop ready, and ensure your baking sheet is lined with parchment paper for the pre-freezing stages.
Phase One: Deep Freezing for Ultimate Structural Integrity
This is the most time consuming yet vital part of the Ice Cream Dessert Recipe . After scooping your six portions, place them on the lined sheet into the deep freezer for at least one hour. This initial hardening sets the structure. Next, we begin the coating process.
Each frozen ball must be quickly rolled in flour (the first binder), then dipped in two whisked eggs (the primary glue), and finally, pressed firmly into your cinnamon sugar Corn Flakes Fried Ice Cream coating mixture.
The trick here is ensuring that the dry mix adheres thoroughly use your fingers to gently press the crumbs onto the sticky, egg-washed surface. Once fully coated, these fragile creations must return to the freezer for a minimum of three more hours, ideally four, or until they are completely frozen solid, transforming into near indestructible frozen orbs.
Related Recipes Worth Trying
- The Frozen Firework Foolproof Homemade Fried Ice Cream Recipe — Master the paradox This Homemade Fried Ice Cream Recipe delivers a perfectly crisp shell and icy centre Learn the essential freezing tricks for success
- The Proper Pintos Truly Authentic Homemade Refried Beans — Ditch the tin Learn how to make truly authentic homemade refried beans from scratch Rich creamy and deeply savourythe backbone of great Recetas Mexicanas
- Foolproof Creamy Tuscan Scallops Restaurant Quality at Home — Achieve perfectly seared Creamy Tuscan Scallops in under 35 minutes This restaurantquality Tuscan Scallops Recipe features garlic butter and spinach Get the...
The High Speed Frying Technique for Perfect Fried Ice Cream

Once your coated spheres are rock hard, the cooking phase begins, and speed is paramount. In your deep pot, heat approximately 4 cups of vegetable or canola oil until the thermometer reads precisely 375° F ( 190° C). This temperature must be maintained.
Frying in small batches one or two scoops maximum prevents the oil temperature from plummeting drastically when the cold item is introduced.
Serving Up the Showstopper: Garnishes and Presentation
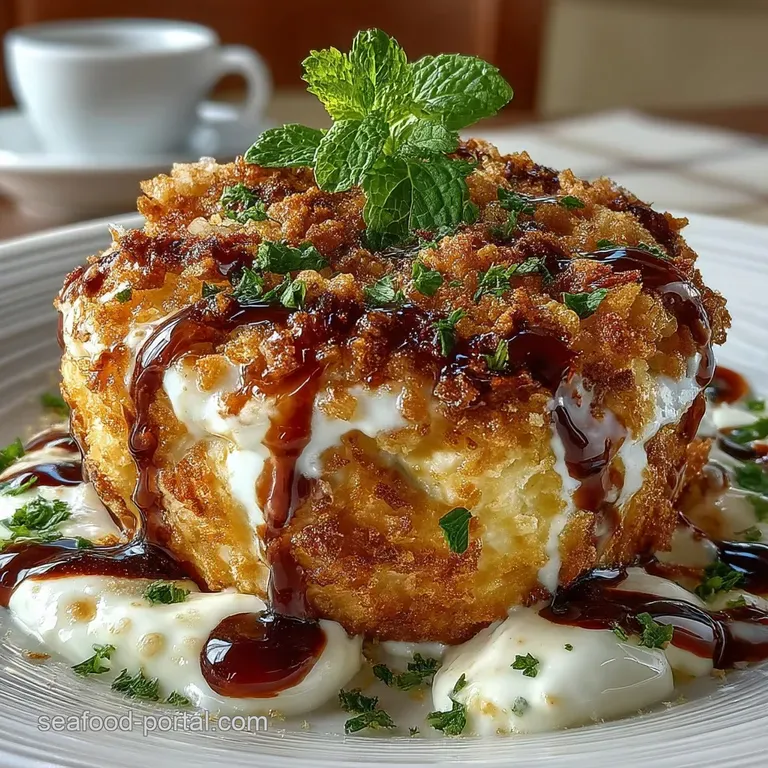
The moment the ice cream emerges from the oil, it needs to be plated immediately. The visual contrast of the deep golden brown shell against the anticipated cold interior is half the fun.
Scooping and Shaping the Rock Solid Ice Cream Balls
Before you even turn on the stove, ensure you have your final serving dishes ready and perhaps even chilled slightly in the freezer. The goal is to present the dish almost instantly after frying, maximizing the dramatic hot-cold experience.
The Triple Dipping Method: Building an Impenetrable Coating
Remember that the three stage dredging process flour, egg, crumbs is designed to build thickness. A thin coating will melt too quickly. Be generous and ensure every inch is sealed before the final deep freeze.
Oil Temperature Protocols: Hitting the Sweet Spot for Crispness
If the oil drops below 360° F ( 182° C), the coating will soak up the fat and become greasy rather than crisp. If the oil is too hot (over 390° F/ 200° C), the coating will burn black before the interior has even had a chance to heat the surface slightly.
Maintain that 375° F mark diligently.
Quick Assembly: Plating Your Warm, Crunchy Masterpiece Immediately
Using a spider strainer or slotted spoon, carefully lift the golden spheres from the oil, briefly drain excess oil on paper towels, and transfer them directly into your waiting, chilled bowls. Drizzle immediately with your chosen sauce.
Troubleshooting Common Failures in Homemade Fried Ice Cream
The most frequent issue is the dreaded "melted puddle." This almost always points back to insufficient pre-freezing time. If the ice cream isn't stone solid, it will fail. Another issue is a soggy crust; this is usually a sign that the oil temperature dropped too low during frying, allowing the coating to steam in the oil rather than crisp up instantly.
If your coating cracks during frying, it means the shell wasn't pressed firmly enough onto the egg wash during the final dredge, leaving weak spots where the oil can penetrate too deeply.
Creative Variations Beyond the Classic Cinnamon Coating
While the vanilla base with a simple cinnamon crust is the quintessential Fried Ice Cream Dessert , feel free to innovate. You can substitute the vanilla for Cinnamon Ice Cream itself for a double dose of spice.
For a different texture, try using crushed shortbread cookies or even finely ground pretzels in place of some of the cereal mixture. Another fantastic variation is to incorporate finely ground nuts, like pecans or walnuts, into the final dry dredge for added richness and complexity.
Nutritional Insights and Planning Ahead
As an indulgent treat, this Fried Ice Cream Recipe is certainly higher in fat and sugar due to the ice cream and the frying process. However, the actual cooking time is so minimal (under 90 seconds per serving) that the amount of oil absorbed is surprisingly controlled, provided your temperature management is spot on.
Making Ahead: Storage Tips for Frozen Balls (Pre-Frying)
If you are preparing for a large gathering, the beauty of this dessert is that the coated balls can be made days in advance. Once they have completed their final 3-hour deep freeze, transfer the individual balls (separated by parchment squares) into a heavy duty, airtight freezer bag.
Store them in the back of the freezer, ensuring they remain untouched by warmer freezer air pockets, ready for their quick trip into the fryer when guests arrive.
Elevating Your Dish with Online Cooking Class Techniques (Advanced Flavor Profiles)
For those looking to explore advanced textures, some culinary demonstrations suggest using sweetened condensed milk mixed with graham crackers as an intermediate layer between the egg wash and the final crumbs.
This creates an even thicker, almost caramel like seal that offers incredible protection during the quick fry, leading to a richer, more complex crust reminiscent of an upscale dessert bar.
Understanding Macronutrients in This Decadent Dessert
When budgeting for this dish, remember that the majority of the calories stem from the fat in the premium ice cream base and the oil absorbed by the crust, alongside the sugars in both the ice cream and the cinnamon sugar coating.
Pairing it with lighter accompaniments, like fresh fruit or unsweetened whipped cream, helps balance the overall profile of this spectacular final course.
Recipe FAQs
My ice cream always melts before it even hits the hot oil! What’s the secret to successful Fried Ice Cream?
The secret, my friend, is making sure your ice cream scoops are absolutely, ridiculously frozen we're talking rock solid. You need a minimum of four hours in the coldest part of your freezer after the final coating.
Think of it like getting a good winter coat on before going out in a blizzard; that shell needs deep chilling to buy you the crucial 90 seconds in the fryer.
Do I really need a thermometer for this? Can’t I just test the oil temperature with a crumb?
While testing with a crumb might work for chips, for this dish, a thermometer is your best mate. The oil MUST be exactly 375°F (190°C) before you drop in the first ball. If it’s too cool, the coating soaks up the oil and goes soggy; if it's too hot, the outside burns before the core has a chance to solidify that shell.
I want to prep ahead. How long can I store the coated ice cream scoops before frying?
For the best results, aim to fry them the same day you coat them, ideally within 4 to 8 hours after their final freeze. If you absolutely must store them longer, wrap each individually in plastic wrap and place them in a sealed container in the freezer for up to a week.
Just be aware that longer storage slightly increases the risk of freezer burn or the coating absorbing moisture.
What can I use instead of vanilla ice cream? I fancy a different flavour for my Fried Ice Cream.
That’s the spirit! Coffee, cinnamon, or even mint chocolate chip ice cream work brilliantly, provided they are firm and high quality. If you use anything with large chunks (like brownie bits), you might want to increase your final coating layer thickness slightly to ensure everything stays sealed during the frying process.
My coating keeps falling off in the hot oil, even after I pressed hard! What am I doing wrong?
This usually comes down to moisture interference or insufficient pressure. Ensure you are completely draining the ice cream balls after the egg wash before rolling them in the dry mix any excess liquid ruins the adhesion.
Also, when pressing the coating on, really compact it; you're creating an impenetrable fortress against the heat!
Fried Ice Cream Perfection