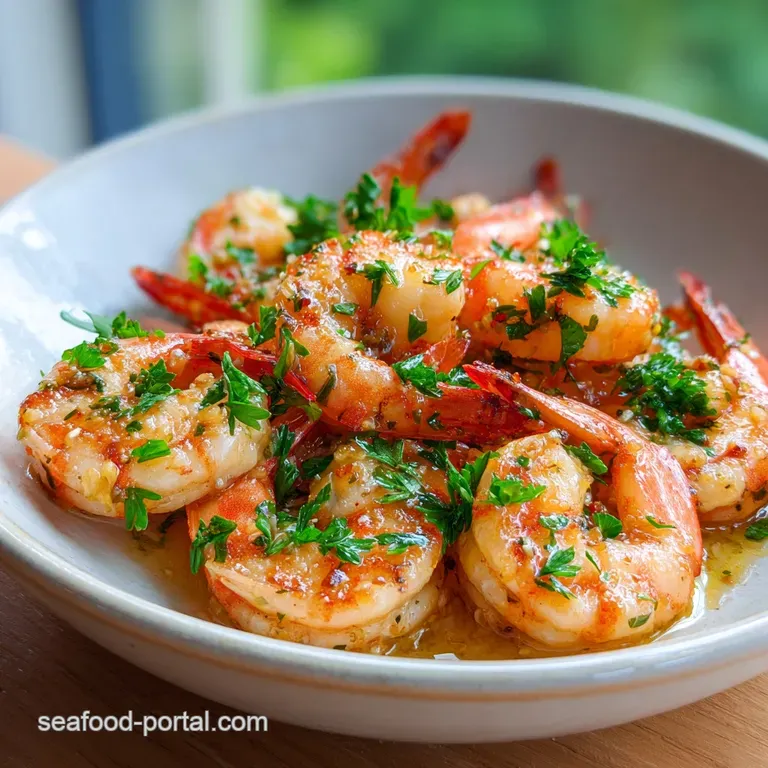
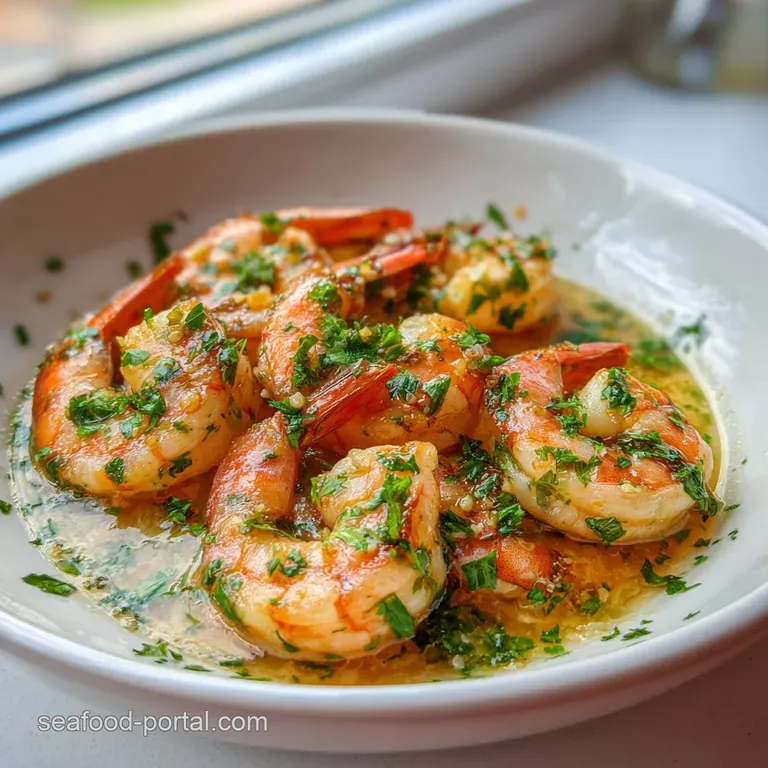
Garlic Butter Shrimp: Golden and Pan-Seared
- Time: 5 min prep + 10 min cook = Total 15 minutes
- Flavor/Texture Hook: Golden, buttery sear with a zesty, garlic infused finish
- Perfect for: Impressive weeknight dinners or a quick date night appetizer
- Why This Flavor Build Works
- Component Analysis for Best Flavor
- Essential Tools for the Pan
- Ingredient Deep Dive
- Step by Step Searing Guide
- Common Pitfalls and Pro Fixes
- Troubleshooting Common Issues
- Adjusting the Portion Size
- Truth About Shrimp Cooking
- Storage and Scrap Saving
- Best Sides for Your Shrimp
- High in Sodium
- Recipe FAQs
- 📝 Recipe Card
That smell of burnt garlic is something I'll never forget. A few years back, I tried to make a quick dinner and tossed everything into the pan at once. I ended up with bitter, black garlic bits and shrimp that had the consistency of a pencil eraser.
It was a disaster, and I almost gave up on pan searing seafood entirely.
The problem was that I was trying to do too much at one temperature. High heat is great for a crust, but it kills garlic in seconds and overcooks shrimp before they even change color. I realized that the order of operations is everything.
By separating the over high heat sear from the butter infusion, you get that golden exterior without the rubbery interior. Discover the perfect Shrimp Recipe Idea with Garlic and Butter that fixes those common mistakes once and for all. It's all about layering the flavor so nothing burns and everything stays juicy.
Why This Flavor Build Works
- The Dry Surface: Patting the shrimp dry removes surface moisture, which means they sizzle immediately instead of steaming in their own juices. This is how you get that golden color instead of a grey, soggy look.
- Staged Fat Addition: Starting with olive oil allows for a higher smoke point during the sear, while adding cold butter at the end creates a glossy, velvety emulsion that clings to the shrimp.
- The Garlic Window: Garlic burns at a much lower temperature than shrimp sears. By pushing the shrimp aside and adding garlic last, we extract the aroma without the bitterness.
- Acid Balance: Adding lemon juice at the very end cuts through the heavy butter fat, brightening the whole dish and making the garlic pop.
| Method | Time | Texture | Best For |
|---|---|---|---|
| Pan Searing | 15 minutes | Snappy and Golden | Quick dinners |
| Oven Baking | 25 minutes | Tender and Soft | Large crowds |
| Poaching | 10 minutes | Silky and Pale | low-fat diets |
Trust me, once you see the difference a proper sear makes, you'll never go back to just tossing them in a pot of boiling water. It's the difference between a home meal and something that feels like it came from a high end bistro.
Component Analysis for Best Flavor
| Ingredient | Science Role | Pro Secret |
|---|---|---|
| Unsalted Butter | Fat and Emulsifier | Use cold butter for a thicker, creamier sauce |
| Fresh Garlic | Aromatic Base | Mince by hand for better flavor release than a press |
| Lemon Juice | pH Balancer | Strain out seeds to keep the sauce smooth |
| Red Pepper Flakes | Heat Contrast | Add these with the garlic to toast them in the fat |
Essential Tools for the Pan
You don't need a professional kitchen for this, but the pan choice actually matters. I always reach for a stainless steel or cast iron skillet. Why? Because they hold heat much better than non stick pans. When you drop the shrimp in, you want to hear an aggressive sizzle, not a quiet hiss.
If you only have non stick, that's fine, but you might find it harder to get that deep golden crust. A wide pan is also key. If you crowd the shrimp, they'll release too much moisture and end up boiling in a pool of liquid. Give them room to breathe.
I also suggest using a fish spatula or a wide turner. It lets you flip the shrimp without breaking the delicate edges, keeping them whole and looking great on the plate.
Ingredient Deep Dive
- 1 lb (450g) large shrimp, peeled and deveined Why this? Large shrimp hold their juice better than small ones
- 4 tbsp (57g) unsalted butter, divided Why this? Unsalted lets you control the seasoning exactly
- 4 cloves (12g) garlic, minced Why this? Fresh garlic has a bite that powdered can't match
- 1 tbsp (15ml) olive oil Why this? Raises the smoke point for the initial sear
- 1 tbsp (15ml) fresh lemon juice Why this? Fresh acidity awakens the butter and garlic
- 2 tbsp (8g) fresh parsley, chopped Why this? Adds a fresh, grassy note to balance the richness
- 1/2 tsp (3g) salt Why this? Enhances all existing flavors
- 1/4 tsp (1g) black pepper Why this? Provides a subtle, earthy warmth
- 1/4 tsp (1g) red pepper flakes Why this? Adds a tiny bit of back end heat
Substitution Guide
| Original Ingredient | Substitute | Why It Works |
|---|---|---|
| Unsalted Butter | Ghee (clarified butter) | Higher smoke point. Note: Less creamy finish than butter |
| Lemon Juice | White Wine (Dry) | Similar acidity. Note: Adds a deeper, fermented flavor |
| Fresh Parsley | Fresh Chives | Similar color and freshness. Note: Adds a mild onion taste |
| Olive Oil | Avocado Oil | Very high smoke point. Note: Neutral flavor, won't affect the taste |
If you're looking for something even more indulgent, this butter technique is very similar to what I use for my Baked Lobster Tail, where the butter acts as the primary flavor carrier.
Step by step Searing Guide
- Pat the shrimp completely dry with paper towels. Note: Any water left on the surface will steam the shrimp instead of searing them.
- Heat olive oil and 1 tbsp (14g) of butter in a large stainless steel or cast iron skillet over medium high heat until the butter foams.
- Add shrimp in a single layer; sear for 2 minutes without moving them until the bottoms are golden.
- Flip the shrimp and sear for 1 minute more.
- Reduce heat to medium. Push the shrimp to the sides of the pan and add the remaining 3 tbsp (43g) of butter to the center.
- Once the butter is melted, stir in the minced garlic and red pepper flakes. Sauté for 1 minute until fragrant but not browned.
- Toss the shrimp back into the garlic butter and stir in the lemon juice, salt, and pepper.
- Remove from heat immediately once the sauce is glossy and the shrimp are opaque.
- Fold in the fresh parsley just before serving to maintain its vibrant green color.
Common Pitfalls and Pro Fixes
Troubleshooting Common Issues
| Issue | Solution |
|---|---|
| Why Your Shrimp Are Rubbery | Overcooking is the most common mistake. According to Serious Eats, shrimp proteins tighten up quickly, squeezing out moisture and creating a rubbery texture. The moment |
| Why Your Garlic Tastes Bitter | This happens when the garlic hits the pan while the oil is too hot, or it stays in the pan too long. Garlic sugars burn quickly. Always lower your heat before adding the garlic and keep it moving. |
| Why the Sauce is Greasy | If you use too much oil or overheat the butter until it separates, you'll get a pool of grease. The key is adding the final butter at a lower temperature to create a velvety emulsion. |
Common Mistakes Checklist
- ✓ Did you pat the shrimp dry?
- ✓ Did you avoid crowding the pan?
- ✓ Did you wait for the butter to foam before adding shrimp?
- ✓ Did you remove the pan from heat the second the shrimp turned opaque?
- ✓ Did you add the parsley at the very end?
Adjusting the Portion Size
When you're cooking for a crowd, the biggest mistake is just doubling everything in the same pan. If you put 2 lbs of shrimp in a standard skillet, they'll release too much liquid and you'll lose the sear.
Cooking for Fewer (1/2 or 1/4 batch): Use a smaller skillet so the butter doesn't spread too thin and burn. Reduce the searing time by about 20% because the pan will heat up and cool down faster with less mass.
Cooking for More (2x-4x batch): Work in batches. Sear the shrimp in two or three separate rounds, then set them aside on a plate. Once all the shrimp are seared, make the garlic butter sauce in the pan and toss all the cooked shrimp back in at once to glaze.
Also, only increase the salt and red pepper flakes to 1.5x the original amount; full doubling often makes the seasoning too aggressive.
| If you want X | Do Y |
|---|---|
| A creamier sauce | Add 1 tbsp of heavy cream at step 7 |
| More heat | Double the red pepper flakes and add a pinch of cayenne |
| A deeper flavor | Use browned butter (beurre noisette) for the final stage |
Truth About Shrimp Cooking
There's a common idea that you should "seal in the juices" by searing. In reality, searing doesn't create a waterproof seal. Instead, it creates a flavorful crust through browning. The "juiciness" comes from not overcooking the internal proteins.
Another myth is that frozen shrimp are inferior. Honestly, most "fresh" shrimp at the counter were frozen on the boat anyway. The trick is thawing them slowly in the fridge and drying them thoroughly.
Some people think you need to devein shrimp to make them taste better. While the vein (the digestive tract) isn't tasty and can be gritty, it doesn't actually ruin the flavor of the dish. However, for a professional look and feel, it's worth the effort.
Storage and Scrap Saving
Fridge Storage Store any leftovers in an airtight container for up to 2 days. To keep them from becoming rubbery, reheat them gently in a pan over low heat with a tiny splash of water or a knob of butter.
Avoid the microwave if you can, as it's the fastest way to ruin the texture of this Shrimp Recipe Idea with Garlic and Butter.
Freezing I don't recommend freezing the finished dish because the butter sauce will separate and the shrimp will toughen. If you must, freeze the seared shrimp without the sauce and reheat them in a fresh batch of garlic butter.
Zero Waste Tips Don't throw away the shrimp shells and heads! Toss them into a freezer bag. Once you have enough, simmer them with some onion, carrot, and celery to make a quick seafood stock. This stock is the secret base for a Lobster Bisque or a seafood risotto.
Best Sides for Your Shrimp
Since the sauce is so velvety and rich, you need sides that can either soak up that gold or cut through the fat.
The Classic Soak Up Crusty French bread or a toasted baguette is a must. I like to brush the bread with a little olive oil and toast it in the oven for 5 minutes. Use it to swipe every last drop of garlic butter from the plate.
The Fresh Balance A crisp green salad with a lemon vinaigrette works beautifully. The acidity of the salad cleanses the palate between bites of the rich shrimp. Roasted asparagus or sautéed spinach also provide a nice earthy contrast.
The Hearty Base For a full meal, serve this over a bed of fluffy jasmine rice or linguine. If you're keeping it low carb, cauliflower rice or zucchini noodles are great alternatives that let the garlic butter shine without adding heavy carbs.
High in Sodium
841 mg 841 mg of sodium per serving (37% 37% of daily value)
The American Heart Association recommends a daily limit of no more than 2,300mg of sodium to maintain heart health.
Tips to Reduce Sodium
-
Reduce Added Salt-25%
Cut the 1/2 tsp of salt in half or omit it entirely; the shrimp naturally contains sodium that enhances the flavor.
-
Boost Acidity-10%
Increase the fresh lemon juice to 2 tbsp to provide a bright, tangy flavor that mimics the taste of salt.
-
Enhance Aromatics-5%
Add an extra clove of minced garlic or a pinch of salt free garlic powder to deepen the savory profile.
-
Use Fresh Herbs
Increase the amount of fresh parsley or add a pinch of smoked paprika for extra depth without adding any sodium.
Recipe FAQs
Why are my shrimp rubbery?
You likely overcooked them. Shrimp proteins tighten quickly and squeeze out moisture when exposed to heat for too long, ruining the texture.
Why does my garlic taste bitter?
The garlic burned in the pan. This happens if the heat is too high or the garlic is sautéed for more than a minute, causing the natural sugars to scorch.
Is it necessary to pat the shrimp dry?
Yes, it is essential for a proper sear. Any surface moisture will steam the shrimp instead of browning them, preventing the golden crust.
How to prevent the shrimp from overcooking?
Remove them from the heat immediately once the shrimp are opaque and the sauce is glossy. Stick strictly to the 2-minute and 1-minute sear times.
Can I freeze the finished shrimp with the sauce?
No, I don't recommend it. The butter sauce will separate during the thawing process and the shrimp will become tough.
What is the best way to serve these shrimp?
Serve them as a protein over pasta or rice. If you enjoy this flavor profile, you can apply the same garlic butter technique to a lemon garlic spaghetti.
Is it true that shrimp must be cooked for several minutes per side to be safe?
No, this is a common misconception. Shrimp cook very rapidly and only require a total of 3 minutes of searing to be fully cooked and tender.
Garlic Butter Shrimp Idea

