The Nofuss Allcrunch Crispy Baked Chicken Parmesan
- Unlocking the Secret to a Truly Shatteringly Crispy Baked Chicken Parmesan
- Why This Oven Method Beats Traditional Frying
- Essential Components for Your Ultimate Crispy Baked Chicken Parmesan Platter
- Sourcing Superior Ingredients for Maximum Flavor Impact
- Step-by-Step Assembly of Your Masterpiece Chicken Parmesan
- Baking Techniques Engineered for Maximum Crispness
- Elevating Your Crispy Baked Chicken Parmesan with Side Dish Pairings
- Storage Wisdom and Reheating to Preserve the Crunch
- Recipe FAQs
- 📝 Recipe Card
Unlocking the Secret to a Truly Shatteringly Crispy Baked Chicken Parmesan
Settle in, friends, because today we are dismantling the myth that achieving an undeniably crisp crust on Chicken Parmesan requires drowning your cutlets in hot oil. As a chef who appreciates both tradition and efficiency, I can tell you that the Crispy Baked Chicken Parmesan we are about to create is a revelation.
We are talking about that glorious, shattering texture you expect from a perfectly fried cutlet, delivered straight from your oven. This recipe the Best Baked Chicken Parmesan Recipe —is your ticket to classic Italian American comfort food without the subsequent clean-up nightmare.
We start with thin, tender chicken, embrace the power of Panko, and bake our way to golden perfection. It’s truly the blueprint for an Easy Baked Chicken Parmesan .
Why This Oven Method Beats Traditional Frying
The primary reason home cooks resort to frying is the guarantee of crunch. However, when you shallow fry, you introduce a large volume of oil that must be thoroughly absorbed by the crust. If the oil isn't hot enough, or the cutlets are too thick, you end up with greasy, undercooked centers.
Our alternative is superior because it controls moisture and maximizes dry heat exposure, delivering an intensely crunchy exterior while keeping the interior juicy.
The Culinary Magic Behind the Perfect Baked Crust
The magic truly lies in the preparation before the heat hits. We use Panko breadcrumbs those airy, irregularly shaped flakes which toast up beautifully when exposed to the dry heat of the oven.
Combined with a strategic drizzle of olive oil, these crumbs form a shield around the chicken, preventing the internal moisture from turning the coating soggy. We also elevate the standard breading mix by incorporating finely grated Parmesan directly into the breadcrumbs, ensuring depth of flavor in every bite.
Goodbye Sogginess: Our Game Changing Breading Blueprint
Sogginess is the nemesis of Crispy Oven Chicken Parmesan . To defeat it, we rely on three crucial principles woven into our Breaded Chicken Cutlets Baked process.
First, we pound the chicken aggressively to ensure uniform thinness about 1/2 inch so the crust crisps simultaneously as the meat cooks through. Second, we use a classic three stage dredging system (flour, egg, Panko mix) that builds layers of adhesion.
Third, and most importantly for moisture control, we bake these cutlets on a wire rack set over a baking sheet. This small elevation allows hot air to circulate completely around the cutlet, drying out the underside crust instantly.
Chef's Promise: Flavor Without the Splatter
My promise to you is robust flavor achieved with minimal mess. Because we skip the deep fryer, there is no oil splatter coating your stovetop. This Crispy Baked Chicken Tenders style preparation (though using full breasts) ensures that every piece of Crispy Baked Parmesan Chicken Breast is cooked evenly and retains its beautiful texture.
You get the satisfying crunch and savory depth that makes Baked Chicken Parmesan a beloved staple, all accomplished in about 50 minutes total.
Essential Components for Your Ultimate Crispy Baked Chicken Parmesan Platter
Building this dish successfully hinges on selecting components that play well together. While the chicken and breading are vital, the quality of your sauce and cheese dramatically impacts the final experience of this Crispy Baked Chicken .
We aim for balance: robust, savory crunch balanced by tangy sauce and gooey, melted cheese.
Sourcing Superior Ingredients for Maximum Flavor Impact
We are making Crispy Baked Chicken , which means we must treat the ingredients with respect. You don't need an entire pantry overhaul, just a few smart swaps to guarantee success.
The Chicken and the Coating Components Checklist
For the protein, opt for four high-quality, boneless, skinless chicken breasts, each about 6 ounces. If they are very thick, butterfly them horizontally first. The coating is where we make the Panko count; it is non-negotiable for true crunch. Mix your Panko with finely grated Parmesan, garlic powder, and oregano.
This infused breading mixture is the key to transforming simple Crispy Baked Chicken into something extraordinary.
Selecting the Best Cheeses and Marinara Sauce Alternatives
When it comes to the topping, choose a low-moisture, whole milk mozzarella for the best melt it browns nicely without releasing excessive water. If you desire extra decadence, layer a few thin slices of fresh mozzarella or provolone on top before the final bake.
As for the marinara, this is a great place to use a high-quality store-bought sauce; however, ensure it’s rich and slightly thick. A watery sauce is the quickest way to undo all our hard work ensuring a Crispy Baked Chicken Parmesan .
Tools Required: Beyond the Standard Baking Sheet
While any standard baking sheet will suffice, investing in a simple cooling rack that fits snugly inside your sheet pan is transformative. This elevates the breaded cutlets, allowing air to circulate underneath, ensuring the bottom of the crust dries out and stays crunchy.
A meat mallet for pounding the chicken is also necessary to achieve the uniform 1/2 inch thickness required for perfect timing.
Related Recipes Worth Trying
- UltraCrispy Air Fryer Korean Fried Chicken Bites Recipe — Forget the deep fryer Get the shatteringly crisp crunch of Korean fried chicken bites with this easy air fryer recipe Perfect for a weeknight snack
- The Best DoubleFried Korean Fried Chicken Recipe — Forget soggy takeaways Master the shattering crispness of authentic Korean Fried Chicken using the doublefry technique This recipe delivers the best KFC...
- Authentic Spanish Seafood Chicken Paella Recipe with Socarrat — Learn how to master a truly authentic Spanish paella recipe featuring chicken shrimp and saffron Get the tips to achieve that perfect crispy socarrat
Step-by-step Assembly of Your Masterpiece Chicken Parmesan
The assembly process is rhythmic and satisfying. After prepping your chicken pounding it thin and seasoning lightly you set up your dredging station. The sequence is strict: flour first (to create a dry surface for the egg to adhere to), then the egg wash (the glue), and finally, the seasoned Panko mixture.
When coating in the Panko, press down firmly on each side of the cutlet; we want maximum adherence for a lasting crunch. Once breaded, they are ready for the oven environment engineered for crispness.
Baking Techniques Engineered for Maximum Crispness
Getting the chicken cooked perfectly involves a two-stage baking process. We bake first to crisp the coating and set the internal structure, and then we add the toppings for the melt. This staggered approach ensures the cheese melts without steaming the breading beneath it.
Preparing the Chicken Cutlets: Pounding for Perfection
Place your chicken breasts between plastic wrap or parchment paper. Using the flat side of a meat mallet, systematically pound the thickest parts down until the entire cutlet is roughly a uniform 1/2 inch thick. Uniformity is essential so that no piece ends up overcooked while another remains raw.
Season both sides lightly with salt and pepper before heading to the breading station.
The Three Stage Breading Process Explained Simply
Set up three shallow dishes. Dish one contains flour, seasoned lightly. Dish two holds your whisked eggs. Dish three contains your Panko, grated Parmesan, garlic powder, and oregano.
Dredge each cutlet completely: first in the flour (shaking off the excess), then fully submerging in the egg wash (allowing the excess to drip), and finally, pressing firmly into the Panko mixture until completely coated.
Achieving Golden Perfection: Oven Temperature and Timing Secrets
Preheat your oven to a robust 400° F ( 200° C). Place the breaded cutlets on the wire rack over your baking sheet. Crucially, lightly spray or drizzle the tops of the cutlets with olive oil. This fat acts as a conductor for heat, promoting that golden brown color.
Bake the cutlets for 12 to 15 minutes. The goal here is not to cook them through completely, but to set the crust until it is visibly firm and lightly golden.
The Final Melt: Broiling for that Beautifully Browned Top
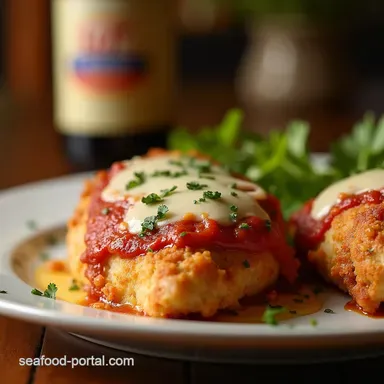
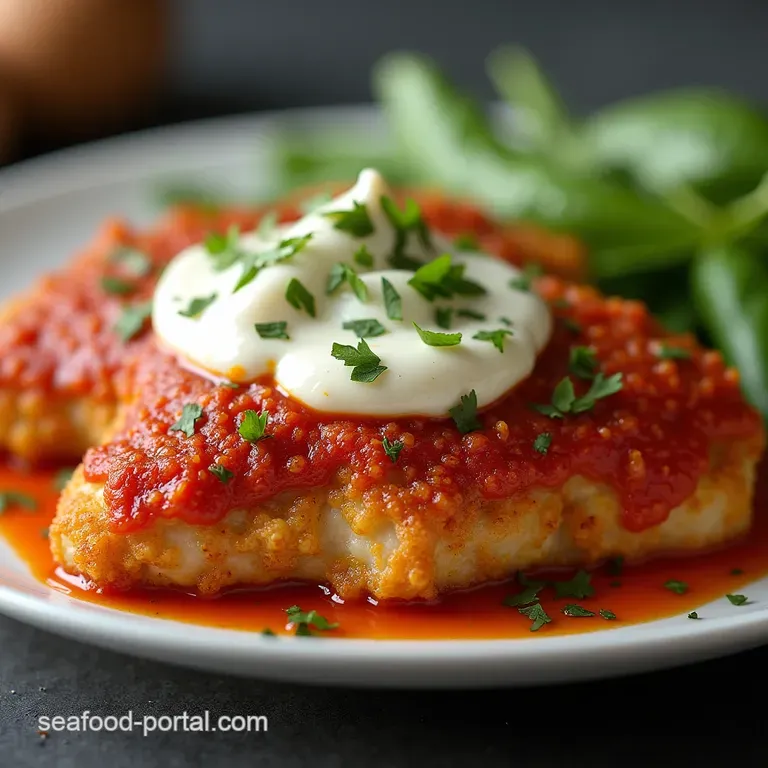
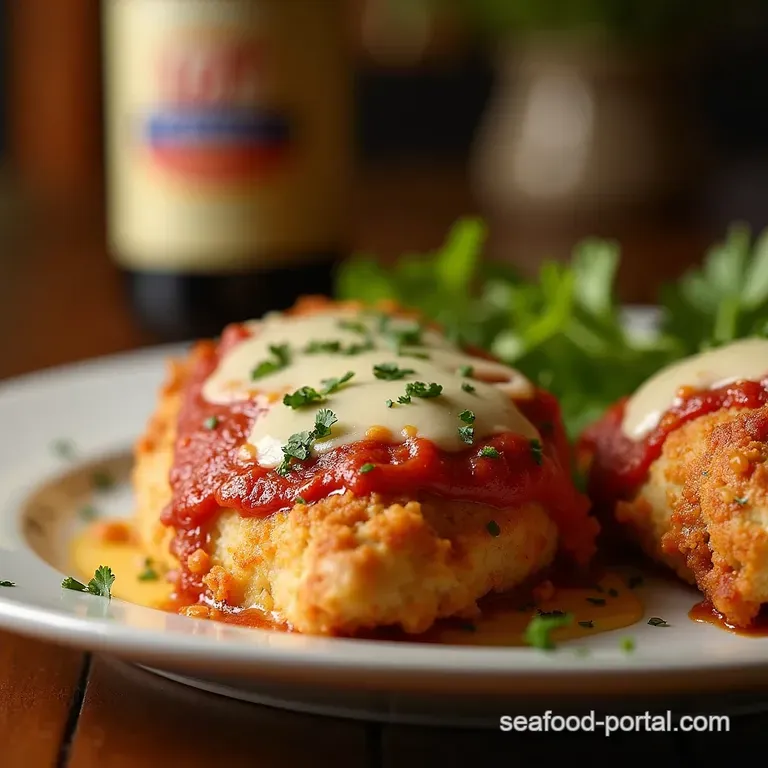
Once the crust is set, pull the pan out. Spoon a moderate amount of marinara sauce over the center of each cutlet, leaving at least a half inch border of exposed crust this border is your crisp insurance policy! Top generously with your mozzarella.
Return the dish to the oven for another 8 to 10 minutes, or until the chicken registers 165° F ( 74° C) internally and the cheese is bubbly.
For that extra visual pop, briefly switch the oven to the broiler setting for the last minute, watching very carefully until the cheese achieves a beautiful light brown char.
Elevating Your Crispy Baked Chicken Parmesan with Side Dish Pairings
While the Crispy Baked Chicken itself is the star, the accompaniments complete the experience. We want dishes that complement the richness without adding unnecessary weight or steaminess to the plate.
Pairing Suggestions: Think Beyond Just Pasta
The default pairing is spaghetti, but to honor the crispness we worked so hard to achieve, consider serving this over a bed of creamy polenta or alongside garlic sautéed zucchini noodles if you want to keep it lighter than traditional pasta.
A simple, sharp side salad dressed with a bright lemon vinaigrette provides the perfect acidic counterpoint to the savory chicken and cheese.
Making It Lighter: Low-Carb and gluten-free Adjustments
This Crispy Baked Chicken Parmesan Recipe is naturally lighter than fried versions, but we can go further. For low-carb options, skip the pasta entirely and serve alongside roasted broccoli or steamed asparagus.
For gluten-free adaptations, replace the flour with almond flour and use gluten-free Panko or even crushed cornflakes (which also yield a great crunch!) in the breading stage.
Storage Wisdom and Reheating to Preserve the Crunch
Even the best prepared crispy food can suffer when stored incorrectly. The key to long term success with leftovers is preventing the crust from absorbing ambient moisture in the refrigerator.
How to Successfully Freeze and Revive Leftovers
If you plan to freeze leftovers, do not top them with the sauce or cheese before freezing. Cool the baked cutlets completely, then wrap them individually in plastic wrap followed by foil.
When reheating from frozen, bake them directly from the freezer on a wire rack at 375° F ( 190° C) for about 25 minutes, then top with sauce and cheese and finish baking until heated through.
This method minimizes sogginess better than microwaving any Crispy Baked Parmesan Chicken Breast can manage. For simple refrigeration, store the chicken, sauce, and cheese separately if possible, or ensure they are stored in an airtight container lined with a paper towel to absorb any condensation.
Recipe FAQs
How can I ensure my Crispy Baked Chicken Parmesan stays truly crunchy and doesn't go soggy in the oven?
The secret lies in two things: using Panko breadcrumbs and ensuring air circulation underneath the chicken. Make sure to lightly spray or drizzle the tops with olive oil before baking, and critically, bake the cutlets on a wire rack set inside your baking sheet.
This prevents steam build-up underneath, keeping the base as crisp as the top!
My chicken breasts are thick; how do I make sure they cook through before the crust burns?
Uniform thickness is absolutely essential for this dish; you must pound those chicken breasts to about half an inch, just like a good old-fashioned cutlet. If they are still thick, bake them for a few minutes longer before adding the sauce and cheese, which insulates the top slightly.
Use a meat thermometer 165°F (74°C) is your magic number!
Can I make this ahead of time, and if so, how should I store the leftovers?
While it’s best eaten fresh out of the oven, you can certainly make it ahead! Cool completely, then store the baked chicken (sauce and cheese included) in an airtight container in the fridge for up to three days.
When reheating, use a toaster oven or conventional oven avoid the microwave, which turns the crisp coating into rubber!
I don't have Panko; what's the next best substitute for achieving a crunchy coating?
Panko really is the MVP here, but if you’re stuck, your next best bet is blitzing up some dried Italian breadcrumbs in a food processor very briefly you want texture, not dust.
Alternatively, crushed cornflakes (unfrosted, obviously!) can also give you a surprisingly decent crunch, though the flavour profile changes slightly.
Is there a way to lighten up the cheese topping without sacrificing that classic flavour?
Absolutely, you don't need a mountain of cheese to get the flavour across. Instead of piling on low-quality shredded mozzarella, try using a smaller amount of a higher flavour cheese, like fresh Provolone or a touch of grated Pecorino Romano mixed with the mozzarella.
This means less volume overall, but much more bang for your buck!
Crispy Baked Parm