Cinnamon Swirl Baked Apples with Brown Butter Crumble
- Elevating the Humble Dessert: Why This Baked Apple Recipe Triumphs
- The Comfort Factor: Setting the Scene for Your Autumn Bake
- Assembling Your Core Components for Stellar Baked Apples
- Sourcing Superior Produce: Apple Variety Selection Guide
- Mastering the Preparation: Core, Fill, and Arrange
- Serving Suggestions: Pairing Your Warm Masterpiece
- Troubleshooting Common Baking Pitfalls
- Recipe FAQs
- 📝 Recipe Card
Elevating the Humble Dessert: Why This Baked Apple Recipe Triumphs
There is a certain magic that settles over a kitchen when the scent of spiced fruit begins to permeate the air. The humble baked apple, often relegated to simple school lunches or basic weeknight fare, is about to undergo a transformation.
This particular Baked Apples Recipe moves beyond the ordinary, integrating techniques that turn simple fruit into an impressive, deeply satisfying dessert experience.
We are aiming for tender, yielding fruit encased in a rich, nutty, brown butter crumble a dessert that truly feels like a celebration of the harvest. This recipe is designed to be Easy Baked Apples to assemble, yet it delivers a complex flavor profile perfect for impressing friends or simply treating yourself after a long week.
The Comfort Factor: Setting the Scene for Your Autumn Bake
The appeal of Baked Apples in Oven recipes lies squarely in their ability to evoke immediate nostalgia and warmth. There is very little effort required to achieve such high sensory rewards.
Imagine sliding these into the oven while the afternoon light fades outside; the kitchen fills with the promise of sweet spice. This is the perfect centerpiece for those cozy moments, slotting seamlessly into our rotation of Healthy Fall Desserts , especially when we consider how much of the sweetness comes naturally from the fruit itself.
Beyond Basic: Our Secret Ingredient Twist
What separates this rendition from the standard fare is the deliberate layering of flavor within the filling. While the essential ingredients cinnamon, butter, and sugar are present, we introduce a splash of dark rum (or potent apple juice for an alcohol free version).
This addition doesn't make the dessert boozy; instead, it deepens the fruit's natural caramelization, providing a subtle, sophisticated backbone to the sweetness. On top of that,, the incorporation of plump raisins or tart dried cranberries adds necessary bursts of chewiness and contrasting texture to the soft interior.
Aromatic Promise: What Happens When These Go in the Oven
As the Baked Apples with Cinnamon begin their journey in the oven, the aromatic compounds are released intensely. The heat melts the spiced butter mixture, allowing it to gently permeate the apple flesh from the inside out.
Simultaneously, the high heat works on the exterior topping, activating the Maillard reaction in the flour and oats mixed with our signature browned butter. This two-pronged approach ensures that the apple softens perfectly while the topping develops a deep, savory, nutty crust.
Perfectly Poached Perfection: Defining the Ideal Texture
The goal here is not mush; it is tender succulence. We want an apple that yields readily to the pressure of a fork but still retains the structural integrity of a fruit. Achieving this balance requires attention to the initial preparation specifically the scoring and the use of steam generated by the water or cider added to the bottom of the baking dish.
This method mimics a gentle poaching process while the topping bakes to golden crispness overhead, creating Baked Apples for Baby (once cooled and mashed) or adults alike.
Assembling Your Core Components for Stellar Baked Apples
Creating this dessert begins long before preheating the oven; it starts with thoughtful selection and careful component preparation. For an Easy Baked Apples experience, preparation should be methodical, ensuring that every part of the final dish contributes meaningfully to the overall texture and taste.
Related Recipes Worth Trying
- The Ultimate Loaded Baked Potatoes Crispy Skin Fluffy Inside — Ditch the foil Master the properly pampered Loaded Baked Potatoes recipe for a fluffy centre and shatteringly crisp skin Perfect for a hearty standalone...
- The Perfect Oven Baked Potatoes with Crispy Skin — Achieve the crispiest skin and fluffiest interior with this foolproof Oven Baked Potatoes Recipe Forget foilthis method guarantees perfection every time
- Easy LemonHerb Baked Salmon Flaky Perfection in 30 Mins — Master the best baked salmon recipe This easy baked salmon at 400 F delivers incredibly flaky results every time Ready for Tuesday tea
Sourcing Superior Produce: Apple Variety Selection Guide
Choosing the right apple is non-negotiable for successful baking. Avoid soft varieties like Red Delicious, which disintegrate too quickly under heat. We highly recommend using firm, crisp apples that hold their shape and offer a pleasant balance of sweetness and tartness.
A blend is often best: perhaps using Granny Smith for its requisite acidity to cut through the richness, balanced with a sweeter option like Honeycrisp or Gala. You will need four large specimens for this recipe, ensuring they are washed well but left unpeeled to maintain structure during baking.
The Brown Butter Crumble Blueprint: Ratios for Richness
The secret weapon in this Baked Apples Recipe is the topping, specifically the inclusion of brown butter, or beurre noisette . To create this, four tablespoons of unsalted butter are melted slowly until the milk solids toast and form fragrant, dark specks at the bottom of the pan.
Once this nutty base is achieved, it is combined with equal parts flour and rolled oats, along with brown sugar and a pinch of salt. This ratio ensures the topping is substantial enough to form a protective, crunchy layer without becoming overly dense or heavy.
Essential Tools for Hollowing and Baking
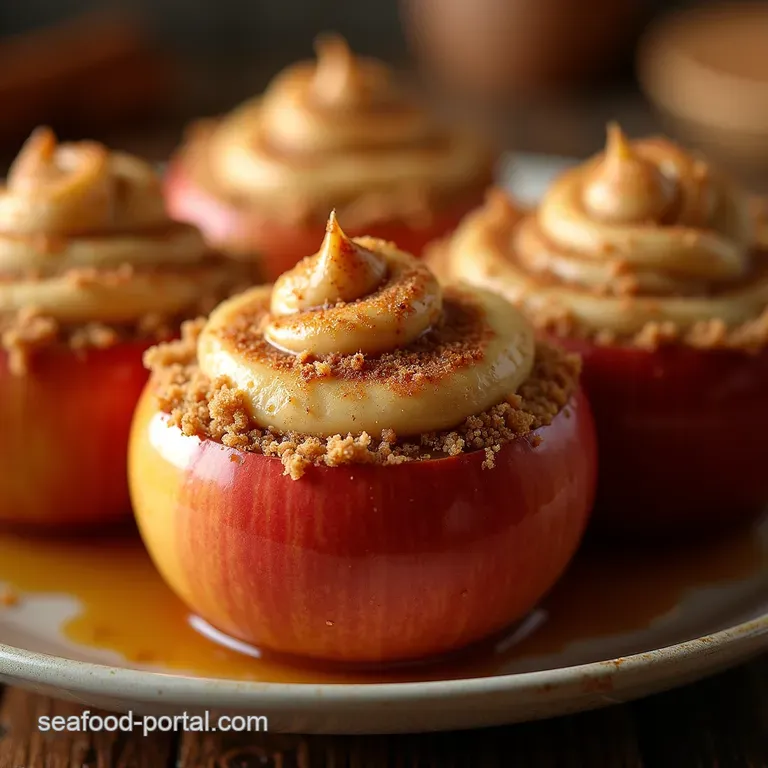
While an actual apple corer makes quick work of the task, a small, sharp paring knife and a melon baller can achieve the same result. The critical step is to carefully excavate the core, leaving a base wall approximately half an inch thick.
This barrier is essential to contain the luscious filling and prevent it from seeping out entirely into the baking dish. You will also need a sturdy 8x8 inch baking dish to house the four apples snugly.
Spice Cabinet Secrets: Measuring the Cinnamon Swirl
The internal filling requires just one teaspoon of ground cinnamon and a quarter teaspoon of nutmeg. These warm spices marry beautifully with the softened butter and brown sugar base.
Accuracy here is important; too much nutmeg can overpower the delicate apple flavor, whereas the cinnamon should provide a comforting, pervasive warmth throughout the cooked fruit.
Mastering the Preparation: Core, Fill, and Arrange
With your ingredients measured and your crumble ingredients ready for the browning stage, the next phase is assembly. This is where we turn raw ingredients into the foundations of our Weekend Breakfast Recipes star, or indeed, our evening dessert.
Step 1: Creating the Perfect Cavity for the Filling
After hollowing out the center of each apple, take a small knife and gently score a shallow ring around the circumference of each piece, about an inch down from the stem. This simple action prevents the skin from bursting violently during the intense heat of the oven, leading to a more aesthetically pleasing result.
Step 2: Layering the Flavors (Filling Installation)
The filling mixture comprising softened butter, brown sugar, spices, dried fruit, and the optional rum or juice is blended until uniform. Generously stuff this mixture into the cavity of each prepared apple. Don't be shy; the filling will melt and spread slightly as it bakes, coating the interior flesh.
Step 3: Baking Time Calibration for Flawless Baked Apples
Preheat your oven to 375° F ( 190° C). Arrange the filled apples in your greased baking dish. Crucially, pour about a quarter inch of water or apple cider into the bottom of the dish.
This liquid creates steam, ensuring the apples cook evenly and remain moist a vital step for Healthy Baked Apples where we aim for tenderness without adding excessive external fats.
Step 4: Achieving Peak Crumble Crispness
Before the apples enter the heat, ensure the prepared brown butter crumble topping is distributed evenly over the exposed filling of each apple. The apples should bake for 35 to 45 minutes.
You are looking for visual cues: the topping should be deeply golden brown, and the liquid bubbling gently around the base of the fruit.
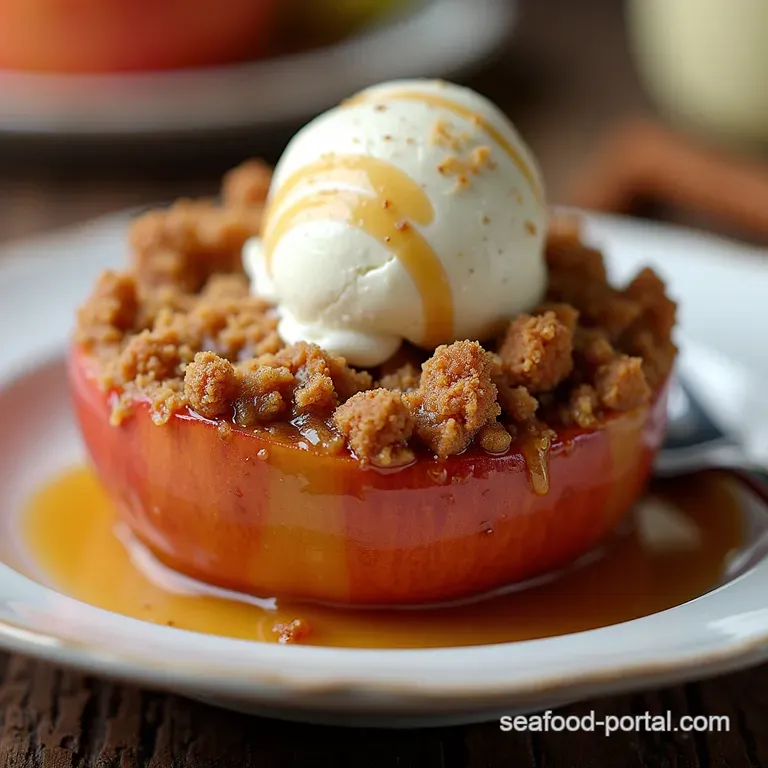
Serving Suggestions: Pairing Your Warm Masterpiece
Once these Simple Baked Apples emerge from the oven, allow them a brief 10-minute respite. The intensity of the heat needs to settle slightly. Serve them warm. While delicious on their own, they truly shine when paired with contrast.
A scoop of cold, high-quality vanilla bean ice cream is the classic partner, melting beautifully into the warm spiced crevices. For an even more decadent experience, a drizzle of thick, salty caramel sauce elevates this dessert to holiday status.
Troubleshooting Common Baking Pitfalls
Even the most straightforward recipes can encounter hiccups. Understanding potential issues beforehand helps ensure your bake is successful, whether you are making them for a casual treat or something more special.
Making Ahead and Storing Your Leftovers
These are best eaten immediately, but leftovers store beautifully. Cool the remaining apples completely, then transfer them to an airtight container in the refrigerator. They will keep well for up to three days.
They reheat wonderfully in a toaster oven or microwave, though you might want to refresh the texture by sprinkling a few extra oats on top before reheating the latter.
Impressing Guests: Next Level Topping Combinations
To make your already excellent Baked Apples with Cinnamon truly memorable, consider customizing the crumble. Before adding the flour mixture, toast some chopped pecans or walnuts until fragrant and incorporate them into the crumble mix.
Alternatively, a small grating of fresh orange zest mixed into the filling just before stuffing adds a lovely brightness that cuts through the richness.
When Your Apples Aren't Softening: Adjusting Oven Temps
If your apples remain stubbornly firm after the 45-minute mark, the issue is likely insufficient steaming or an oven running cool. Do not drastically increase the temperature, as this will burn the topping.
Instead, add a splash more water to the base of the dish, cover the dish loosely with foil to trap steam (protecting the topping from direct heat), and continue baking for another 10 to 15 minutes until perfectly tender.
Flavor Evolution: Infusing Alternative Fillings Post Bake
If you decide late in the game that you prefer a slightly tangier internal flavor profile, this can be remedied post bake. Once the apple is cooled slightly, you can use a small piping bag or a tiny spoon to introduce a dollop of high-quality crème fraîche or Greek yogurt into the center cavity before serving.
This adds a cool, tangy counterpoint to the hot, sweet fruit.
Freezing and Reheating Baked Fruit Desserts
If you anticipate having more than you can eat, these freeze exceptionally well. Allow the baked apples to cool completely, then wrap each one individually in plastic wrap, followed by a layer of aluminum foil. Freeze for up to three months.
To reheat, unwrap and bake at 350° F ( 175° C) for about 20 minutes, or until heated through, perhaps adding a spoonful of fresh water to the bottom of the dish to refresh the steam environment.
Recipe FAQs
What are the best apples to use for making Baked Apples?
You want apples that hold their shape well, so avoid anything too soft like Red Delicious, which turns to complete mush. A mix of tart apples like Granny Smith with a firm sweet variety such as Honeycrisp or Gala gives you the best balance of flavour and texture.
My Baked Apples keep splitting their skins how do I prevent this?
That’s a classic kitchen conundrum! Before baking, lightly score the skin all the way around the middle circumference of each apple with a small knife. This gives the skin somewhere to expand without bursting messily along the sides.
Can I make this Cinnamon Swirl Baked Apples recipe ahead of time?
You absolutely can assemble them ahead of time, which is brilliant for when you have folks coming over for Sunday lunch! Prepare the apples, filling, and topping, assemble them in the dish, cover tightly, and refrigerate for up to 24 hours.
Just add an extra 5 10 minutes to the baking time if they are going into the oven straight from the fridge.
How should I store leftovers of the Baked Apples?
Once completely cooled, store any leftovers in an airtight container in the fridge for up to three days. They reheat wonderfully a quick blast in the microwave or 10 minutes in a low oven brings that crumble back to life beautifully.
Do I really need to brown the butter for the crumble topping?
While you can use regular melted butter, browning it first elevates this dish significantly it’s where we get that gorgeous, nutty depth often called beurre noisette. It only takes a few extra minutes but makes the crumble taste far more sophisticated than your average bake.
Brown Butter Baked Apples

