The Ultimate Creamy Homemade Refried Beans Frijoles Refritos
- Beyond the Can: Discovering True Cantina-Style Frijoles Refritos
- Why This Homemade Recipe Outshines Store-Bought Refried Beans
- Assembling Your Pantry: Essential Components for Superior Refried Beans
- Tools of the Trade: What You Need to Get Mashing
- The Two-Stage Cook: Tenderizing and Transforming Your Pinto Base
- Elevating Your Refried Beans: Expert Tips and Common Fixes
- Serving Suggestions and Storage Wisdom
- Recipe FAQs
- 📝 Recipe Card
Beyond the Can: Discovering True Cantina Style Frijoles Refritos
There’s a particular kind of comfort food magic that happens when you take humble dried beans, cook them until they surrender their structure, and then transform them into something velvety and deeply seasoned.
Many of us grew up accepting canned Refried Beans as the standard a quick scoop for taco night, perhaps. But I’m here to tell you that you’ve been missing out on the magnificent, soulful flavour only achievable when you make them from scratch (or, using our shortcut method, from quality canned stock).
These Frijoles Refritos are more than just a side dish; they are the warm, earthy foundation upon which great Tex-Mex meals are built. Preparing them yourself unlocks a depth of taste that rivals any high end cantina.
Why This Homemade Recipe Outshines store-bought Refried Beans
The difference between the processed paste in a tin and what we are creating here is night and day. store-bought versions often rely heavily on thickeners and stabilizers to achieve a homogenous texture, frequently sacrificing genuine flavour in the process.
Our Refried Beans Recipe focuses on layering simple, high-quality components: perfectly tender beans, fragrant aromatics, and the critical, slow frying stage that marries it all together.
When you learn How To Make Refried Beans properly, you gain control over the salt level, the fat content, and most importantly, the texture.
Setting the Stage: Our Goal for Unforgettable Creaminess
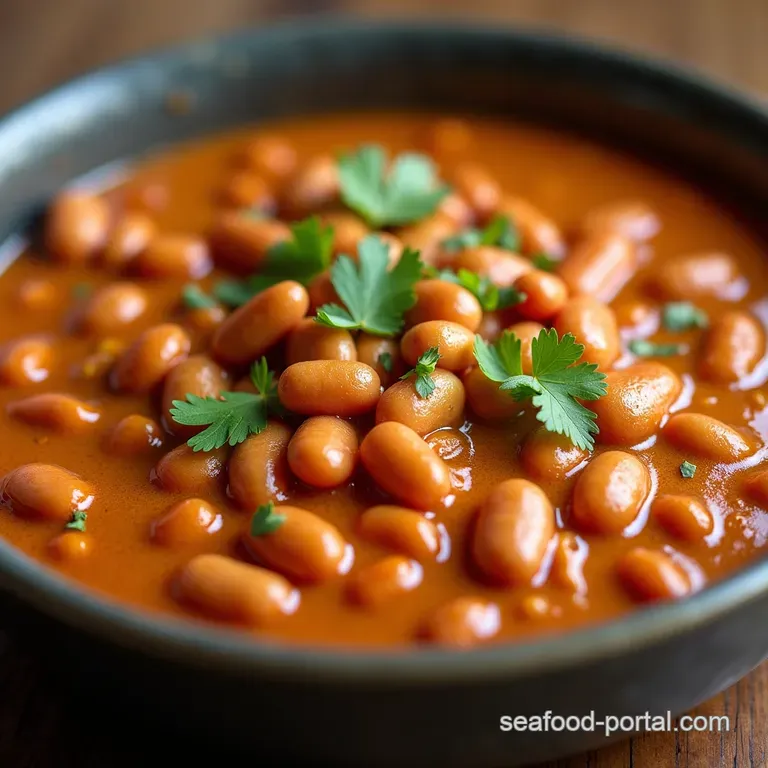
Our primary aim for these Homemade Refried Beans is achieving that elusive, luscious texture the kind that spreads beautifully without being watery. We are targeting a Creamy Refried Beans result, which means we must ensure the beans are cooked until absolutely soft before they ever hit the frying pan.
If the beans start out firm, no amount of mashing or frying will yield that smooth, satisfying mouthfeel. For today’s streamlined process, we rely on premium canned pinto beans, ensuring they are thoroughly rinsed to start clean.
The Secret to Authentic Depth of Flavor
Authenticity in frijoles comes from patience and fat. While modern cooking favours lighter oils, the true heart of Authentic Refried Beans often lies in manteca (lard).
If you are willing to indulge slightly, using lard provides a richer, deeper flavour base that coats the palate beautifully. This richness, combined with slowly sweated onions, garlic, and the warmth of cumin, creates an aromatic backbone that canned varieties simply cannot replicate.
These components elevate the humble bean into a star side, perfect for loading up on tacos or even using as a binder in vegetarian Taco Fillings .
Assembling Your Pantry: Essential Components for Superior Refried Beans
To create the Best Refried Beans Recipe , we need to gather our core ingredients. We’ll be relying on pinto beans for their classic flavour and texture. You’ll need two standard 15-ounce cans, thoroughly rinsed.
Crucially, don’t toss all the canning liquid; we reserve about half a cup of that starchy goodness the aquafaba —as it helps bind and emulsify the final mash beautifully.
Aromatics are key: fresh yellow onion and garlic provide the foundation, but the spice blend must be simple and effective: good quality ground cumin and dried Mexican oregano. Finally, for seasoning, we start conservatively with salt and pepper, always remembering we can adjust at the end.
Related Recipes Worth Trying
- The Crispiest OvenRoasted Green Beans With Garlic Parmesan — Forget soggy sides These OvenRoasted Green Beans With Garlic Parmesan are tendercrisp and ready in 30 minutes A healthy vegetable side dish thats truly...
- The Proper Job Speedy Baked Beans Recipe — Transform humble Canned Bean Baked Beans into something smoky and rich This jazzed up baked beans recipe uses Worcestershire sauce for unbelievable depth in...
- Best Restaurant Style Refried Beans Recipe Using Canned — Elevate storebought beans into the Best Refried Beans Recipe using simple techniques for authentic flavour Perfect Mexican Side Dishes made creamy in 30 mins
Tools of the Trade: What You Need to Get Mashing
The right equipment ensures the transformation goes smoothly. A large, heavy bottomed skillet or a cast iron Dutch oven is non-negotiable. Why heavy bottomed? Because the final stage of the Refried Beans process involves slow cooking over low heat, and you need that even heat distribution to prevent scorching.
Beyond the pan, you need a solid implement for achieving your desired texture. A traditional potato masher works wonders for a rustic, slightly chunky mash, while an immersion blender is there if you want that ultra silky restaurant finish.
The Pinto Foundation: Choosing and Preparing Your Beans
While a traditional Dried Beans Recipe involves overnight soaking and long simmering, we are opting for a quicker route using canned beans for this version, which drastically cuts down the total time while preserving quality.
The most important step here, regardless of whether you used dry or canned, is making sure the beans are tender. If using canned, drain them well but keep that liquid reserved. Before adding them to the pan, a quick rinse under cold water removes excess sodium and starch residue, leading to a cleaner final taste.
Aromatic Backbone: Garlic, Onion, and Spice Ratios
Our flavour profile hinges on perfectly cooked aromatics. We introduce the finely chopped yellow onion first, sweating it down gently in the hot fat over medium heat for about five to seven minutes until it’s translucent and sweet never browned.
Next comes the minced garlic, which only needs about 60 seconds before it releases its fragrance. We add our spices cumin and oregano right after the garlic to "bloom" them in the hot fat for about 30 seconds. This brief toasting intensifies their earthy notes before the beans are introduced.
Lard or Oil? Deciding on the Perfect Frying Medium
This decision significantly impacts the depth of your final product. If you want to honour the traditional flavour profile, rendering a couple of tablespoons of lard (manteca) provides an unmatched richness; it’s worth seeking out for this dish.
However, high-quality olive oil functions perfectly well, offering a lighter but still delicious result. The fat serves two purposes: softening the aromatics and facilitating the crucial "re-fry" stage where the texture develops.
The Two-Stage Cook: Tenderizing and Transforming Your Pinto Base
The process of making Refried Beans is not a single action but two distinct cooking phases. The first stage is about incorporating flavour and initial softening; the second is the actual, slower refrito stage, where the magic of texture and flavour concentration occurs.
Ensuring you execute both stages correctly is essential for success.
Step 1: Slow Simmering for Maximum Tenderness
Once the aromatics and spices are fragrant, add your rinsed beans and the reserved bean liquid (or stock). Bring this mixture up to a gentle, comforting simmer. At this point, you are not worried about mashing yet; you are allowing the spices to meld with the beans and ensuring everything is uniformly hot and slightly hydrated before you begin breaking them down.
This gentle simmer lasts about 10 minutes and helps release any remaining starch, which aids in binding later.
Mashing Techniques: Achieving Your Preferred Texture (Chunky vs. Smooth)
Now it’s time to put the muscle into it! Using a sturdy potato masher, begin crushing the beans right there in the skillet. Resist the urge to over mash immediately. Some people adore a rustic texture, where you can still identify whole or half beans in the mix.
If this is your preference, mash until about 50% of the beans are broken down. If you chase the Creamy Refried Beans experience, mash vigorously until the mixture resembles a thick, slightly lumpy paste.
Incorporating the Sauté: Building Flavor Layers
After the initial mashing, you should see the mixture starting to thicken as the starch from the broken beans integrates with the liquid. Continue cooking, stirring frequently. This gentle agitation prevents sticking while allowing the excess moisture the water content that makes beans soupy to evaporate.
This evaporation is non-negotiable; it’s what concentrates the cumin, garlic, and bean flavour into a potent, earthy profile.
The Final Mash and Return to the Pan: Mastering the Refry
Once the consistency is approaching thick paste, reduce the heat to the absolute lowest setting. This is the true refrito —the re-frying. Stir often, scraping the bottom of the pan.
You are looking for the mixture to pull cleanly away from the sides and bottom when you drag your spoon across the surface. If you see a slight sheen of fat separating and the beans hold a soft peak, you’ve nailed it.
This concentration process can take 10 to 15 minutes and is critical for deep flavour.
Elevating Your Refried Beans: Expert Tips and Common Fixes
Even with the best intentions, sometimes the texture isn't quite right or the seasoning falls slightly flat. Knowing how to adjust on the fly separates a good cook from a great one.
Troubleshooting: Thin Beans and Over Salting Corrections
If your Refried Beans look too runny after the final frying stage, don't panic! Simply increase the heat slightly (staying mindful of scorching) and continue stirring until more moisture evaporates.
Conversely, if you’ve added too much salt, a classic trick is to stir in a small, raw potato cut into quarters and simmer for 10 minutes before removing the potato it has a surprising ability to absorb excess salinity.
Creative Twists: Adding Smoked Paprika or Chipotle for Depth
While our base recipe is wonderfully traditional, customization is fun! To introduce a smoky element reminiscent of the American Southwest, stir in a teaspoon of smoked paprika along with your cumin.
For true heat and smoke, blend a canned chipotle pepper in adobo sauce with a tablespoon of the bean liquid before stirring it in during the final 10 minutes of cooking. These subtle additions make your Homemade Refried Beans truly unique.
Best Practices for Reheating Leftover Refried Beans
Leftovers are often even better the next day! When reheating, remember that these beans will naturally thicken considerably overnight as they cool and absorb moisture. You almost always need to add liquid.
Reheat slowly on the stovetop over low heat, adding stock, water, or even a splash of milk (if not strictly traditional) a tablespoon at a time until the desired creamy consistency returns.
How Long Will These Delicious Refried Beans Last?
Properly stored, these rich Refried Beans Nutrition powerhouses will keep beautifully in an airtight container in the refrigerator for up to four days. If you find yourself with a surplus, they freeze exceptionally well.
Portion them into freezer safe bags or containers, ensuring you leave a little headspace for expansion. They’ll maintain excellent quality in the freezer for up to three months.
Serving Suggestions and Storage Wisdom
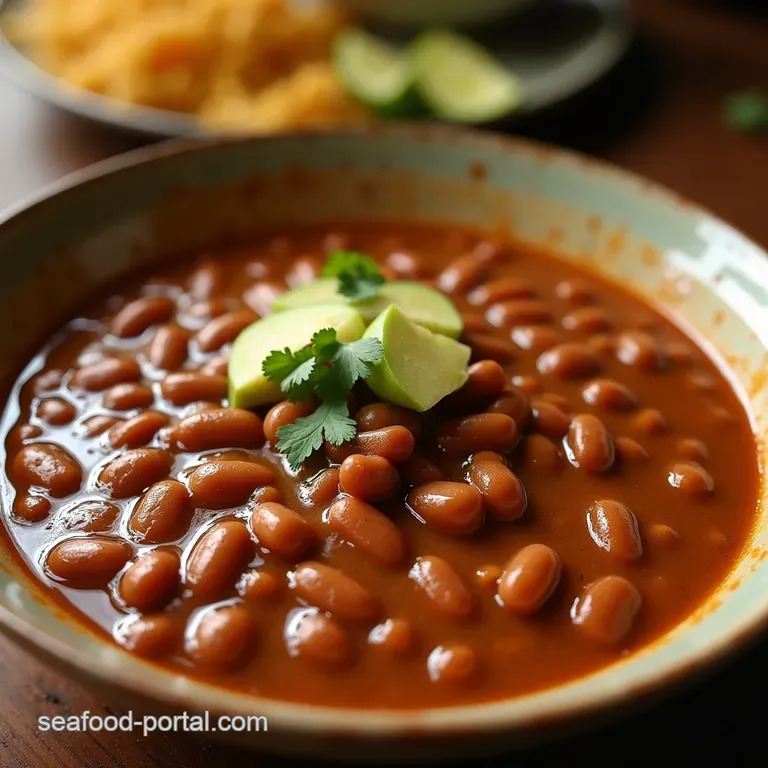
These Refried Beans are incredibly versatile, far beyond just being a standard side. Dollop them generously onto hot corn tortillas for instant vegetarian tacos, use them as a creamy layer in a seven layer dip, or simply serve them hot with crumbled queso fresco and fresh cilantro.
They provide excellent Refried Beans Nutrition —a great source of fibre and plant protein making them a satisfying component in any meal. Enjoy the rich, earthy flavour that only comes from dedicating a little time to doing it right!
Recipe FAQs
What’s the secret to making my Refried Beans actually taste like they came from a proper cantina?
The real magic lies in the "refrying" stage don't rush it! You need to cook the mashed beans low and slow in the fat (lard is best if you can manage it) until the excess moisture evaporates.
This concentrates the flavour and gives you that deeply earthy, slightly toasted taste that canned versions just can't touch.
My refried beans have turned out too watery/soupy, what have I done wrong?
This usually happens if you haven't simmered them long enough during the final stage (Step 5 onwards). Keep stirring them over low heat; they need to reduce significantly until they hold their shape on a spoon. If they are just too wet to begin with, you might need to add an extra 10 minutes of slow simmering.
Can I skip the canned beans and use dried pinto beans instead for these Refried Beans?
Absolutely, though it adds serious time! If using dried beans, you'll need to soak them overnight and then simmer them for 1.5 to 2 hours until they are completely tender before you mash them. Just ensure you reserve that cooking liquid (aquafaba), as it's packed with flavour for the mashing process.
How long will leftovers of these homemade Refried Beans last in the fridge?
They keep brilliantly, much better than store-bought! Store them in an airtight container in the fridge for up to 4 or 5 days. When reheating, you might need to stir in a splash of water or stock, as they thicken up considerably overnight.
Are these Refried Beans suitable for vegetarians or vegans?
The core recipe is vegetarian, but if you use lard (manteca), they are not strictly vegetarian. To make them fully vegan, simply substitute the lard with olive oil or vegan butter, and skip the optional cheese garnish at the end. They'll still be absolutely smashing!
Creamy Homemade Refried Beans

