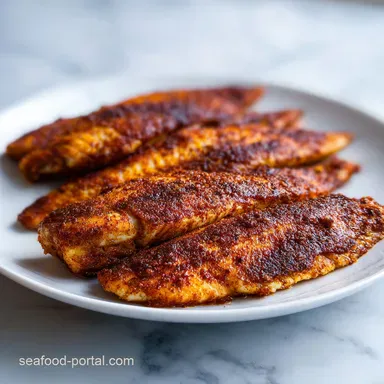
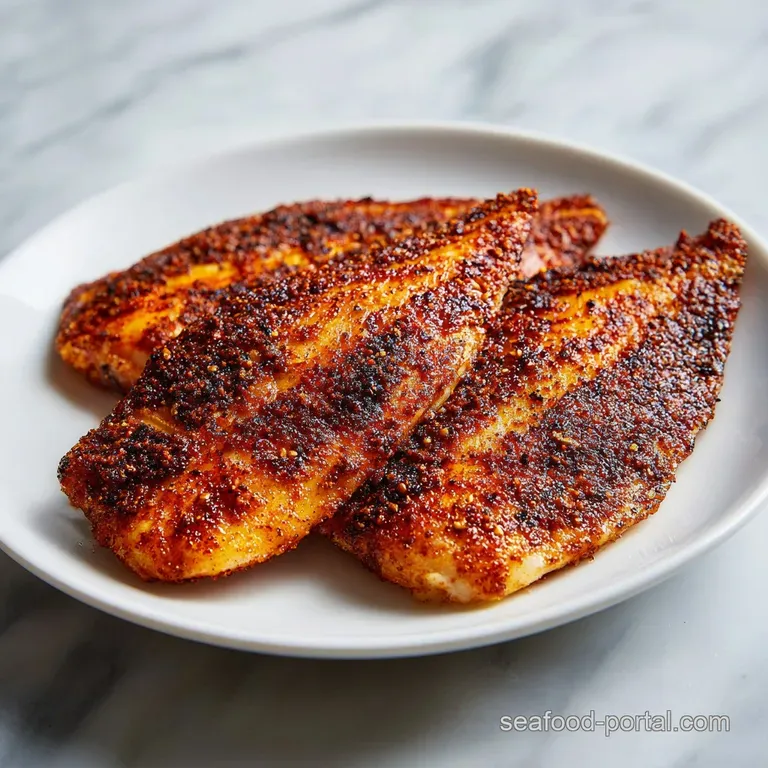
The Ultimate Blackened Tilapia: Smoky and Flaky
- Time: 5 min active + 6 min cook = Total 13 mins
- Flavor/Texture Hook: Smoky, charred crust with a velvety, flaky center
- Perfect for: Weeknight dinners, low carb meal prep, seafood beginners
- The ultimate blackened tilapia recipe
- Why this method actually works
- Component Analysis
- Gathering Your Essentials
- Tools for the job
- Step by step searing
- Troubleshooting common mishaps
- Tweaking and variations
- Scaling your portions
- Flavor Truths
- Storage and waste tips
- Best ways to serve
- Recipe FAQs
- 📝 Recipe Card
The ultimate blackened tilapia recipe
That first sound is what gets me every time. You drop the fillets into a screaming hot cast iron, and it's an immediate, aggressive sizzle that fills the kitchen with the scent of toasted paprika and melted butter.
There's something about that specific aroma - it's earthy, slightly sweet, and smells like a New Orleans street market in the middle of July.
I remember the first time I tried this. I was terrified of "blackening" because I thought it meant burning the fish to a crisp. I spent ten minutes hovering over the pan, flipping the fish every thirty seconds because I was paranoid. The result? A grey, steamed piece of fish that tasted like nothing.
I realized then that the secret isn't in the fire, it's in the patience. Once you let that crust form, the fish transforms into something completely different.
This is the ultimate blackened tilapia recipe because it balances that charred exterior with a center that practically melts. We aren't just throwing spices on fish; we're building a flavor shell that protects the delicate protein inside. It's fast, it's loud, and it's incredibly rewarding.
Why this method actually works
- Surface Dryness: Removing water prevents the fish from steaming, which allows the spices to sear instead of boil.
- Sugar Caramelization: A tiny bit of brown sugar chars quickly, creating those dark, flavorful spots without overcooking the fish.
- Smoke Point: Using avocado oil allows the pan to get hot enough to char the spices without the oil breaking down and tasting bitter.
- Butter Basting: Adding butter at the end adds a velvety richness and helps the seasoning stick to the fish.
| Method | Time | Texture | Best For |
|---|---|---|---|
| Fast Pan Sear | 6 minutes | Shatter crisp crust | Weeknight speed |
| Classic Oven | 12 minutes | Evenly cooked, softer | Large batches |
Component Analysis
| Ingredient | Science Role | Pro Secret |
|---|---|---|
| Smoked Paprika | Color and Depth | Use "Pimentón" for a more authentic Spanish smokiness |
| Brown Sugar | Browning Agent | Keep it to 1 tsp so it doesn't burn too fast |
| Avocado Oil | Heat Conduit | High smoke point prevents the "burnt oil" taste |
| Lemon Juice | Acid Balance | Brightens the heavy smoke and cuts through the butter |
Gathering Your Essentials
For the seasoning blend, we're looking for a mix that hits every part of your tongue. The smoked paprika provides the base, while the cayenne adds a back of-the throat heat. The addition of dried thyme and oregano gives it a herbal lift that stops the spices from feeling one dimensional.
For the fish, I use 6 oz fillets. Tilapia is great because it's a blank canvas. It doesn't have a strong "fishy" taste, so it lets the blackened tilapia seasoning really shine. If you're looking for other ways to use this fish, my easy tilapia ceviche recipe is a great fresh alternative.
The Ingredient List: 2 tbsp smoked paprika Why this? Gives the iconic red color and smoky flavor 1 tsp garlic powder Why this? Consistent flavor, doesn't burn like fresh garlic 1 tsp onion powder Why this? Adds a
Subtle savory sweetness 1 tsp brown sugar Why this? Helps the crust caramelize and darken 1/2 tsp salt Why this? Draws out moisture and enhances all flavors 1/2 tsp black pepper Why this? Basic heat and aromatic
Punch 1/2 tsp cayenne pepper Why this? The primary source of "kick" 1/4 tsp dried thyme Why this? Earthy undertone 1/4 tsp dried oregano Why this? Traditional Creole style herbal note 4 tilapia fillets (6 oz each)
Why this? Mild flavor, cooks quickly and evenly 2 tbsp avocado oil Why this? Handles high heat without smoking 1 tbsp unsalted butter Why this? Adds a rich, nutty finish to the crust 4 lemon wedges Why
This? Essential acid to cut through the richness
Ingredient Swaps:
| Original Ingredient | Substitute | Why It Works |
|---|---|---|
| Avocado Oil | Grapeseed Oil | Similar high smoke point. Note: Neutral taste, no nutritional change |
| Tilapia | Catfish | Traditional Southern choice. Note: Fattier, slightly stronger flavor |
| Brown Sugar | Coconut Sugar | Similar caramelization. Note: Adds a slight coconut hint |
| Smoked Paprika | Regular Paprika | Still gives color. Note: Loses the "fire" and smoky depth |
Right then, let's talk about the gear. You don't need a professional kitchen, but a few specific tools make the ultimate blackened tilapia recipe much easier.
Tools for the job
The cast iron skillet is non negotiable for me. It holds heat better than any other pan, which is exactly what you need to get that dark crust without overcooking the inside. If you don't have one, a heavy stainless steel pan works, but avoid non stick.
Non stick pans can't handle the temperatures we need for a true blackening, and some of the coatings can degrade at these heats.
I also recommend a fish spatula. Tilapia is delicate, and once it's cooked, it can flake apart if you use a chunky metal turner. A thin, flexible spatula lets you get under the crust and flip the fillets in one clean motion.
Finally,, have a plate ready with a wire rack. If you put the fish directly onto a flat plate, the bottom will steam and lose that shatter crisp texture. A rack keeps the air flowing, preserving the crust while the fish rests.
Step by step searing

Now we get into the actual work. Trust me on the heat - it needs to be hot. If the oil isn't shimmering, you're just frying the fish, not blackening it.
- Pat each tilapia fillet completely dry with paper towels to remove surface moisture. Note: Wet fish won't sear; it will steam
- In a small bowl, whisk together smoked paprika, garlic powder, onion powder, brown sugar, salt, pepper, cayenne, thyme, and oregano.
- Press the seasoning firmly into both sides of the fish until heavily coated. Note: Be generous; the spice is the star
- Heat avocado oil in a cast iron skillet over medium high heat until it shimmers and begins to smoke.
- Place fillets in the pan and sear undisturbed for 3 minutes until a dark, charred crust forms.
- Flip the fillets and add the unsalted butter to the pan, basting the fish for another 2-3 minutes until the fish is opaque and flakes easily.
- Remove fillets from the pan and let them rest on a plate for 2 minutes. Note: This lets the juices redistribute
- Squeeze fresh lemon juice over the top before serving.
Chef's Note: If you see a lot of smoke, don't panic. That's part of the process. Just make sure your kitchen vent is on high. If the spices start to smell acrid or bitter, your heat is too high - lift the pan off the burner for 10 seconds to cool it down.
Troubleshooting common mishaps
The most common issue people have with this recipe is the "stick." When you first put the fish in, it's going to feel like it's glued to the pan. This is normal. The fish is creating a bond with the metal as the proteins sear. If you try to flip it too early, you'll tear the fillet.
Wait for the crust to fully form, and the fish will actually release itself from the pan.
Another common slip up is the heat balance. If the outside is pitch black but the middle is raw, your pan was too hot. If the fish is cooked through but the outside is pale, your pan wasn't hot enough.
Why Your Fish Stuck
This usually happens because the pan wasn't hot enough or the fish was too wet. If the oil hasn't reached its shimmering point, the protein bonds to the metal instead of searing instantly.
| Problem | Root Cause | Solution |
|---|---|---|
| Fish sticks to pan | Pan not hot enough | Wait for oil to smoke slightly before adding fish |
| Seasoning falls off | Fillets were damp | Pat fish dry with paper towels until bone dry |
| Burnt spices/raw fish | Heat too aggressive | Lower heat slightly and increase sear time by 1 min |
Common Mistakes Checklist:
- ✓ Patting fish dry (never skip this!)
- ✓ Not overcrowding the pan (leave space between fillets)
- ✓ Waiting 3 full minutes before the first flip
- ✓ Using a high smoke point oil
- ✓ Letting the fish rest for 2 minutes before eating
Tweaking and variations
Depending on your gear, you might want to change the method. While the pan sear is the gold standard, other ways to make blackened tilapia can work if you're feeding a crowd.
If you're using a blackened tilapia air fryer method, set it to 400°F (200°C) and cook for about 7-10 minutes. You won't get the same buttery baste as the skillet, but it's a great hands off approach.
For those with a blackened tilapia blackstone, the massive surface area is a dream. Just keep the heat on medium high and use a bit more oil than you would in a pan.
For those who prefer blackened tilapia in oven settings, start them under the broiler for 3 minutes to get the color, then move them to a 400°F (200°C) oven for another 5-7 minutes.
It's a bit slower, but it's the easiest way to handle six or eight fillets at once.
If you're looking for a different protein with a similar vibe, my Marry Me Salmon recipe uses a different flavor profile but delivers that same "wow" factor for a dinner party.
Decision Shortcut: If you want the best crust → Use the cast iron skillet method. If you're cooking for 8+ people → Use the oven/broiler method. If you want zero cleanup → Use the air fryer.
Scaling your portions
When you're making this for a crowd, don't just dump all the fish into one pan. If you crowd the skillet, the temperature drops instantly, and you'll end up steaming your fish in its own juices. Work in batches of two or three fillets.
For the seasoning, if you're doubling the recipe, don't double the salt exactly. I find that 1.5x the salt is usually enough for a double batch of fish. The spices can become overwhelming if you just multiply everything linearly.
If you're scaling down for a single serving, just mix a small portion of the seasoning. You can store the leftover dry rub in a jar for months. Since this is a low carb dish, it scales beautifully for meal prep. Just be careful with the reheating process.
Flavor Truths
There's a persistent belief that searing meat or fish "locks in the juices." Honestly, that's not true. Moisture loss happens regardless of how you cook the fish. What searing actually does is create a concentrated layer of flavor and texture. According to Serious Eats, the browning process (which we're doing with the sugar and spices) creates new flavor compounds that you just can't get from boiling or steaming.
Another myth is that you need to use expensive fillets for a blackened dish. Because the seasoning is so bold, tilapia is actually a brilliant choice. You don't need a pricey piece of halibut when the blackened tilapia seasoning is doing the heavy lifting.
Storage and waste tips
Leftover blackened tilapia is still great, though the crust will soften. Store it in an airtight container in the fridge for up to 3 days. When reheating, avoid the microwave if you can. Instead, pop it in a toaster oven or a dry skillet over medium heat for 2 minutes per side.
This helps bring back some of that crispiness.
For freezing, I don't recommend freezing the cooked fish, as the texture becomes mushy. However, you can freeze raw tilapia fillets for 3 months. Just make sure they're vacuum sealed or wrapped tightly to avoid freezer burn.
In terms of zero waste, don't throw away the lemon rinds. After you squeeze the wedges for the fish, you can zest the remaining skin into a salad or a pasta dish. If you have leftover seasoning rub, use it on shrimp or chicken breasts - it works just as well on them as it does on the fish.
Best ways to serve
This dish is all about contrast. You have a rich, smoky, salty crust, so you need something bright and fresh to balance it. I love serving this over a bed of coconut rice or a simple quinoa salad with cucumber and mint.
The Low Carb Pair: Pair the fillets with roasted asparagus or sautéed spinach with garlic. The bitterness of the greens cuts right through the butter and paprika.
The Hearty Pair: Try this with a side of cheesy grits or a corn maque choux. The creaminess of the grits acts as a perfect foil to the charred exterior of the fish.
Right then, you're all set. This is the ultimate blackened tilapia recipe that takes a humble piece of fish and turns it into something that feels like a restaurant meal. Just remember: keep the pan hot, pat the fish dry, and don't be afraid of a little smoke. Let's crack on!
Recipe FAQs
Why is my tilapia sticking to the cast iron skillet?
It is a normal part of the searing process. The proteins bond with the metal as the crust forms. Wait until the fish naturally releases itself from the pan before attempting to flip.
Is it true that I should flip the fish as soon as the seasoning browns?
No, this is a common misconception. You must sear the fish undisturbed for 3 minutes to establish a proper crust. Flipping too early will tear the delicate fillets.
How to prepare tilapia fillets to ensure they don't steam?
Pat each fillet completely dry with paper towels. Removing all surface moisture allows the fish to sear immediately rather than steaming in the pan.
How to reheat leftover blackened tilapia without making it mushy?
Place the fish in a toaster oven or dry skillet over medium heat. Heat for 2 minutes per side to restore the crispiness of the crust.
Why is the exterior burnt while the center remains raw?
Your pan was too hot. Ensure the avocado oil is shimmering and smoking, but not overheating to the point where it chars the spices before the heat penetrates the fish.
What is the best way to serve blackened tilapia?
Serve with fresh lemon wedges and a zesty sauce. This pairs perfectly with a creamy fish taco sauce to balance the heat of the spices.
How to get a heavy spice crust on the fish?
Press the spice mixture firmly into both sides of the fillets. Be generous with the seasoning to ensure the flavors are locked in during the high heat sear.
Ultimate Blackened Tilapia