Crispy Gold St Louisstyle Fried Ravioli with Zesty Marinara Dip
- The Cult Classic: Unpacking True St. Louis Fried Ravioli Heritage
- Why Flash-Frying Delivers Maximum Flavor and Crunch
- Sourcing the Star: What You Need for Perfect Pockets
- The Trio of Textures: Building the Ultimate Breading Station
- Mastering the Triple-Dip Technique for Non-Soggy Fried Ravioli
- Troubleshooting Common Frying Pitfalls and Fixes
- Creative Twists: Beyond Classic Meat and Cheese Fillings
- Serving Suggestions
- Recipe FAQs
- 📝 Recipe Card
The Cult Classic: Unpacking True St. Louis Fried Ravioli Heritage
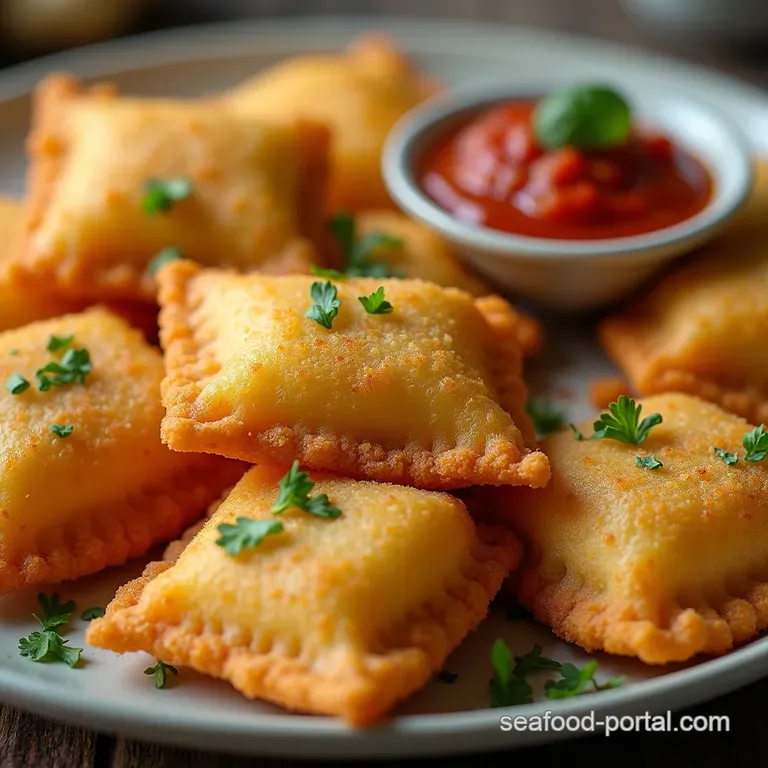
There are certain dishes that transcend mere cuisine; they become geographical markers, instantly transporting you to the time and place they originated. For anyone familiar with the vibrant Italian American culinary landscape of the Midwest, that dish is undoubtedly Fried Ravioli .
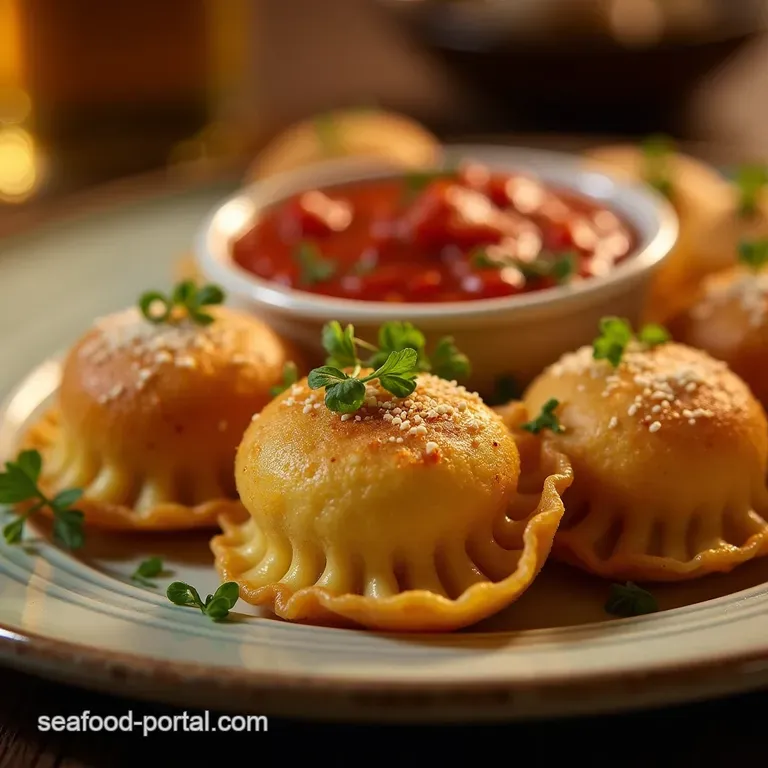
This beloved appetizer, often called Toasted Ravioli Recipe by those outside its birthplace, is a hallmark of St. Louis dining. It's not just about deep frying pasta; it’s a specific cultural iteration a perfectly sealed, savory pocket turned golden brown, traditionally served dusted with Parmesan and alongside a robust, tangy red sauce.
Forget the soggy microwave versions; this is the real deal! Originating famously in the Italian American community of St. Louis, these delicate parcels of cheese and beef are flash fried to absolute perfection. The result is a shatteringly crisp exterior protecting a molten, savory interior.
We're aiming for true St Louis Fried Ravioli right here in your kitchen.
Why Flash Frying Delivers Maximum Flavor and Crunch
The magic of this Fried Ravioli Recipe lies entirely in the cooking method. Deep frying is a high heat, rapid process that achieves two critical things simultaneously: it creates an immediate, impermeable barrier around the pasta dough and flashes the internal filling to a steaming, molten state.
This controlled chaos is what prevents the ravioli from becoming waterlogged or falling apart. When executed correctly, you achieve a textural duality that is intoxicating the exterior delivers a satisfying, audible crunch that gives way to the soft, warm interior.
This technique elevates humble pasta to spectacular finger food status, making it the perfect Fried Ravioli Appetizer .
From Street Food Staple to Home Kitchen Star
While the exact origin is hotly debated among St. Louis eateries, the consensus points to the mid-20th century, born out of necessity and ingenuity within local Italian delis and restaurants. It was a quick, cost effective way to utilize leftover pasta or to offer a novel snack.
What started as a local secret has exploded into a national sensation, proving that the concept of Homemade Fried Ravioli is universally appealing. Bringing this recipe home allows you to control every element, from the quality of the ricotta to the heat of the oil.
Setting Expectations: What Makes This Recipe Superior
We are specifically aiming for Crispy Fried Ravioli . This means we must counteract the inherent sogginess that comes from frying pasta, which is essentially wet dough.
Our approach involves a meticulous breading process combined with mandatory chilling periods to ensure the crust adheres fiercely to the pasta wrapper. The foundational blueprint for a truly cracking Fried Ravioli Recipe requires high-quality ingredients well-drained cheeses and Panko breadcrumbs are non-negotiable allies in this quest for ultimate crispness.
Essential Gear for Achieving Perfect Golden Results
Achieving that perfect golden hue without burning the outside or leaving the inside cold relies heavily on temperature management. The single most important piece of equipment here is a reliable deep fry or candy thermometer .
Without it, you are guessing, and guessing usually leads to over absorption of oil. You’ll also need three shallow dishes set up in sequence for the breading, a large, deep pot or Dutch oven capable of holding a few inches of oil comfortably, and crucially, a wire cooling rack set over a baking sheet.
This rack allows air circulation, preventing the bottoms of your newly fried treasures from steaming themselves soft.
Sourcing the Star: What You Need for Perfect Pockets
The heart of this dish is the filling. For simplicity, many excellent recipes utilize high-quality, store-bought, uncooked ravioli. However, to create a truly memorable experience, crafting your own filling is highly recommended.
We start with a base of well drained, high-quality Ricotta cheese, lending that essential creamy texture. This is bolstered by lean ground beef or Italian sausage, which has been fully browned and cooled no excess moisture allowed! Parmesan cheese adds salinity and depth, while an egg yolk acts as a binder.
Finally, fresh Italian parsley provides a necessary herbaceous lift that cuts through the richness. If you are using pre-made pasta sheets, remember to seal the edges meticulously; any gap is an invitation for oil seepage.
The Trio of Textures: Building the Ultimate Breading Station
The secret weapon that guarantees superior crunch isn't the frying itself, but what goes on before the plunge. We utilize a classic three stage breading assembly line the "trio of textures" designed for maximum adhesion.
This technique builds layers that harden almost instantly upon hitting the hot oil, locking in the flavor and creating that signature shatter.
Core Components: Choosing Your Ravioli Base
While our ideal filling is detailed above, the pasta wrapper itself is important. If using fresh, homemade ravioli, ensure the dough is thin but structurally sound. If using store-bought, aim for a larger size, as small ones tend to vanish too quickly during the frying process.
If you are using frozen ravioli, you must thaw and dry them thoroughly before breading; otherwise, the ice crystals will cause catastrophic oil splatter and steam pockets.
Elevating the Marinara Dipping Sauce Beyond Basic
A rich, oily Fried Ravioli Appetizer demands a bright, sharp counterpoint. Our accompanying Zesty Marinara Dip does exactly that. We start with quality crushed tomatoes, sautéing the garlic briefly in olive oil before adding the tomatoes, oregano, and a hint of sugar to balance acidity.
The real trick, however, is the finish: stirring in the zest of a fresh lemon right after removing it from the heat. This citrus brightness cuts through the richness of the fried coating beautifully.
Oil Selection: Heat Stability and Flavor Transfer
The oil is the medium, and it must perform under pressure. You need a neutral oil with a high smoke point think Canola, Vegetable, or Peanut oil. Olive oil, while delicious, has too low a smoke point for deep frying at the necessary temperature of 350° F ( 175° C).
Having ample oil (at least 3 4 inches deep in the pot) ensures the temperature doesn't plummet when you introduce the cold ravioli.
Related Recipes Worth Trying
- The Ultimate Crispy Fried Chicken Sandwiches with Honey Mustard — Make unbeatable Fried Chicken Sandwiches with Honey Mustard Sauce Our buttermilk chicken yields incredible crunch and flavour Get the foolproof recipe now
- Super Crispy Baked Chicken Tenders Recipe OvenFried Dream — Achieve shatteringly crisp ovenbaked chicken tenders using Panko and a simple doublecoat method Perfect for a simple weeknight dinner
- The Proper Crunch Cod Sandwich Crispy Fried Fish Sandwich — Ditch the soggy fillet This beerbattered fish sandwich recipe guarantees pubworthy crispness with a zingy homemade tartar sauce Ultimate comfort food awaits
Mastering the Triple Dip Technique for Non-Soggy Fried Ravioli
This breading sequence is perhaps the most crucial stage in producing truly Crispy Fried Ravioli . It ensures every millimeter of the pasta is sealed against the oil. The goal is a uniform, thick, and dry coating that will stand up to the heat.
Preparing the Flour, Egg Wash, and Panko Assembly Line
Set up your three dishes strictly in this order: Dish 1 holds the seasoned All-Purpose Flour. Dish 2 holds the Egg Wash two large eggs lightly beaten with a tablespoon of water to thin the viscosity slightly.
Dish 3 is reserved for the textural powerhouse: a mixture of Panko breadcrumbs combined with finely grated Parmesan cheese. Panko is preferred over standard breadcrumbs due to its larger, airier structure, which yields superior crunch.
Step-by-step: Coating Technique for Maximum Adhesion
Take one chilled ravioli at a time. First, dredge it completely in the Flour , tapping off any excess this dry layer helps the egg adhere. Next, immerse it completely in the Egg Wash , letting it drip back into the bowl for a few seconds.
Finally, press the ravioli firmly into the Panko/Parmesan mix . Use your fingers to gently press the crumbs onto the entire surface, ensuring total coverage.
Place the fully breaded ravioli back onto the parchment lined tray and immediately return the tray to the freezer for a mandatory 30-minute chill. This second cooling period sets the coating firmly onto the pasta, minimizing the chances of the coating separating during frying.
The Critical Drop: Frying Times and Batch Management
Once the oil reaches a steady 350° F ( 175° C), it’s time for the action. The golden rule of frying is: Do Not Overcrowd the Pot . Introduce the ravioli in small batches usually 6 to 8 pieces depending on your pot size.
Adding too many items lowers the oil temperature instantly, which is the primary cause of greasy food. Allow them to cook undisturbed for 1.5 to 2 minutes per side. They cook remarkably fast because the filling is already cooked; we are merely heating it through and crisping the exterior.
They should turn a deep, even golden brown.
Post Fry Protocol: Draining and Immediate Seasoning
Using a spider strainer or slotted spoon, quickly lift the Fried Ravioli from the oil and transfer them directly onto the prepared wire rack. The rack is essential for air circulation. As soon as they hit the rack, sprinkle them lightly with fine salt.
This seasoning must happen immediately while they are still steaming hot for the salt to adhere properly.
Troubleshooting Common Frying Pitfalls and Fixes
If your Fried Ravioli aren't turning out perfectly, temperature control is usually the culprit. If they are falling apart or oozing filling, your ravioli were not sealed well enough, or the oil was too hot, causing the pasta to tear before the filling could set.
If they taste greasy, the oil temperature dropped below 335° F ( 168° C) during frying always wait for the thermometer to recover before adding the next batch.
If the coating is peeling off but the pasta isn't raw, it usually means the initial flour dredge was insufficient, or the second chilling period was skipped.
Creative Twists: Beyond Classic Meat and Cheese Fillings
While the traditional beef and cheese filling is spectacular, this Fried Ravioli Recipe lends itself beautifully to experimentation. Think about replacing the standard components with bolder flavors.
For instance, use smoked Gouda and sautéed wild mushrooms blended with fresh thyme for a savory, earthy profile. Or, for a spicy twist, try a filling of Monterey Jack, corn, and black beans, served not with marinara, but with a bright lime cilantro crema.
Storage Solutions: Maintaining Crispness for Later Enjoyment
Admittedly, these are best eaten moments after they leave the fryer. If you absolutely must store leftovers, cool them completely to room temperature on the wire rack first. Store them in a single layer in an airtight container.
The best way to revive them is in a preheated 400° F ( 200° C) oven or toaster oven for about 5– 7 minutes until the crust re-crisps. Avoid the microwave at all costs, as it guarantees sogginess.
Flavor Enhancements: Spice Blends for the Breading
To build on that Crispy Gold exterior, consider mixing savory spices directly into your Panko blend. A tablespoon of smoked paprika adds a beautiful color and depth, while a teaspoon of garlic powder and onion powder enhances the savory notes.
For a fiery kick that pairs surprisingly well with the marinara, incorporate a pinch of cayenne pepper into the flour dredge.
Altitude Adjustments for Consistent Frying Performance
If you are cooking at high altitude, be aware that water boils and oil heats differently. You may need to increase your target oil temperature by 5° F to 10° F (about 3° C to 6° C) above the standard 350° F ( 175° C) to account for reduced atmospheric pressure affecting evaporation rates, which can sometimes lead to slightly soggier results if not compensated for.
Serving Suggestions
These beautiful, Crispy Fried Ravioli pieces are meant to be shared, often as the star of a casual gathering. The mandatory Zesty Marinara Dip should certainly be present, but never hesitate to offer a creamy, cooling side like buttermilk Ranch dressing; the cool fat beautifully tempers the heat and richness of the deep fried dough.
For a lighter contrast, a side of sharply dressed arugula tossed simply with lemon juice and quality olive oil provides the perfect fresh foil to this iconic Italian American staple. Enjoy the crunch!
Recipe FAQs
What is the secret to getting that perfect, non-soggy crust on my Fried Ravioli?
It all comes down to temperature control and chilling, mate! Firstly, make sure your frying oil is spot-on at 350°F (175°C); if it's too cool, the pasta soaks up the oil like a sponge.
Secondly, don't skip the final 30-minute chill after you've breaded them this sets the coating so it won't fall off in the hot oil.
Can I use store-bought frozen ravioli instead of making them from scratch?
Absolutely, that’s a cracking shortcut if you’re short on time! If using frozen ravioli, make sure they are completely thawed and patted very dry before breading, or the coating won't stick properly.
You might need to slightly increase the frying time by about 30 seconds per side to ensure the centre is piping hot.
My ravioli split open while frying! What did I do wrong?
That’s usually down to two things: either the filling was too wet, or the ravioli wasn't chilled enough before hitting the heat. When the filling expands too quickly due to temperature shock, it bursts the pasta seal. Ensure your ricotta is well drained and that you've firmly crimped those edges!
How long can I store leftover Fried Ravioli, and can I reheat them?
Leftovers are best eaten the same day, as they rapidly lose that beautiful crunch. If you must store them, pop them in an airtight container in the fridge for up to two days. To reheat, ditch the microwave entirely it’s a recipe for soggy disappointment!
Use an air fryer or a hot oven (around 400°F/200°C) for about 5-7 minutes to bring some crispness back.
What's the best way to serve these other than the marinara dip?
While the zesty marinara is the traditional route, try whipping up a quick garlic aioli or even a spicy honey drizzle for a modern twist it offers a lovely sweet heat contrast. For a proper American appetizer spread, a side of cool Ranch dressing is surprisingly brilliant for dipping too!
St Louis Fried Ravioli Gold

