Crispy Traditional Pan Fried Tuna Cakes
- Time: 10 min active + 10 min cook
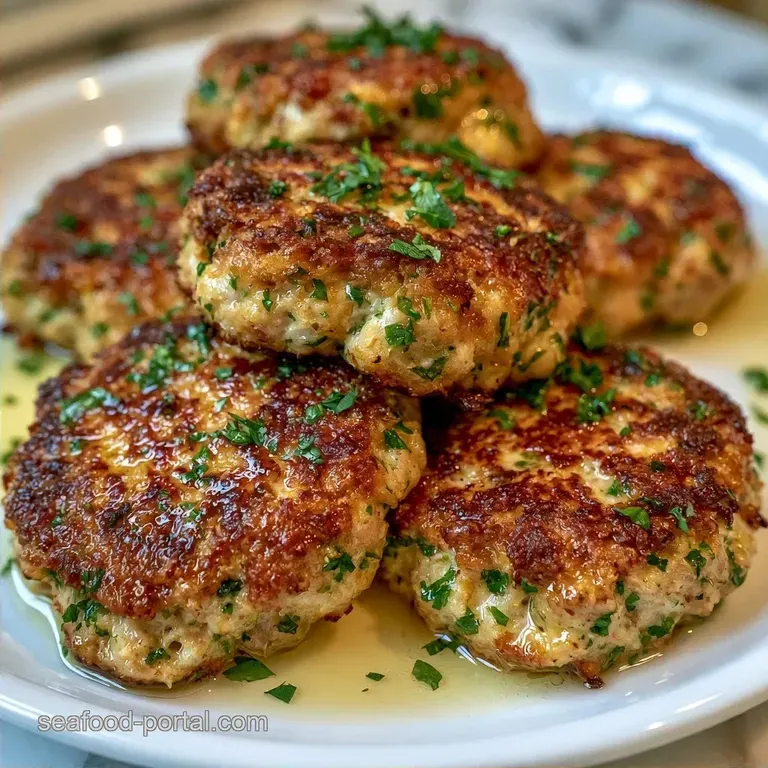
- Flavor/Texture Hook: Mahogany colored, shattering crust with a tender center
- Perfect for: Budget-friendly weeknight dinners or a quick appetizer
- Traditional Pan Fried Tuna Cakes
- Recipe Specs
- What Each Ingredient Does
- Ingredients and Substitutions
- Gear for the Job
- How to Make It
- The Moisture Factor
- Fixing Common Problems
- Scaling the Recipe
- Debunking Tuna Myths
- Storage and Freshness
- Flavor Twists to Try
- Plating and Presentation
- Recipe FAQs
- 📝 Recipe Card
Traditional pan fried Tuna Cakes
That first hiss when the patty hits the hot olive oil is everything. It's the sound of a Tuesday night transforming from "whatever's in the pantry" to something that actually feels like a meal.
I remember making these for my roommate back in college when our budget was basically zero, but we still wanted something that didn't taste like a sad sandwich.
The smell hits you immediately. First, it's the sharp, vinegary tang of Dijon mustard, then the warm, earthy scent of garlic powder as it toasts in the pan. By the time the Panko starts to brown, your whole kitchen smells like a seaside bistro.
You can expect a patty that's light but filling. We're aiming for a specific contrast: a crust that actually cracks when you bite into it and a center that's savory and soft. It's a simple balance, but getting that sear right makes all the difference.
Recipe Specs
When you're staring at a can of tuna, it's easy to think the result will be mushy. These Traditional pan fried Tuna Cakes avoid that by using a very specific binding method. We aren't just mixing things together, we're building a structure.
The goal is a patty that holds its shape without needing a mountain of filler. By keeping the prep time to 10 minutes and the cook time to 10 minutes, you get a high reward meal with very little effort. It's a great way to use pantry staples while keeping the flavor fresh.
Quick Decision: Method Comparison
| Method | Time | Texture | Best For |
|---|---|---|---|
| Fast (Canned) | 20 mins | Crisp & Soft | Weeknight meals |
| Classic (Fresh) | 45 mins | Flaky & Firm | Special occasions |
| Baked | 30 mins | Uniform | Healthier option |
What Each Ingredient Does
I've tried making these with just mayo, but the Greek yogurt is a move I'll never regret. It provides a tang that cuts through the richness of the tuna. According to USDA FoodData, Greek yogurt is a great way to add protein and creaminess without the heavy fats found in traditional binders.
Ingredient Deep Dive
| Ingredient | What It Does | Best Swap |
|---|---|---|
| Canned Tuna | Provides the bulk and protein | Fresh tuna (chopped) |
| Greek Yogurt | Adds moisture and a tangy zip | Mayonnaise |
| Panko Breadcrumbs | Creates the "shattering" crust | Crushed cornflakes |
| Egg | Binds everything together | Flax egg (1tbsp meal + 3tbsp water) |
Ingredients and Substitutions
Get your ingredients ready before you start. Since this is a fast recipe, you don't want to be chopping parsley while your oil is already smoking.
- 2 cans (5 oz / 142 g each) tuna in water, drained thoroughly Why this? Water packed is leaner and lets the seasonings shine
- 1 large egg (50 g) Why this? Essential for structural integrity
- 2 tbsp (30 g) plain Greek yogurt Why this? Keeps the interior moist
- 1 tbsp (15 g) Dijon mustard Why this? Adds a sophisticated, sharp depth
- 2 tbsp (8 g) fresh parsley, finely chopped
- 2 tbsp (10 g) green onion, minced
- 1 tsp (2 g) garlic powder
- ½ tsp (3 g) kosher salt
- ¼ tsp (1 g) black pepper
- ½ cup (30 g) Panko breadcrumbs Why this? Larger flakes create more surface area for crisping
- 1 tbsp (15 ml) olive oil
Substitution Guide
| Original Ingredient | Substitute | Why It Works |
|---|---|---|
| Panko (1/2 cup) | Breadcrumbs (1/2 cup) | Same binding effect. Note: Less airy crunch than Panko |
| Greek Yogurt (2 tbsp) | Mayo (2 tbsp) | Similar fat content. Note: Heavier, less tangy flavor |
| Fresh Parsley (2 tbsp) | Dried Parsley (2 tsp) | Similar herbal note. Note: Less vibrant color and aroma |
Gear for the Job
You don't need a professional kitchen for this. A sturdy mixing bowl and a fork are your main tools here. I prefer a stainless steel or non stick skillet because it distributes heat evenly, which is a must for those Traditional pan fried Tuna Cakes.
A wire rack is a small detail that makes a huge difference. If you put hot patties directly onto a plate, the bottom steams and gets soggy. Letting them breathe for 2 minutes keeps the crust intact.
How to Make It
Right then, let's get into the actual cooking. Pay attention to the smell and color cues, as these tell you more than a timer ever will.
1. The Binding Phase
Drain the tuna cans aggressively. Press the lid down hard to squeeze out every drop of water. Transfer the tuna to a bowl and use a fork to flake it. You want small pieces, no huge chunks, so the patties don't fall apart.
Stir in the egg, Greek yogurt, Dijon mustard, parsley, green onion, garlic powder, salt, and pepper. Mix until the mixture is cohesive. It should feel like a thick paste that holds its shape when you press it with a spoon.
2. The Shaping Phase
Divide the mixture into 5 equal portions. Gently shape each into a patty about 1 inch thick. Don't over compress them, or they'll become dense and rubbery.
Place each patty into a shallow dish of Panko breadcrumbs. Press lightly on both sides. You want an even, sandy coating that covers the tuna completely.
3. The Searing Phase
Heat the olive oil in a skillet over medium high heat. Wait until the oil shimmers. Gently place the patties in the pan.
Sear for 3–4 minutes per side. You're looking for a mahogany colored, shattering crust. The center should feel firm to the touch. Remove them and let them rest on a wire rack for 2 minutes.
The Moisture Factor

The biggest struggle with these Traditional pan fried Tuna Cakes is the "mush factor." If there's too much liquid in the tuna, the Panko absorbs it and turns into a soggy layer instead of a crisp shell. This is why I insist on draining the tuna aggressively.
If you've ever made salmon cakes, you know that moisture management is the difference between a patty and a pancake. The Greek yogurt is key here because it's thicker than mayo, providing a creamy texture without adding excess liquid that would steam the patty from the inside.
Quick Fix Guide
| If you want X | Do Y |
|---|---|
| Extra Crunch | Double coat the Panko |
| Lower Calories | Bake at 400°F for 12 mins |
| More Zest | Add 1 tsp lemon zest to the mix |
Fixing Common Problems
Even the best home cooks run into issues. Usually, it comes down to heat management or ingredient ratios.
Patties are falling apart in the pan
This usually happens if the tuna wasn't drained enough or if the pan wasn't hot enough. If the oil isn't shimmering, the patty sticks and tears when you try to flip it. Trust me, wait for the heat.
Exterior is burnt but center is cold
Your heat is too high. The Panko browns quickly, but the heat isn't penetrating the 1 inch center. Drop the flame to medium and give them an extra minute per side.
The crust isn't "shattering"
You might have used too much binder or didn't use enough Panko. Ensure the coating is a distinct layer, not just mixed in.
Troubleshooting Table
| Problem | Root Cause | Solution |
|---|---|---|
| Mushy Center | Excess water in tuna | Press lid harder when draining |
| Sticking to Pan | Oil not hot enough | Wait for oil to shimmer before adding |
| Bland Flavor | Under seasoned base | Add a pinch more salt or lemon juice |
Scaling the Recipe
If you're cooking for a crowd, don't just multiply everything blindly. Some ingredients behave differently in large batches.
For a double batch (10 servings), I only increase the salt and garlic powder to 1.5x. Too much salt in a large batch can make the tuna taste metallic. Work in batches in the pan. If you crowd the skillet, the temperature drops, and you'll end up boiling the patties in oil rather than searing them.
If you're making a single serving, beat one egg in a small cup first, then use half of it. Using a whole egg for one patty will make the mixture too wet to shape.
Debunking Tuna Myths
You'll often hear that canned tuna can't be "gourmet." That's just not true. With the right aromatics, it's a blank canvas.
Some people think adding flour to the mix makes the patties sturdier. In reality, flour can make them dense and gummy. Panko provides the structural support we need while keeping the texture light.
Another myth is that you need to deep fry these to get a crunch. As long as you use a high smoke point oil and medium high heat, a shallow pan fry gives you that exact same result with way less mess.
Storage and Freshness
These Traditional pan fried Tuna Cakes keep well, but the crust is the first thing to go.
Fridge: Store in an airtight container for up to 3 days. To bring back the crunch, don't microwave them. Instead, toss them back in a hot pan for 2 minutes per side.
Freezer: You can freeze these before or after frying. If freezing raw, wrap them individually in parchment paper for up to 2 months. Fry them straight from frozen, just add 2 minutes to the cook time per side.
Zero Waste: Don't toss the tuna water if you have a garden it's rich in minerals (though a bit salty). More practically, use the empty tuna cans to store small items like nails or paperclips in your junk drawer.
Flavor Twists to Try
Once you've nailed the basic version, you can start playing with the profile. I love adding a bit of heat to the mix.
For a spicy version, stir in a tablespoon of Sriracha or chopped jalapeños. If you're into that vibe, you might also like a spicy tuna tartare for a fresher, uncooked alternative.
For a Mediterranean style, swap the garlic powder for dried oregano and use feta cheese instead of Greek yogurt. If you need a gluten-free option, almond flour or crushed pork rinds work surprisingly well as a substitute for Panko. For Keto, skip the breadcrumbs entirely and use grated parmesan cheese for the crust.
Plating and Presentation
You don't need to be a pro to make these look great. A simple arrangement makes a huge difference.
The Zesty Pairing Serve these with a dollop of tartar sauce or a squeeze of fresh lemon. The acidity cuts through the fried exterior and wakes up the tuna. A side of arugula with a light vinaigrette adds a peppery contrast.
The Balanced Plate Place three patties slightly overlapping in the center of the plate. Add a scoop of creamy coleslaw or a handful of steamed green beans to the side. The bright green of the beans against the mahogany crust of the tuna cakes looks professional and tastes balanced.
Recipe FAQs
What is the secret to crispy tuna cakes?
Press them into Panko breadcrumbs and sear in shimmering olive oil. Fry for 3 4 minutes per side until a mahogany colored, shattering crust forms.
Do you put an egg in tuna patties?
Yes, one large egg is essential. It acts as a primary binder along with Greek yogurt to ensure the patties hold their shape during frying.
How do you keep tuna cakes from falling apart?
Drain the tuna aggressively by pressing the lid down to remove all excess water. This prevents the mixture from becoming too wet to bind together.
Is it possible to make tuna cakes like crab cakes?
Yes, by using a similar binding method and pairing them with a tart sauce. They taste authentic when served with a zesty lemon dill sauce for that classic seafood profile.
What should I serve with tuna patties?
Pair them with a crisp green salad or steamed vegetables. A fresh squeeze of lemon juice also helps cut through the richness of the pan-fried crust.
How do I reheat tuna cakes without losing the crunch?
Toss them back in a hot pan for 2 minutes per side. Avoid using a microwave, as it will make the Panko coating soggy.
Can I freeze tuna cakes for later?
Yes, either before or after frying. Wrap raw patties individually in parchment paper for up to 2 months, and add 2 minutes to the cook time per side when frying straight from frozen.
pan fried Tuna Cakes