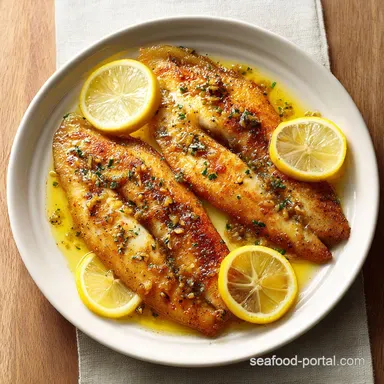
Tilapia Fillet Recipe with Lemon and Garlic
- Time: 5 min active + 10 min cook = Total 20 mins
- Flavor/Texture Hook: Golden brown crust with a velvety, zesty butter finish
- Perfect for: Fast weeknight dinners or a low effort healthy meal
- Tilapia Fillet Recipe with Lemon and Garlic
- Why This Method Actually Works
- Component Analysis
- Essential Pantry and Fresh Items
- The Right Cooking Tools
- Simple Step by Step Guide
- Common Pitfalls and Pro Tips
- Troubleshooting Common Issues
- Adjustment Guidelines
- Debunking Fish Myths
- Storage and Waste Reduction
- Best Ways to Serve
- Recipe FAQs
- 📝 Recipe Card
Tilapia Fillet Recipe with Lemon and Garlic
That sharp, citrusy crackle when fresh lemon juice hits a sizzling pan is my favorite sound in the kitchen. There is something about that exact moment where the butter is foaming and the garlic is just starting to turn golden that makes the whole house smell like a seaside bistro.
For a long time, I treated tilapia as a "boring" fish, often overcooking it into a dry, rubbery mess because I was too scared to use high heat.
Then I realized the secret isn't in the temperature, but in the moisture. I used to throw the fillets straight from the package into the pan, which just created a cloud of steam and left me with grey, limp fish. Once I started patting them bone dry and letting them sit for a few minutes, everything changed.
The fish actually sears, the edges get that gorgeous golden color, and the inside stays flaky.
Discover the ultimate Tilapia Fillet Recipe with Lemon and Garlic. This approach isn't about fancy techniques, it's just about timing. You get a hit of acidity from the lemon to cut through the richness of the butter, and enough garlic to make it savory.
It's the kind of meal that feels like you spent an hour in the kitchen, but honestly, you're done in twenty minutes.
Why This Method Actually Works
I spent way too much time wondering why some restaurant fish has that golden crust while mine looked boiled. It turns out it is all about how the heat interacts with the surface of the fillet.
Surface Dryness: Water is the enemy of a sear. When the fish is dry, the heat goes straight to browning the protein instead of evaporating surface moisture.
The Butter Buffer: Starting with olive oil allows for a higher searing temp, but finishing with butter adds a velvety texture and prevents the garlic from burning too quickly.
Acid Balance: Adding lemon juice at the very end prevents the acid from "cooking" the fish too much while it's in the pan, keeping the flavor bright and fresh.
Carryover Heat: Fish continues to cook for a minute after it leaves the pan. Pulling it off just as it turns opaque prevents that dreaded rubbery texture.
| Approach | Searing Temp | Texture | Best For |
|---|---|---|---|
| Fast Sear | Medium High | Crispy edges, moist center | Quick weeknights |
| Classic Bake | Medium | Uniformly soft, tender | Large batches |
| Poached | Low | Silky, very soft | Delicate diets |
Component Analysis
Understanding what each ingredient actually does helps you tweak the recipe without ruining the dish.
| Ingredient | Science Role | Pro Secret |
|---|---|---|
| Unsalted Butter | Flavor Carrier | Use a high fat European butter for a richer, more velvety sauce |
| Fresh Lemon Zest | Aromatic Punch | Zest the lemon before juicing it; it's much easier |
| Olive Oil | Heat Stability | Use a neutral oil if you're worried about a burnt olive oil taste |
| Garlic | Savory Base | Mince it very fine so it distributes evenly in the butter |
Essential Pantry and Fresh Items
Keep it simple. Tilapia is a mild fish, so we don't want to overwhelm it, but we do want to wake up those flavors.
- 4 tilapia fillets, approx 1 lb (450g) Why this? Mild flavor that absorbs butter and lemon easily
- 1/2 tsp salt Why this? Enhances natural fish flavors
- 1/4 tsp black pepper Why this? Adds a subtle earthy heat
- 1 tbsp olive oil Why this? Prevents sticking at high temperatures
- 3 tbsp unsalted butter Why this? Creates the velvety sauce base
- 3 cloves garlic, minced Why this? Provides a pungent, savory depth
- 1 tbsp fresh lemon juice Why this? Cuts through the fat of the butter
- 1 tsp lemon zest Why this? Adds concentrated citrus aroma
- 1 tbsp fresh parsley, chopped Why this? Adds a fresh, herbal finish
Ingredient Substitutions
| Original Ingredient | Substitute | Why It Works |
|---|---|---|
| Unsalted Butter | Ghee (3 tbsp) | Higher smoke point. Note: Lacks the milky sweetness of butter |
| Fresh Parsley | Fresh Cilantro (1 tbsp) | Similar freshness. Note: Shifts flavor toward a more zesty, taco like profile |
| Olive Oil | Avocado Oil (1 tbsp) | Very stable at high heat. Note: Completely neutral flavor |
| Tilapia Fillets | Cod or Halibut (1 lb) | Similar white fish. Note: May require 1-2 extra minutes of cooking depending on thickness |
Since this dish is so lean, I often serve it with something creamy. If you're feeling adventurous, a dollop of my Fish Taco Sauce recipe on the side adds a great zesty contrast.
The Right Cooking Tools
You don't need a professional kitchen, but a few specific tools make a huge difference in how the fish turns out.
- 12 inch Non stick Skillet: This is the safest bet for tilapia since it's a delicate fish that likes to cling to the pan.
- Cast Iron Pan: If you want a deeper, more intense golden crust, cast iron is the way to go, though you'll need to be more generous with the oil.
- Fish Spatula: A wide, thin spatula is essential for flipping the fillets without breaking them.
- Microplane or Zester: Essential for getting that fine lemon zest without hitting the bitter white pith.
- Paper Towels: Seriously, don't skip these. The drier the fish, the better the sear.
Simple step by step Guide

Let's get into the action. Keep an eye on the colors and the sounds - that's how you'll know you're on the right track.
Phase 1: Preparing the Protein
- Rinse the tilapia fillets under cold water and pat them bone dry with paper towels. Note: Moisture creates steam, which prevents browning
- Season both sides of the fillets evenly with salt and black pepper.
- Let the fillets sit at room temperature for 5 minutes to ensure an even cook. Note: Cold fish can drop the pan temperature too quickly
Phase 2: The Searing Process
- Heat olive oil in a 12 inch non stick skillet or cast iron pan over medium high heat until the oil shimmers.
- Carefully place fillets in the pan, pressing down lightly with a spatula to ensure contact. Sear for 3-4 minutes per side until the edges are opaque and the bottom is golden brown.
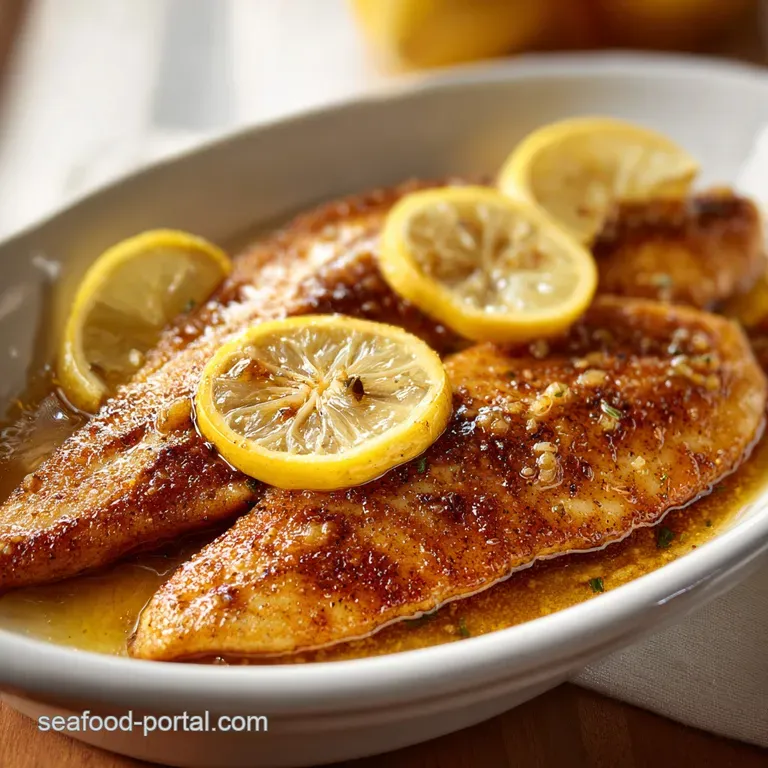
Phase 3: The Garlic Butter Finish
- Reduce heat to medium. Add unsalted butter and minced garlic to the pan.
- Once the butter foams, stir in the lemon juice and lemon zest.
- Use a spoon to continuously pour the bubbling garlic butter over the fillets for 60 seconds. Note: This is called basting and it infuses the flavor deep into the meat
- Remove from heat immediately and garnish with chopped fresh parsley.
If you're in the mood for something even more indulgent, you might like my Pan Seared Tilapia with Everything Bagel sauce, but for a clean, classic dinner, this lemon garlic version is the winner.
Common Pitfalls and Pro Tips
Most mistakes with this recipe happen because of temperature control or timing. Tilapia is very lean, so it doesn't have much room for error before it dries out.
Troubleshooting Common Issues
| Issue | Solution |
|---|---|
| Why Your Fish Sticks | This usually happens because the pan wasn't hot enough when the fish went in, or the fillets were still damp. If the fish doesn't "release" easily from the pan after 3 minutes, don't force it. Let it |
| Why Your Garlic Burnt | Garlic burns quickly at high heat. That is why we reduce the heat to medium before adding the butter and garlic. If you see the garlic turning dark brown instead of golden, pull the pan off the heat i |
| Why Your Fish is Rubbery | Overcooking is the biggest enemy here. According to guidelines from Serious Eats, fish is best when it just barely reaches its target internal temperature. Once the fles |
Mistakes Checklist
- ✓ Did you pat the fillets completely dry?
- ✓ Did you wait for the oil to shimmer before adding fish?
- ✓ Did you reduce the heat before adding the garlic butter?
- ✓ Did you pull the fish off the heat as soon as it turned opaque?
- ✓ Did you zest the lemon before juicing it?
Adjustment Guidelines
Whether you're cooking for one or a crowd, you can scale this Tilapia Fillet Recipe with Lemon and Garlic without losing the flavor balance.
Scaling Down (1-2 Fillets) Use a smaller 8 inch skillet. If the pan is too large, the butter will spread too thin and burn before you can baste the fish. Reduce the garlic to 1-2 cloves and use 1.5 tbsp of butter. The cook time remains the same, but keep a closer eye on the butter foaming.
Scaling Up (8+ Fillets) Do not crowd the pan. If you put too many fillets in at once, the temperature will drop, and you'll end up steaming the fish instead of searing it. Work in batches. For the sauce, increase the butter and garlic to 1.5x (not 2x) to avoid the sauce becoming too greasy.
Temperature Tweaks If you're using a very thin fillet, reduce the sear time to 2-3 minutes per side. For thicker cuts, you might need 4-5 minutes. The visual cue is the most important part: look for that golden brown crust and opaque center.
Debunking Fish Myths
Myth: You need to seal in the juices. A lot of people think searing "seals" the fish to keep it moist. In reality, searing is about flavor and texture. Moisture loss happens regardless, but the golden crust adds a depth of flavor that you just can't get from baking or poaching.
Myth: Frozen tilapia is always inferior. While fresh is great, flash frozen tilapia is often frozen right at the source. The key is how you thaw it. Thaw it slowly in the fridge, not on the counter, and then follow the pat dry rule. You'll get results that are virtually identical to fresh.
Storage and Waste Reduction
Fridge and Freezer Store leftovers in an airtight container in the fridge for up to 2 days. To reheat, avoid the microwave, which makes fish rubbery. Instead, place the fillets in a pan over medium heat with a tiny bit of extra butter for 2-3 minutes per side.
I don't recommend freezing cooked tilapia as the texture breaks down significantly.
Zero Waste Tips Don't throw away the lemon halves! Squeeze every last drop for your sauce, then toss the rinds into a jar of olive oil with some garlic for a quick infused oil.
If you have leftover parsley stems, chop them finely and add them to a homemade stock or a vegetable soup for an extra hit of flavor.
Best Ways to Serve
This dish is incredibly versatile. Because the flavors are so clean, it pairs well with almost any side.
The Classic Pairing Serve this with steamed asparagus or sautéed spinach. The brightness of the lemon garlic butter seeps into the vegetables, making them taste like they were cooked in the same pan.
The Hearty Option For something more filling, pair it with a bed of fluffy quinoa or wild rice. The rice absorbs the extra garlic butter from the pan, so nothing goes to waste.
The Low Carb Route Roasted cauliflower or a simple arugula salad with a light vinaigrette keeps the meal light and healthy while letting the fish be the star of the show. Just a final sprinkle of fresh parsley over the whole plate makes it look professional.
Recipe FAQs
Why does my tilapia stick to the pan?
The pan wasn't hot enough or the fillets were damp. Ensure the olive oil shimmers before adding fish and pat fillets bone dry. If the fish doesn't release after 3 minutes, let it sear longer without forcing it.
Why did my garlic burn?
The heat was too high when added. Always reduce the heat to medium before adding the butter and garlic. Pull the pan off the heat immediately if the garlic turns dark brown instead of golden.
Why is my fish rubbery?
It was overcooked. Tilapia is lean and cooks quickly, so remove the fillets as soon as the edges are opaque and the bottom is golden brown.
How to prepare tilapia fillets for the best sear?
Rinse under cold water and pat bone dry with paper towels. Season with salt and pepper, then let the fillets sit at room temperature for 5 minutes to ensure an even cook.
Is it true that I can freeze cooked tilapia for later?
No, this is a common misconception. Freezing cooked tilapia causes the texture to break down significantly, making it unpleasant to eat.
Can I use a different white fish instead of tilapia?
Yes, most mild white fish work well. If you enjoy the light flavor profile here, you can apply the same pan-searing technique to our crispy fillets.
How to reheat leftover tilapia?
Place the fillets in a pan over medium heat with a tiny bit of extra butter. Heat for 2-3 minutes per side to avoid the rubbery texture caused by microwave reheating.
Lemon Garlic Tilapia Fillet