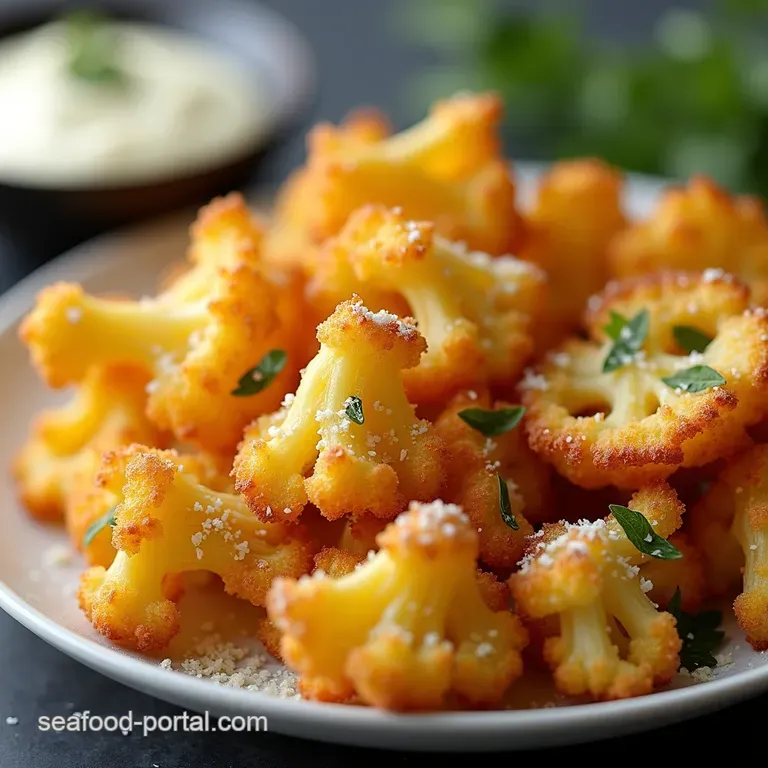
Golden Garlicky Baked Cauliflower Crisps with Parmesan Dust
- The Transformation: Why This Baked Cauliflower Crisp Changes Everything
- Decoding the Delight: Texture Secrets of the Perfect Crisp
- The Crisping Catalyst: Essential Pantry Components
- Assembly Arsenal: Tools Required for Maximum Crunch
- The Pre-Bake Ritual: Preparing Cauliflower Florets for Glory
- Achieving Oven Gold: Step-by-Step Baking Protocol
- Troubleshooting Common Crisping Catastrophes
- Culinary Canvas: Creative Twists on the Classic Recipe
- Storage Strategy and Editorial Insight on Leftovers
- Recipe FAQs
- 📝 Recipe Card
The Transformation: Why This Baked Cauliflower Crisp Changes Everything
There are few culinary moments as satisfying as taking a humble vegetable and transforming it into something utterly addictive. If your experience with cauliflower usually involves bland steaming or lackluster roasting, prepare for a genuine revelation.
We are diving deep into mastering the Baked Cauliflower Crisp —a recipe designed to deliver that perfect textural dichotomy: tender, almost creamy on the inside, shrouded in a golden, deeply flavourful crust.
This isn't just a side dish; it’s the star attraction that will convert the most ardent vegetable sceptics. We’re aiming for pub-grub satisfaction without any of the associated guilt, making this the Best Baked Crispy Cauliflower Recipe you’ll ever need.
Decoding the Delight: Texture Secrets of the Perfect Crisp
Achieving true crispiness with cauliflower a vegetable notorious for its high water content requires strategic intervention. It’s about creating a barrier that locks the internal moisture in while promoting external dehydration and browning.
Our approach involves a light, flavourful binder combined with high, dry heat, ensuring that every bite of these Baked Crispy Cauliflower Bites sings with crunch.
Ditching the Dreaded Sog Factor: Our Initial Promise
The number one enemy of crispiness is moisture. If the florets are damp when they hit the oven, they will steam, resulting in limp, disappointing vegetables. Our Easy Baked Cauliflower Crisps recipe prioritizes a thorough drying process right at the start.
We use a very light coating, just enough to adhere seasoning and create a surface for the heat to work its magic, rather than relying on a heavy batter which often results in a chewy texture.
Meet Your New Favourite Side Dish (Or Snack!)
This recipe is incredibly versatile. While they shine as a vibrant accompaniment to grilled salmon or roast chicken, these Baked Crispy Cauliflower Florets are equally fantastic served on their own as a satisfying, wholesome snack.
We're using a double stage coating process a quick dip in egg followed by a dusting in seasoned flour which ensures maximum surface adhesion without weighing down the vegetable.
Expert Tip: Sourcing the Freshest Cauliflower Head
The quality of your core ingredient matters immensely. Look for a cauliflower head that feels heavy for its size, with tight, creamy white florets. Avoid any heads showing significant browning or softness around the edges.
A sturdy, fresh head will hold its structure better during the baking process, which is crucial when learning How To Cook Cauliflower Crispy In The Oven .
The Crisping Catalyst: Essential Pantry Components
To achieve this signature golden exterior, we need a specific blend of pantry staples working in harmony. For the foundational coating, you will need one large head of cauliflower, cut into uniform, bite sized florets. The binding agent starts with one large egg, lightly beaten, which acts as the glue.
This is paired with about two tablespoons of all-purpose flour to create a thin slurry that accepts seasoning beautifully.
For flavour, simplicity is key. We rely on one teaspoon of aromatic garlic powder, half a teaspoon of deep, earthy smoked paprika for colour and depth, half a teaspoon of fine sea salt, and a quarter teaspoon of freshly ground black pepper.
These ingredients, combined with about three tablespoons of quality olive oil, form the initial delicious layer.
Assembly Arsenal: Tools Required for Maximum Crunch
A successful bake relies on having the right equipment ready before you start mixing. You’ll need a large mixing bowl for tossing, a sharp knife and cutting board for preparation, and most importantly, one or two large baking sheets.
Crucially, line these sheets with parchment paper or a silicone baking mat; this prevents sticking and aids in an even, golden bake across the entire surface area of the florets. Finally, a small whisk or fork will be needed to prepare the egg wash.
Beyond Salt and Pepper: Flavour Layering Explained
Our approach involves two distinct flavour stages. The first stage integrates the primary seasonings (garlic powder and smoked paprika) directly into the flour dredge. This ensures every molecule of the coating tastes vibrant.
The second, often overlooked, stage happens after the bake, where we introduce our secret weapon for next level flavour: a salty, herbaceous topping.
The Parmesan Dilemma: Choosing the Right Grate Size
For that ultimate finish which transforms these into something resembling Baked Crispy Cauliflower Wings —we introduce cheese. You’ll need about half a cup of finely grated Parmesan cheese, mixed with one teaspoon of dried parsley.
It is imperative that the Parmesan is finely grated. Large shreds will burn before the cauliflower is fully cooked; a fine grate melts smoothly and crisps up into a lovely, nutty crust.
Prep Station Checklist: Mise en Place for Success
Before the cauliflower hits the heat, organization prevents panic. Ensure your florets are washed and meticulously dried. Set up your dredging stations: one bowl for the beaten egg, and a second, shallower bowl or plate containing the seasoned flour mix.
Finally, have your lined baking sheets ready to receive the coated pieces. Having everything in place makes the Prep Time fly by.
Related Recipes Worth Trying
- The Best RestaurantStyle Crispy Crab Rangoons Recipe — Forget soggy starters Master this foolproof Crispy Crab Rangoon recipe for shatteringly crisp wontons and a creamy savoury filling Easy finger foods await
- The Sunday Supper Shortcut Simple Baked Rigatoni Recipe — Need an easy baked rigatoni with ricotta that tastes homemade This foolproof recipe is your weeknight hero for hearty Italian casserole dinners
- Crispy Baked Bang Bang Salmon Rice Bowls in 40 Mins — Forget the takeaway These easy Bang Bang Salmon Rice Bowls feature crispy pankocrusted salmon smothered in a creamy spicy sauce A perfect Salmon Rice Bowl...
The Pre-Bake Ritual: Preparing Cauliflower Florets for Glory
This is where we earn the crisp. After ensuring your florets are completely dry, they go into the egg wash. Toss them just until they are lightly slicked we aren't drowning them. Immediately transfer these damp florets into the seasoned flour mixture.
Toss thoroughly here; the goal is for every crevice to be coated in a thin, dusty layer of the flavour blend. This technique ensures the coating adheres securely before it ever sees the oven.
Achieving Oven Gold: step-by-step Baking Protocol
The journey to achieving these Roasted Cauliflower Crispy delights requires precision in technique and temperature management. Start by preheating your oven to a robust 400° F ( 200° C).
Remember, high heat is essential for driving off moisture quickly.
Toss Technique: Ensuring Even Coating Distribution
Once coated, spread the florets onto your prepared baking sheets. This step is non-negotiable: they must be in a single layer, with ample space between each piece. Overcrowding leads to steaming, which defeats the entire purpose of creating a Baked Cauliflower Crisp .
Think of it as providing each floret its own little slice of hot oven real estate.
Temperature Triumphs: Setting Your Oven for Perfection
We employ a two-stage baking process. The initial bake lasts for 15 minutes. This sets the coating and begins the cooking process internally. After this period, remove the sheets.
The Mid-Bake Flip: Maximizing Surface Area Exposure
Drizzle the exposed sides of the florets lightly with your three tablespoons of olive oil. Gently toss them right there on the tray to redistribute the oil. This ensures browning occurs on all sides. Return them to the oven for another 10 to 15 minutes.
At this point, you should see lovely golden edges forming.
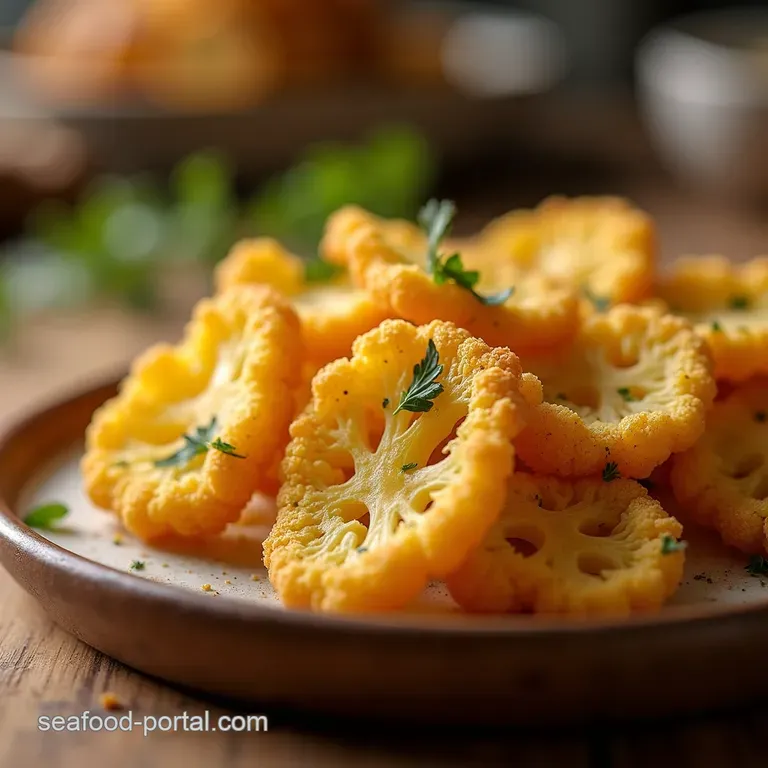
Final Touch: Dusting and Serving the Baked Cauliflower Crisp
While they finish the second bake, mix your finely grated Parmesan cheese with the dried parsley. When the cauliflower emerges, golden and smelling incredible, immediately sprinkle this mixture evenly over the piping hot florets.
Return the trays to the oven for a final, brief blast just 3 to 5 minutes until the cheese is melted and just beginning to brown. This step is key to that wonderful texture often found in Baked Crispy Cauliflower with Cheese .
Serve immediately for peak crispness!
Troubleshooting Common Crisping Catastrophes
Did your florets turn out less than stellar? Often, the issue traces back to moisture control or oven crowding. If they are soft, it means they steamed; next time, ensure your florets are dry and use two baking sheets if necessary to prevent overlap.
If the coating fell off, the egg wash might have been too thick, or you didn't toss the flour mixture thoroughly enough to create a proper dredge. Trust the high heat don't be tempted to lower the temperature hoping to prevent burning, as this only encourages sogginess.
Culinary Canvas: Creative Twists on the Classic Recipe
While the Parmesan version is divine, these crisps are a fantastic base for experimentation. For those craving heat reminiscent of Baked Crispy Cauliflower Wings , incorporate a pinch of cayenne pepper or a teaspoon of hot sauce into the initial egg wash.
For an Asian inspired flair, substitute the Parmesan topping with a mix of sesame seeds and a drizzle of toasted sesame oil post bake. You can even swap the smoked paprika for turmeric for a vibrant, earthy colour and flavour profile.
Storage Strategy and Editorial Insight on Leftovers
These Baked Crispy Cauliflower Bites are engineered for immediate gratification; their texture is best enjoyed straight from the oven. If you do have leftovers, store them in an airtight container at room temperature for up to 24 hours.
To revive them, absolutely avoid the microwave, which guarantees sogginess. Instead, reheat them on a tray in a 350° F oven for 8– 10 minutes until the exterior is hot and crisp once more.
FAQ: Frequently Asked Questions by the Home Cook
Q: Can I use frozen cauliflower? A: It is strongly advised against using frozen cauliflower for this specific recipe, as the excess water released during thawing will prevent the crisp coating from forming properly. Always start with fresh.
Q: Do I need to pre-cook the cauliflower? A: No. The 30-35 minute baking time at 400° F is sufficient to render the cauliflower tender while simultaneously crisping the exterior.
Q: What if I don’t have an egg? A: As mentioned in the variations, a binder of plant milk mixed with Dijon mustard or even a tablespoon of yogurt can work as a suitable substitute to help the dry coating adhere.
Nutritional Snapshot: Health Benefits of oven-roasted Veg
Cauliflower is a nutritional powerhouse, low in calories and rich in fibre, Vitamin C, and Vitamin K. By baking rather than deep frying, we keep the overall fat content relatively low (using just a touch of olive oil), making this a wonderfully healthy way to increase your daily vegetable intake.
Enjoying these Easy Baked Cauliflower Crisps allows for guilt free indulgence.
The Team’s Top Three Dipping Sauce Pairings
To elevate your experience further, the right sauce is essential. We unanimously recommend three winners: a bright, zesty Lemon Tahini Drizzle for a Middle Eastern twist; a homemade Garlic Aioli for classic richness; and for something truly bold, a Spicy Sriracha Mayo that plays perfectly against the salty Parmesan crust.
Recipe FAQs
My cauliflower always ends up soggy instead of crispy what’s the trick for the perfect Baked Cauliflower Crisp?
Ah, the dreaded sogginess! That’s usually down to two things: water and overcrowding. Make absolutely certain your florets are bone dry after washing; moisture is the enemy of crispness.
Also, never pile them onto the baking tray; they need space around them so the hot air can circulate, much like queuing politely for the bus!
Can I make these ahead of time, or should I only serve them fresh from the oven?
Honestly, these are best served immediately, piping hot, straight from the oven when that Parmesan topping is perfectly gooey. If you must prepare them early, you can coat them completely and keep them ready on the tray in the fridge for a few hours, but they won't achieve peak crispness when reheated.
A quick blast in a hot oven is better than the microwave!
I’m trying to keep this low-carb/gluten-free; what can I use instead of the regular flour?
That’s a smashing idea for slimming down the side dish! For a gluten-free version, try using rice flour or even very finely ground almond flour; both work well to help the egg bind. Just be aware that almond flour might absorb a little more oil, so keep an eye on it while it bakes.
What’s the best way to store leftovers, and how do I revive them the next day?
If you have any leftovers (unlikely, if they are as good as they sound!), store them in an airtight container in the fridge for up to two days. The microwave is your sworn enemy here, as it steams them back to mush.
Reheat them on a baking sheet at 425°F (220°C) for about 8 10 minutes to bring back that crucial crispy exterior.
I don't have any Parmesan cheese; what can I substitute for that lovely salty topping?
If you’re fresh out of Parmesan perhaps you used it all on last night’s pasta, eh? Pecorino Romano is a fantastic, slightly sharper swap. Alternatively, for a completely dairy-free option, mix toasted breadcrumbs with a generous amount of nutritional yeast and garlic powder to mimic that deep, savoury flavour.
Garlicky Parmesan Cauliflower Crisp