Tuna Melt Sandwich: the Ultimate Griddled Comfort Classic
- The Proper Griddled Tuna Melt: Achieving Comfort Food Perfection
- The Science of Sizzle: Why This Tuna Melt Sandwich Hits Different
- Essential Components: Building the Ultimate Tuna Melt Sandwich
- Assembly and Execution: How to Griddle Your Tuna Melt to Glory
- Troubleshooting the Griddle: Common Mistakes and Expert Tips
- Preparation & Preservation: Storing Tuna Salad and Melts
- Perfect Pairings: What to Serve Alongside Your Classic Tuna Melt
- Recipe FAQs
- 📝 Recipe Card
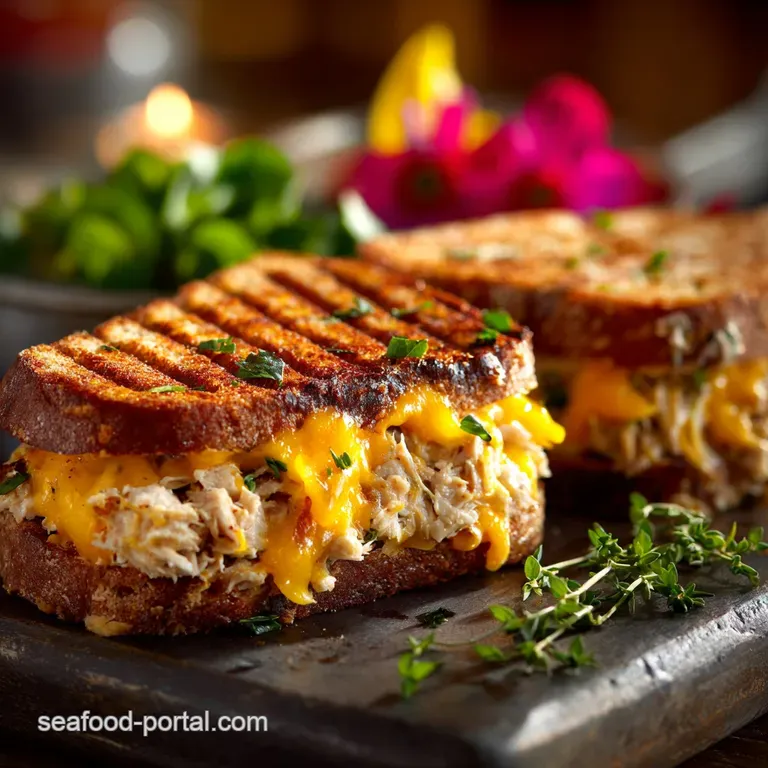
The Proper Griddled Tuna Melt: Achieving Comfort Food Perfection
Hear that sizzle? That crispy, buttery sound when the perfect tuna melt hits the pan is pure magic. When the cheese starts to bubble and the crust turns deep golden brown, you know life is truly good. That aroma of toasty bread, sharp cheddar, and that tangy filling is just intoxicating, isn't it?
Look, we all need those reliable, three ingredient recipes that save dinner when we're absolutely flat out exhausted. The Tuna Melt Sandwich is the ultimate culinary hero in my kitchen lineup. It’s cheap, uses pantry staples, and tastes infinitely better than it has any right to be.
But let's be honest, a bad melt is a tragedy soggy middle, burnt crust, cold cheese. I’ve definitely made all those terrible mistakes so you don’t have to repeat them. We are making the definitive, crunchy, gooey, flavour packed version today, guaranteed to hit the spot.
The Science of Sizzle: Why This Tuna Melt Sandwich Hits Different
Beyond the Diner: What Makes This Tuna Melt Superior (Crunch, Zing, and Melt)
The biggest difference between a meh melt and a spectacular one is texture, hands down. We need that crucial zing from the lemon juice and Dijon mustard to cut through the richness of the mayo. Critically, we are triple layering the cheese for structural integrity and maximum gooeyness.
Quick Overview: The Recipe Structure and Difficulty Level
This recipe is straightforward, truly; don't overthink it. It’s just three main phases: mixing the filling, assembling the sturdy stack, and then the patient griddle process. If you can handle a classic grilled cheese, you can easily master this Griddled Tuna Melt.
Perfecting the Creamy Crunch Ratio in the Filling
Soggy filling is the enemy, so drain your canned tuna until it practically cries for mercy. You need that structural integrity to prevent a watery bottom slice.
The real secret weapon here is the super fine dice on the celery and red onion it provides that perfect, necessary crunch without biting into huge, unstable chunks.
Mastering the Maillard Reaction for Golden Bread
The Maillard Reaction is just a fancy name for developing deep flavour and browning. We achieve this by using softened butter spread evenly, edge-to-edge, on the bread. Medium low heat is your non-negotiable friend; high heat just incinerates the bread before the cheese even thinks about melting properly.
Choosing Cheeses for Optimal Stretch and Gooey Melt
Don't rely on only one type of cheese, please. I learned this the hard way using only pre-sliced cheddar that refused to melt nicely. We are pairing a sharp, punchy cheese (like Cheddar) for flavour with a stretchy, low-melting cheese (like Monterey Jack or Provolone).
This fantastic combo delivers the flavour and the perfect stringy pull when you slice it open.
Essential Components: Building the Ultimate Tuna Melt Sandwich
The Best Bread for Griddling (Density and Thickness)
You need something robust enough to handle the wet filling and the heavy melted cheese. Skip the thin white sandwich bread; it collapses too easily when pressed. Sourdough or a good, medium thick white bread is ideal because the density stops the dreaded soggy bottom syndrome before it even starts.
Elevating the Filling: Canned Tuna, Celery, and Red Onion
I generally prefer quality tuna packed in oil for flavour, but you must still drain it impeccably before mixing. The tiny dice of celery and red onion provides essential texture and vital sharpness against the creamy mayo.
If you hate the harshness of raw onion, a trick I learned is to quick pickle the diced red onion in a teaspoon of vinegar for five minutes it really mellows it out beautifully.
Selecting the Perfect Cheese Blend (Sharpness vs. Melt)
I am a flavour purist, so Sharp Cheddar is completely non-negotiable for the flavour punch that makes this sandwich sing. But Cheddar needs help melting quickly and uniformly. That is why we bring in a melting hero like Provolone or Monterey Jack to ensure the interior is lava like.
| Ingredient | Recommended Substitute |
|---|---|
| Canned Tuna | Canned salmon or flaked, cooked chicken breast. |
| Sharp Cheddar | Swiss or Gruyère (great melt, strong flavour). |
| Mayonnaise | Plain Greek yogurt mixed with a little olive oil. |
| Sourdough Bread | Thick cut Texas toast or hearty Rye bread. |
Healthy Swaps: Mayonnaise Alternatives and dairy-free Options
If you are skipping the dairy, use a high-quality vegan butter spread for coating the bread; it crisps up just as well. For the filling, swap the mayo for plain Greek yogurt or even hummus for an earthy alternative. If you want a truly creamy, healthy filling option, check out my recipe for a NoMayo Tuna Melt: Healthy Creamy Classic (Ready in 20 Minutes) .
Assembly and Execution: How to Griddle Your Tuna Melt to Glory

Phase I: Preparing the 'Zingy' Tuna Salad Filling
Don't forget that crucial half teaspoon of lemon juice; it brightens everything up and prevents the tuna salad from tasting heavy or flat. Mix all the ingredients gently until just combined. We want texture, not tuna paste!
Phase II: Layering and Proportions for Stability
This is where I messed up so many times as a beginner, resulting in fillings that fell out. Do not overfill the sandwich. You must use the cheese as a bottom and top shield, stabilizing the wet filling. It goes: Bread, Cheese, Tuna, More Cheese, Bread.
It's like building a perfect tuna filling cocoon.
Phase III: The Low and Slow Griddle Technique (Crucial for the melt)
Heat the pan or griddle first, then immediately turn the heat down to medium low before adding the sandwich. Low heat, please! Cook the first side until you see the cheese starting to ooze out from the bottom and create a crust around the edges.
That ooze is your signal that the internal temperature is finally hot enough.
Crucial Chef’s Note: Press gently but firmly with a spatula while the sandwich cooks on both sides. This helps flatten the filling slightly and maximizes the bread's contact with the hot pan, guaranteeing an even golden crust and better, faster melting inside.
Troubleshooting the Griddle: Common Mistakes and Expert Tips
Preventing the Soggy Bottom Syndrome
Soggy bottoms happen for two main reasons: wet tuna or insufficient butter coverage on the bread. The fix is simple: press the tuna hard to drain the liquid, and ensure your bread is thick and coated fully in softened butter to create a perfect moisture barrier against the filling.
The Temperature Rule: Ensuring Fully Melted Cheese Inside
If your bread is dark brown or burnt and your cheese is still stubbornly cold or chalky, your heat setting was much too high. Dial it way back. If you are truly impatient, throw a lid or a small bowl over the skillet for the last two minutes the trapped steam helps melt the cheese without incinerating the bread exterior.
Achieving a Crisp Exterior Every Time (Butter vs. Mayo Debate)
While some home cooks swear by slathering the outside of the bread with mayonnaise instead of butter, I find butter yields a deeper, nuttier flavour and a more beautifully consistent, golden crisp. Use soft, room temperature butter and spread it meticulously edge-to-edge.
It's the only way to achieve true griddled perfection, trust me on this.
Preparation & Preservation: Storing Tuna Salad and Melts
Can You Make Tuna Salad Ahead? Shelf Life Guidelines
Absolutely! Tuna salad is a fantastic meal prep component. Kept properly sealed in an airtight container, the filling is perfectly good in the fridge for 3 to 4 days. This makes lunchtime assembly incredibly fast. Just remember: only assemble the sandwich immediately before you are ready to cook and serve it.
Best Methods for Reheating a Cold Tuna Melt
Never, ever microwave a cold tuna melt; that instantly turns the bread into sad, chewy mush. The best way to revive the crispness is to use your oven or, better yet, the air fryer.
Wrap the cold melt loosely in foil to keep the cheese moist and heat at 350°F (175°C) for about 5 to 7 minutes. For maximum crunch, remove the foil for the final minute of heating.
Perfect Pairings: What to Serve Alongside Your Classic Tuna Melt
Classic Sidekicks: Pickle Spears and Chips
The ultimate pairing, bar none, is the giant dill pickle spear. That bright, vinegary acidity cuts through the richness of the cheese and mayo beautifully. Don't forget the crunchy potato chips Salt and Vinegar are the superior choice, fight me on it!
If you're feeling ambitious and looking for real comfort, a steaming mug of classic tomato soup makes this meal truly legendary.

Recipe FAQs
Why does my tuna melt often turn out soggy instead of crunchy?
Sogginess is usually caused by cooking the sandwich over heat that is too high, or by using a tuna salad that is overly wet. Ensure you drain your tuna thoroughly before mixing and use medium low heat during griddling to allow the bread to crisp slowly while the cheese melts.
Can I prepare the tuna salad mix ahead of time?
Absolutely. The tuna salad mixture can be prepared and stored in an airtight container in the refrigerator for up to 3 days. However, do not assemble the full sandwich until you are ready to cook it, as pre-assembled sandwiches will soak the bread and become undesirably soggy.
What is the best cheese blend for the perfect melt?
A combination of cheeses works best for achieving both deep flavor and desirable texture. Sharp cheddar provides the necessary zing and depth, while a softer, gooier cheese like Monterey Jack or Gruyère ensures that stringy, high-quality melt.
Avoid low-fat or highly processed cheeses, as they tend to separate when heated.
I don't like mayonnaise. What is a good substitute for the tuna salad?
If avoiding traditional mayo, you can use Greek yogurt or sour cream for creaminess, although this will result in a tangier flavor profile. For a completely different texture, try mashing half an avocado into the tuna mix, which provides healthy fats and a smooth, rich binder.
My tuna salad is too dry and crumbly. How do I fix it?
To remedy a dry mix, simply incorporate another tablespoon of mayonnaise or a splash of fresh lemon juice until it reaches your desired creamy consistency. If you used tuna packed in water, ensure you haven't squeezed out too much moisture, and add liquid slowly to avoid overdoing it.
Should I use tuna packed in oil or water?
For the richest flavor and texture, high-quality tuna packed in olive oil is usually preferred, as it creates a moister starting point for the salad. If you choose tuna packed in water, you must ensure it is drained extremely well before mixing, perhaps even pressing it gently, to prevent a watery final result.
Can I bake or air fry the tuna melt instead of griddling?
While griddling in butter yields the most traditional crisp crust, you can bake or air fry the assembled sandwich at 375°F (190°C) for about 8 10 minutes. This will melt the cheese effectively, but the buttery flavor and heavy crispness achieved on a griddle will be slightly less pronounced.
Proper Griddled Tuna Melt Sandwich
Ingredients:
Instructions:
Nutrition Facts:
| Calories | 525 kcal |
|---|---|
| Fat | 35 g |
| Fiber | 2 g |
