Baked Teriyaki Salmon: the Ultimate Sticky Savoury Weeknight Hero
- The Ultimate Sticky & Savoury Baked Teriyaki Salmon: An Overview
- Mastering the Glaze: The Science Behind Perfect Caramelization
- Essential Ingredients for the Best Baked Teriyaki Salmon
- Common Ingredient Swaps and Dietary Adjustments
- How to Make Perfect Baked Teriyaki Salmon (Step-by-Step Guide)
- Troubleshooting and Chef’s Tips for Flawless Baked Salmon
- What to Serve Alongside Teriyaki Salmon (Complete Pairings)
- Storing Leftovers and Reheating Baked Teriyaki Salmon
- Recipe FAQs
- 📝 Recipe Card
The Ultimate Sticky & Savoury Baked Teriyaki Salmon: An Overview
Oh my gosh, you have to smell this. The second that homemade teriyaki glaze hits the oven, your entire house transforms into a warm, sticky, savoury paradise. It’s that deep, rich smell of fermented soy and caramelised brown sugar that makes your mouth instantly water.
That perfect Baked Teriyaki Salmon fillet is waiting.
This truly is the definition of a lifesaver weeknight dinner. We're talking maximum flavour for minimal effort; seriously, this is an Easy Teriyaki Salmon Baked solution that beats delivery every single time.
It's also shockingly cost effective, using simple pantry staples and a decent piece of salmon.
Forget everything you thought you knew about rubbery, dry baked fish, because we’re achieving restaurant quality results in less than half an hour. We are going to master that deep, gorgeous caramelisation that makes this Baked Teriyaki Salmon Fillet Recipe truly unforgettable.
Mastering the Glaze: The Science Behind Perfect Caramelization
Why Homemade Teriyaki Beats the store-bought Bottle
I'm going to be blunt: most bottled teriyaki is thin, overly sweet, and tastes strangely metallic. When you make it yourself, you control the balance of salt, acid, and sugar, resulting in a complex flavour profile.
We use fresh ginger and garlic, which adds an incredible depth that the processed stuff just can't touch.
The second key is concentration. By simmering the sauce down slightly and adding a cornflour slurry, we create a true glaze —thick enough to cling to the salmon. This prevents the sauce from running off the fish and puddling on the pan during baking.
How Long Does This Weeknight Meal Truly Take?
The beauty of baking salmon is the speed. The active cooking time is genuinely only 12 to 15 minutes in the oven. Even if you factor in the 15 minute marinating step which I highly recommend for depth you're still looking at dinner ready in under 45 minutes.
This makes it a stellar, reliable choice for busy evenings.
The Maillard Reaction on Salmon Skin Explained
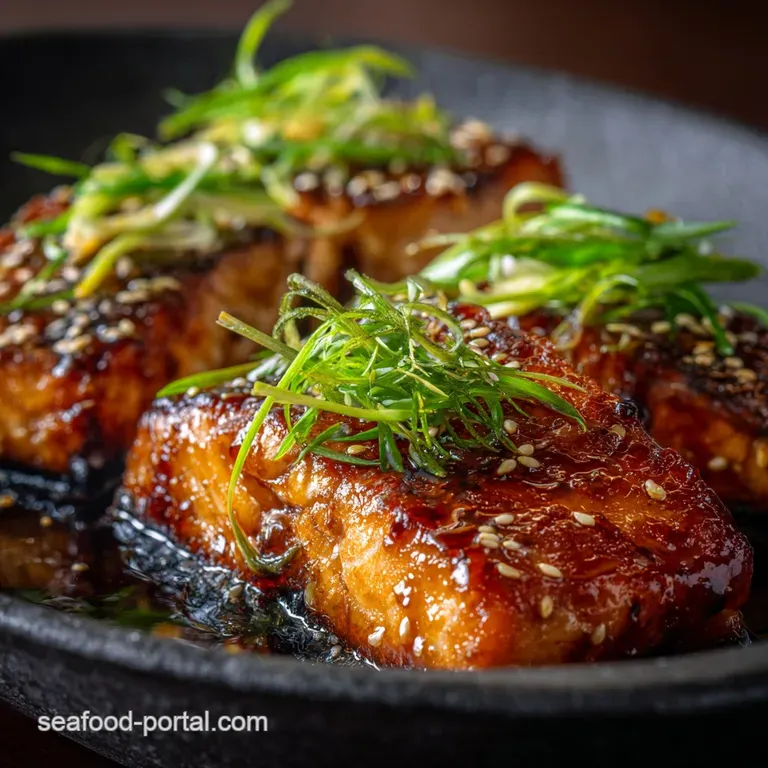
The magical finish we achieve under the broiler is all thanks to the Maillard reaction and caramelisation. Maillard is the process where amino acids and sugars rearrange under heat, creating hundreds of new flavour compounds.
Since our glaze is rich in sugar (from the brown sugar and mirin), when we hit it with intense heat from the broiler, the sugars caramelise rapidly. This is how you get that deep, glossy, sticky crust.
It’s the difference between merely baked fish and truly show stopping Teriyaki Salmon Baked to perfection.
Balancing Umami, Sweet, and Salty Notes in the Sauce
Teriyaki literally translates to "glaze and shine" (teri = shine, yaki = grill/broil). The perfect glaze needs balance. Soy sauce brings the salt and umami, brown sugar and mirin deliver the sweetness, and the sake (or rice vinegar) adds subtle acidity to cut through the richness of the salmon.
Trust me, every element is essential for that perfect harmony.
Essential Ingredients for the Best Baked Teriyaki Salmon
| Ingredient | Role | Why it Matters |
|---|---|---|
| Low-Sodium Soy Sauce | Salt & Umami | Essential flavour foundation; low-sodium prevents overkill. |
| Mirin | Sweetener & Flavour | Adds complex sweetness and subtle tang; don't skip it! |
| Brown Sugar | Caramelization | Provides deep molasses notes and ensures a rich, dark glaze. |
| Salmon Fillets | Main Protein | Needs to be thick (at least 1 inch) to stay moist during baking. |
Common Ingredient Swaps and Dietary Adjustments
Choosing Quality Salmon Fillets (Skin-On vs. Skinless)
I prefer skin-on salmon for baking, always. Why? The skin acts as a protective barrier, preventing the delicate flesh from drying out against the hot pan. If you use skin-on, always place it skin side down on the parchment paper.
If you can only find skinless, that’s fine, just keep a closer eye on the internal temperature.
Building the Homemade Teriyaki Base (Soy Sauce, Mirin, Sake Notes)
If you don't keep Japanese cooking wine (Sake) on hand, don't panic; just substitute it with a splash of water or skip it entirely. Mirin, however, is crucial; if you absolutely cannot find it, you can substitute with dry sherry mixed with a small pinch of sugar.
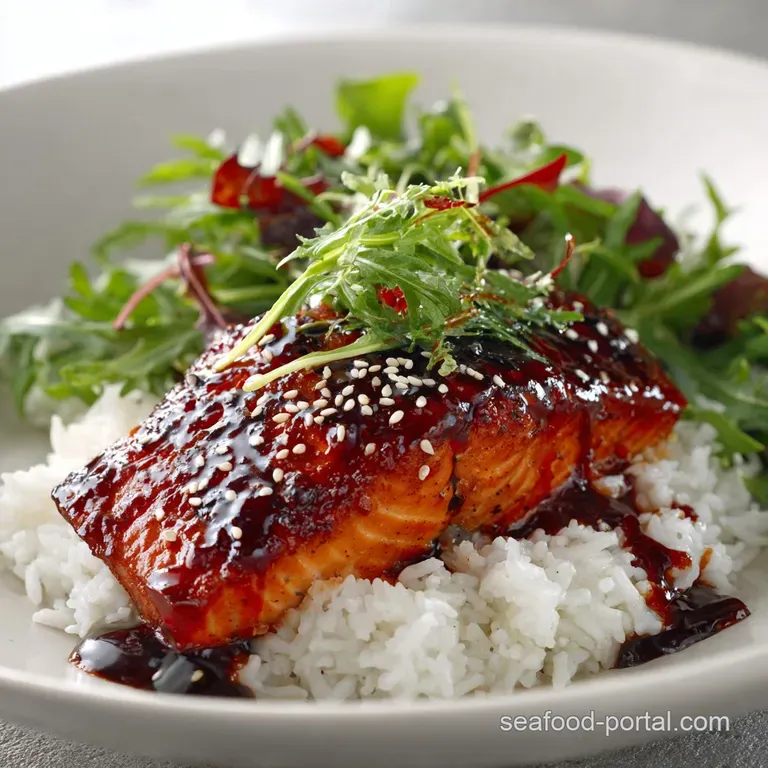
Optional Garnishes and Fresh Additions (Sesame Seeds, Spring Onion)
These garnishes aren't just for looks; they add texture. Toasted sesame seeds bring a nutty crunch, and sliced spring onions (scallions) provide a sharp, fresh bite that cuts through the richness of the glaze and fish. You can also throw a few tiny pieces of diced red chilli on top for a little colour and heat.
gluten-free and Low-Sodium Alternatives for the Sauce
If you are cooking for someone who is gluten-free, Tamari is your best friend here. It swaps 1:1 for the soy sauce and provides the same deep umami flavour. If sodium is a concern, use coconut aminos, but know that it’s inherently sweeter, so you might need to dial back the added brown sugar a touch.
Substituting Sugar and Thickeners (Honey vs. Cornstarch)
You can absolutely swap the brown sugar for honey or maple syrup if that’s what you prefer, but be warned: they caramelise much faster. Watch the broiler closely if you use them! And for the cornstarch slurry? That tiny step is non-negotiable for achieving that sticky glaze consistency.
Chef's Note: I once tried to thicken the sauce using flour, and it turned out cloudy and dull. Cornstarch is key for a clear, glossy, shinny glaze (remember the 'teri'!).
How to Make Perfect Baked Teriyaki Salmon (step-by-step Guide)
Step 1: Preparing and Simmering the Simple Teriyaki Glaze
Grab your saucepan and whisk together the soy sauce, mirin, sugar, garlic, and ginger. Bring that mix to a gentle simmer over medium heat until the sugar fully dissolves. Once simmering, whisk in your cornflour slurry that's just cornstarch mixed with a tablespoon of cold water.
Cook for only about 30 seconds until it thickens like syrup. Immediately remove it from the heat and pour 1/3 of the fresh glaze into a small separate bowl. This is your safe basting reserve.
Step 2: Marinating and Prepping the Salmon for Baking
First, pat your salmon fillets bone dry with paper towels; this is a non-negotiable step for great texture! Season lightly with salt and pepper. Place the salmon in a dish and pour the remaining 2/3 of the glaze over them. Let them sit at room temperature for 15 minutes.
Do not marinate for longer than 30 minutes, or the salt in the soy sauce starts curing the fish, which results in a strange, chewy texture.
Step 3: Oven Baking Time and Temperature Guide
Preheat the oven to 200°C / 400°F. Line your baking tray with parchment paper and lightly oil it; this prevents sticking when the glaze inevitably drips. Place the salmon fillets on the tray, discarding any leftover marinade from the bowl we don't want to use that raw marinade.
Bake the salmon for 8– 10 minutes initially.
When to Apply the Final Coat of Sauce
After that initial 8 10 minute bake, pull the tray out. This is the moment for your reserved, unused glaze! Brush the cooked (but not finished) fish liberally with the fresh glaze.
Monitoring the Broiler to Avoid Burning the Glaze
Switch your oven to the highest Grill (Broil) setting. Move the tray up so the salmon is about 6 to 8 inches from the heat source. Grill for 2– 4 minutes. You must stand there and watch it.
The glaze will bubble and caramelise quickly, giving you that beautiful, sticky finish.
Troubleshooting and Chef’s Tips for Flawless Baked Salmon
Testing for Doneness: The Internal Temperature and Flake Test
The only way to guarantee perfectly moist fish is with a thermometer. Pull the salmon out as soon as the internal temperature hits 60°C (140°F). It will continue cooking as it rests, bringing it up to the safe 63°C (145°F) without drying out.
If you don't have a thermometer, poke the thickest part with a fork; the centre should just begin to flake easily.
Preventing Dryness: Why You Should Never Overbake
If you bake your salmon too long, the delicate protein fibres tighten up, squeezing out all the moisture and fat. This results in that sad, chalky texture we all hate. Seriously, pulling it early and letting it rest is the single best tip I can give you. If you need inspiration for moist, flavourful fish, check out my Lemon Dill Baked Salmon Recipe: Foolproof and Ready in 30 Minutes — it’s another fast favourite.
Solving the 'Too Salty' Teriyaki Glaze Problem
Did you accidentally use regular instead of low-sodium soy sauce? Or did you reduce the glaze too much? If your glaze tastes overwhelmingly salty, just whisk in 1 tablespoon of water or, better yet, a teaspoon of rice vinegar and a pinch more sugar.
The acidity and sweetness will quickly balance out the intense saltiness.
What to Serve Alongside Teriyaki Salmon (Complete Pairings)
Best Rice and Noodle Pairings (Jasmine vs. Soba)
Jasmine rice is fluffy and fragrant, making it a perfect neutral canvas for the sticky glaze. Soba noodles (buckwheat noodles) are also fantastic, offering a chewy, nutty contrast. Honestly, steamed rice is usually the winner, as it soaks up all the glorious excess sauce.
Quick Side Vegetable Recommendations
I love serving this Baked Teriyaki Salmon and Broccoli because it’s so easy to cook the broccoli right alongside the fish. Toss blanched broccoli florets in a little sesame oil and salt, and place them on the pan next to the fillets for the last five minutes of baking.
Asparagus or green beans also work wonderfully and quickly.
Storing Leftovers and Reheating Baked Teriyaki Salmon
Safe Storage Times in the Refrigerator
Leftover baked salmon, if stored promptly in an airtight container, will last safely in the refrigerator for up to 3 days. I find it’s best enjoyed the next day, sliced cold over a fresh salad.
Reheating to Preserve Moisture
Reheating baked salmon can be tricky because it dries out so fast. Never use the microwave! Instead, preheat your oven or toaster oven to 135°C (275°F). Place the salmon on a lined baking tray and reheat for about 8– 10 minutes until warmed through.
The low, slow heat prevents the proteins from seizing up again. If you have some leftover teriyaki glaze, brush a little more on before reheating to lock in extra moisture.
If you happen to have a little too much salmon, don't forget you can always turn those leftovers into something new! A flaked teriyaki salmon spread is surprisingly tasty, similar to my zesty Salmon Spread Recipe: Zesty Smoked Salmon Pâté Ready in 60 Minutes .

Recipe FAQs
Why did my Baked Teriyaki Salmon turn out dry or rubbery?
Salmon is often overcooked when baked past 145°F (63°C), which causes it to lose moisture rapidly. To prevent this, check the fillet at the thickest part; it should flake easily but still look slightly translucent in the center when removed from the oven.
Remember that residual heat (carryover cooking) will finish the process outside the oven.
My homemade teriyaki glaze isn't very sticky or thick. What went wrong?
Ensure you allowed the sauce to simmer sufficiently on the stovetop to reduce its volume by about one-third before baking. If it's still thin, whisk in a small cornstarch slurry (1 tsp cornstarch mixed with 1 tsp cold water) and bring it back to a quick boil to activate the thickening agent.
Brushing on more sauce and utilizing the broiler in the final minutes also helps achieve that desirable caramelized stickiness.
How do I know when the Baked Teriyaki Salmon is fully cooked?
The USDA recommends an internal temperature of 145°F (63°C) for safe consumption, measured at the thickest part of the fillet. Visually, the salmon should transition from translucent red/pink to opaque pink, and the muscle fibers should separate easily when gently poked with a fork.
Can I cook this recipe using an air fryer instead of the oven?
Yes, the air fryer works exceptionally well for Teriyaki Salmon, often resulting in quicker cooking and crispier edges. Preheat the air fryer to 400°F (200°C), cook the salmon for 8-12 minutes depending on thickness, and apply the glaze generously in the final 3 minutes for maximum caramelization.
Should I leave the skin on or take it off before baking?
It is highly recommended to leave the skin on, as it acts as a natural barrier between the heat source and the delicate flesh of the fish. This method helps the salmon retain moisture during the high heat baking process and prevents the fillet from sticking to the baking dish.
How long can I safely store leftover Teriyaki Salmon?
Leftover baked salmon should be cooled quickly and stored in an airtight container in the refrigerator for up to 3 days. Reheat leftovers gently in the oven or air fryer at a low temperature (around 300°F/150°C) to maintain moisture and prevent further drying.
Can I use something other than traditional mirin or sake in the teriyaki sauce?
Mirin provides essential sweetness and depth, while sake adds complex umami flavor to the glaze. For a simple substitution, you can replace the mirin with white grape juice and a dash of rice vinegar, or use a dry sherry if you accept a slight flavor deviation from the traditional taste profile.
Easy Sticky Baked Teriyaki Salmon

Ingredients:
Instructions:
Nutrition Facts:
| Calories | 439 kcal |
|---|---|
| Protein | 43.9 g |
| Fat | 16.2 g |
| Carbs | 26.1 g |
