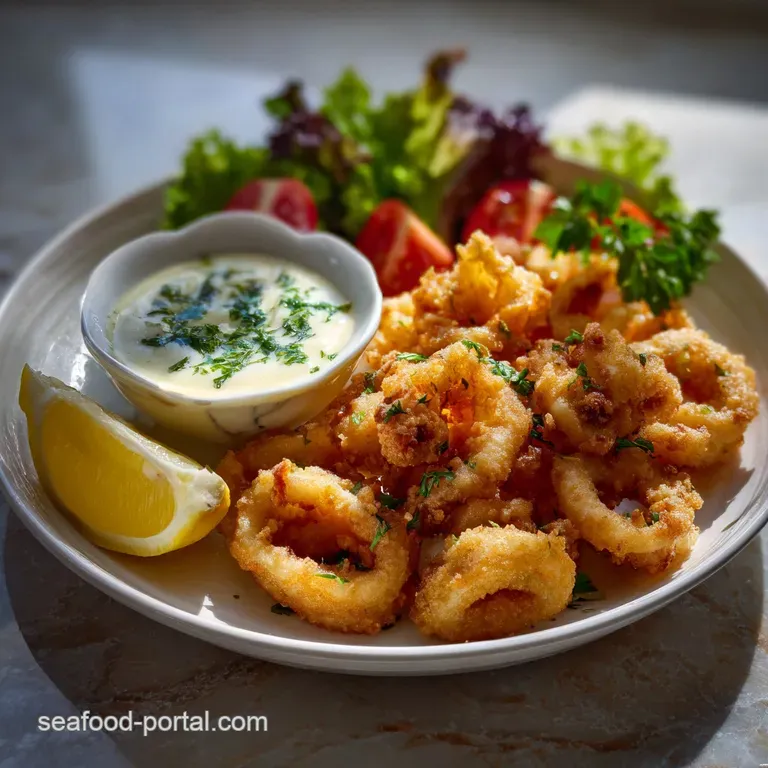
Easy Fried Calamari with Garlic Aioli
- Time: Active 20 minutes, Passive 10 minutes, Total 30 minutes
- Flavor/Texture Hook: Shatter crisp exterior with tender, velvety squid and a pungent, creamy dip
- Perfect for: Impressive weekend appetizers or a quick seafood dinner
- Mastering Easy Fried Calamari with Garlic Aioli
- Why This Simple Frying Method Succeeds
- The Science of Ingredient Selection
- Selecting Your Culinary Essentials
- Minimal Tools for Maximum Results
- Bringing These Crisp Elements Together
- Avoid These Common Frying Pitfalls
- Creative Twists for Your Seafood
- Storing and Repurposing Your Leftovers
- What to Serve With Fried Squid
- Solving Your Frying and Texture Issues
- Recipe FAQs
- 📝 Recipe Card
Mastering Easy Fried Calamari with Garlic Aioli
Ever sat at a seaside bistro, ordered the calamari, and ended up chewing on what felt like rubber bands wrapped in soggy cardboard? It is a heartbreak we have all faced. Making restaurant quality seafood at home often feels intimidating, but I promise you it is simpler than it looks.
We are going to solve the two biggest problems: toughness and grease.
The secret lies in a quick soak and a specific temperature. Most people skip the buttermilk, which is a massive mistake. That slight acidity is what transforms the squid from bouncy to buttery. And let us be honest, the dip is just as important as the squid.
This isn't some store-bought mayo with a bit of garlic powder stirred in. We are making a real, emulsified sauce from scratch that will make you want to lick the bowl.
Right then, let's crack on. This is about to become your go to "wow" dish. It is fast, it is messy in the best way possible, and it tastes like a Mediterranean vacation. Trust me on this, once you nail the cornstarch ratio, you will never order this at a restaurant again.
Why This Simple Frying Method Succeeds
Success in frying isn't about luck, it is about chemistry and heat management. When we drop that squid into the oil, we are looking for an immediate reaction that seals the moisture inside while creating a rigid structure outside.
- Proteolysis: The lactic acid in the 1 cup buttermilk gently breaks down the long protein chains in the squid, ensuring a tender bite rather than a rubbery one.
- Starch Gelatinization: Using 1/2 cup cornstarch alongside the 1 cup all purpose flour creates a lower gluten coating that absorbs less oil and stays crispier for longer.
- Emulsification: Whisking the 1/2 cup extra virgin olive oil into the egg yolks and lemon juice creates a stable fat in-water emulsion for a velvety sauce.
- Flash Evaporation: The high heat of the 1 quart vegetable oil (185°C) causes surface moisture to turn to steam instantly, pushing the coating away from the meat to create air pockets.
The Science of Better Crisp
When you use only flour, the gluten can make the crust chewy. By introducing cornstarch, we interfere with that gluten network. This results in a "shatter" effect when you bite down. It’s the difference between a soft breading and a crisp shell.
Why The Soak Matters
Squid is almost entirely muscle. Without the 20 minutes in buttermilk, those muscles tighten the moment they hit the heat. The soak acts as a pre treatment, relaxing the fibers so they stay succulent during the intense heat of the deep fry.
| Factor | Fast Method (This Recipe) | Classic Method |
|---|---|---|
| Preparation | 20 minute buttermilk soak | Overnight milk marination |
| Coating | Flour and cornstarch blend | Plain flour or heavy batter |
| Texture | Shatter crisp and light | Often thick or bread like |
The Science of Ingredient Selection
Choosing the right components is the difference between a "good" meal and one people talk about for weeks. I always reach for the freshest squid I can find, usually from a local fishmonger who can tell me exactly when it came off the boat.
| Ingredient | Science Role | Pro Secret |
|---|---|---|
| Fresh Squid | Structural Protein | Keep tentacles whole for extra surface area and crunch. |
| Cornstarch | Moisture Barrier | Increases the "shatter" factor by preventing gluten development. |
| Extra Virgin Olive Oil | Flavor Carrier | Use a peppery oil to cut through the richness of the egg yolks. |
| Garlic Paste | Aromatics | Microplane the garlic into a paste for a smoother aioli texture. |
Selecting Your Culinary Essentials
You don't need a pantry full of exotic items for this. Most of these are likely sitting in your kitchen right now. If you're missing something, don't panic, but don't skip the 3 cloves garlic. That’s the soul of the sauce.
- 1 lb fresh squid: Cleaned, tubes cut into 1/2 inch rings and tentacles kept whole. Why this? Freshness prevents that "fishy" odor and ensures the best texture.
- 1 cup buttermilk: Why this? The acidity tenderizes the squid meat effectively. (Substitute: 1 cup milk + 1 tbsp lemon juice)
- 1 cup all purpose flour: Why this? Provides the bulk and structure for the crispy coating. (Substitute: Cup for-cup gluten-free flour)
- 1/2 cup cornstarch: Why this? Essential for a light, non greasy, and very crispy finish. (Substitute: Potato starch or arrowroot)
- 1 tsp smoked paprika: Why this? Adds a subtle warmth and a beautiful golden hue. (Substitute: Sweet paprika or cayenne)
- 1 tsp sea salt: Why this? Enhances all other flavors; use Diamond Crystal Kosher Salt if available. (Substitute: Table salt, use half the amount)
- 1/2 tsp black pepper: Why this? Provides a foundational bite to the dredge. (Substitute: White pepper for less visual speckling)
- 1 quart vegetable oil: Why this? High smoke point is necessary for safe deep frying. (Substitute: Canola or grapeseed oil)
- 2 large egg yolks: Why this? The lecithin in yolks acts as the emulsifier for the aioli. (Substitute: 1/4 cup aquafaba for vegan ish dip)
- 3 cloves garlic: Why this? Provides the pungent, aromatic base for the sauce. (Substitute: 1 tsp garlic confit for a milder taste)
- 1 tbsp fresh lemon juice: Why this? Brightens the aioli and helps stabilize the emulsion. (Substitute: White wine vinegar)
- 1/2 cup extra virgin olive oil: Why this? Gives the aioli its rich, luxurious mouthfeel. (Substitute: Neutral oil for a lighter flavor)
- 1 pinch kosher salt: Why this? Seasons the aioli perfectly. (Substitute: Fine sea salt)
Minimal Tools for Maximum Results
I am a big fan of using what you have. You don't need a fancy electric deep fryer to get professional results. In fact, I prefer using a Lodge Cast Iron Skillet or a heavy bottomed Dutch oven.
They hold heat much better than thin stainless steel, which means your oil temperature won't plummet the second you add the squid.
You will also want a spider strainer or a slotted spoon. This allows you to lift the calamari out while leaving the oil behind. If you use tongs, you risk knocking off the delicate crust we worked so hard to build.
For the aioli, a simple balloon whisk and a steady hand are all you need, though a small food processor can save your forearm some work if you're doubling the batch.
If you enjoy this style of quick seafood, you might also like my 5Minute Spicy Aioli recipe which works brilliantly as an alternative dip for this dish.
Bringing These Crisp Elements Together
1. The Tenderizing Soak
Place the 1 lb fresh squid rings and tentacles into a medium bowl and pour over the 1 cup buttermilk. Note: Ensure all pieces are submerged to allow the acid to work evenly on the proteins. Let this sit for 20 minutes at room temperature.
2. Crafting the Homemade Aioli Sauce
In a clean glass bowl, whisk the 2 large egg yolks, 3 cloves garlic (paste), 1 tbsp fresh lemon juice, and 1 pinch kosher salt until pale. Slowly, and I mean drop by drop at first, whisk in the 1/2 cup extra virgin olive oil.
Note: This slow addition is vital to build the emulsion; if you go too fast, the sauce will break and become oily.
3. The Dry Dredge
In a large Ziploc bag or shallow dish, whisk together the 1 cup all purpose flour, 1/2 cup cornstarch, 1 tsp smoked paprika, 1 tsp sea salt, and 1/2 tsp black pepper. Note: Using a bag allows you to shake the squid for a more even, "nubbly" coating that catches more oil for crunch.
4. Heating the Oil
Pour the 1 quart vegetable oil into your heavy pot and heat over medium high. Use a thermometer to reach 185°C (365°F). Note: If the oil isn't hot enough, the calamari will absorb the fat and become heavy; if it's too hot, the outside will burn before the inside is cooked.
5. Coating the Squid
Remove a handful of squid from the buttermilk, letting the excess drip off. Drop them into the flour mixture and shake vigorously until every nook and cranny is coated. Note: Do this in batches to prevent the flour from becoming a gummy paste.
6. The High Heat Flash
Carefully drop the coated rings into the hot oil. Fry for 2 minutes until they are a light golden brown and sizzle loudly. Note: Overcooking is the enemy here; squid only needs a moment to become opaque and tender.
7. Draining and Resting
Use a spider strainer to lift the squid onto a wire rack set over a baking sheet. Note: A wire rack is better than paper towels because it allows air to circulate, preventing the bottom from steaming and getting soggy.
8. The Finishing Touch
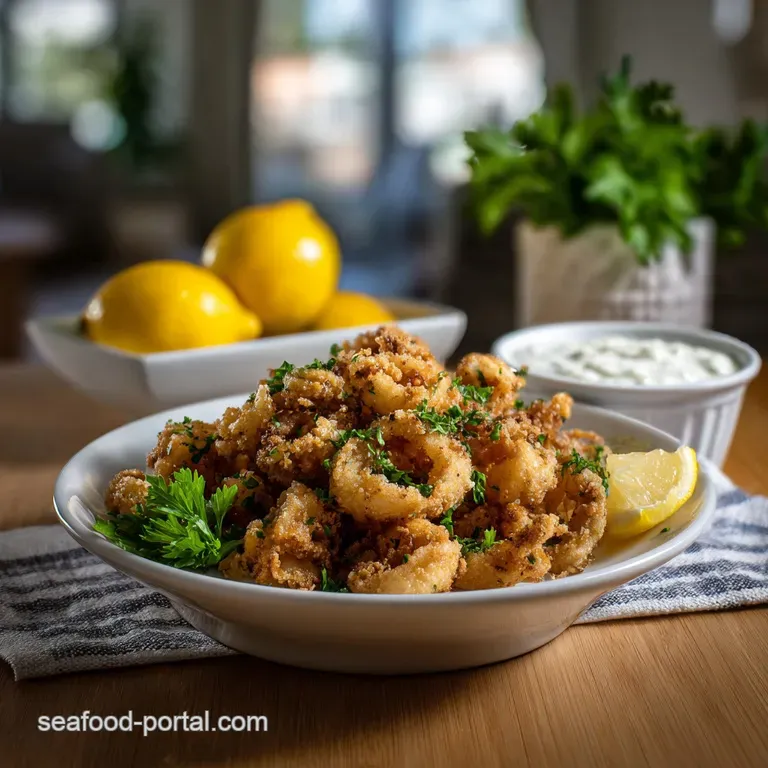
Immediately sprinkle with a tiny bit more sea salt while the oil is still wet on the surface. Serve immediately with a generous dollop of the garlic aioli and a few lemon wedges.
Avoid These Common Frying Pitfalls
Frying can go sideways quickly if you aren't paying attention. The most common mistake is crowding the pan. If you put too much squid in at once, the oil temperature drops by 20 or 30 degrees. Instead of frying, the squid starts to "stew" in the oil. It’s a recipe for disaster.
Chef's Note: If you find your oil is foaming excessively, it usually means there is too much moisture on the squid. Shake off as much buttermilk as possible before dredging. Also, try freezing your butter for 10 minutes before grating it into other recipes, but for this one, the secret is keeping the squid cold until the very last second.
Maintaining Oil Temperature
Keep your thermometer in the pot the whole time. Between batches, wait a minute or two for the oil to climb back up to 185°C. It feels like a long time when you're hungry, but it is the difference between oily squid and the best calamari rings you've ever had.
| Problem | Cause | Fix |
|---|---|---|
| Coating falling off | Squid was too wet | Shake off excess buttermilk thoroughly before dredging. |
| Rubbery texture | Overcooked | Reduce frying time to exactly 2 minutes or until just golden. |
| Soggy crust | Oil too cold | Ensure oil hits 185°C before adding the next batch. |
Creative Twists for Your Seafood
While I love the classic Garlic Aioli, there are so many ways to switch this up. You can easily adapt this recipe to suit different moods or cuisines. For instance, if you're craving something heartier, this crispy squid actually makes a fantastic topping for a Homemade Shrimp Alfredo recipe.
For a Spicy Kick
Add 1 tsp of cayenne pepper to the dry dredge and stir a tablespoon of Sriracha into your finished aioli. The heat pairs beautifully with the cooling lemon.
For a Citrus Herb Twist
Finely mince fresh parsley and zest a whole lemon into the flour mixture. It adds a freshness that cuts right through the fried richness.
For a gluten-free Alternative
Replace the all purpose flour with a high-quality gluten-free blend. Because we already use a large amount of cornstarch, the texture remains remarkably similar to the original.
Storing and Repurposing Your Leftovers
Fried food is always best eaten within minutes of leaving the oil. However, life happens. If you find yourself with leftovers, don't just toss them.
- Storage: Keep the calamari in an airtight container in the fridge for up to 2 days. Keep the aioli in a separate jar for up to 4 days.
- Reheating: Never use a microwave. It will turn the squid into erasers. Instead, put them in an air fryer at 190°C for 3 minutes or in a hot oven (200°C) for 5 minutes until they sizzle again.
- Zero Waste: If the rings have lost their crunch, chop them up and toss them into a seafood pasta sauce or a spicy tomato arrabbiata. The breading will help thicken the sauce and add a deep, toasted flavor.
What to Serve With Fried Squid
I usually serve this as a standalone appetizer, but it can easily become a full meal. A crisp, bitter green salad with a sharp vinaigrette is the perfect partner. The acidity of the dressing cleanses the palate between bites of rich, fried seafood.
If you want to lean into the Italian theme, a side of The Soy Sauce recipe might sound strange, but the salty umami of pan-fried noodles actually complements the sweetness of the squid quite well. Or, keep it traditional with some crusty sourdough bread to mop up any leftover garlic aioli.
Solving Your Frying and Texture Issues
Why Your Squid Is Rubbery
This is almost always due to overcooking. Squid follows a "fast or slow" rule. You either cook it for 2 minutes or 2 hours. Anything in between results in a rubbery texture. Stick to the 2 minute flash fry and you'll be fine.
Why Your Aioli Broke
If your sauce looks like curdled milk, the oil was added too quickly. To fix it, put a fresh egg yolk in a clean bowl and very slowly whisk the broken sauce into it. The new yolk will help re emulsify the mixture.
Scaling the Recipe
- To double it: Use 2 lbs of squid. You don't need to double the oil, just work in more batches. For the spices, only increase them by 1.5x to avoid over salting.
- To halve it: Use 1/2 lb of squid. Beat one egg yolk, then use about half of it for the aioli. Reduce the frying oil to 2 cups in a smaller pot.
Frying Myths Debunked
"Searing or frying seals in juices." This is a total myth. Moisture loss happens the moment heat is applied. The reason we fry is for the Maillard reaction that beautiful brown crust that provides flavor and texture.
"You need a deep fryer for good calamari." Absolutely not. A heavy skillet actually provides more surface area and better heat retention for small batches, making it superior for home cooks.
"Frozen squid is inferior." Honestly, unless you live on the coast, high-quality frozen squid is often "fresher" than the "fresh" squid at the supermarket because it was flash frozen on the boat. Just thaw it completely and pat it dry before the buttermilk soak.
Quick Decision Guide: If you want a thicker crust, dip the squid in flour, then back in buttermilk, then in flour again (Double Dredge). If you want a lighter bite, use 100% cornstarch and skip the all purpose flour entirely.
If you want a punchier sauce, roast the garlic cloves in the oven before mashing them into the aioli.
Enjoy the sizzle and the shatter of this Easy Fried Calamari with Garlic Aioli. It's a simple joy that proves you don't need a professional kitchen to make world class seafood. Just keep that oil hot and the lemon wedges handy!

Recipe FAQs
Can I use frozen calamari instead of fresh for this recipe?
Yes, provided you thaw it fully. high-quality frozen squid is often fresher than supermarket "fresh" options; the critical step is to thaw it completely and pat it extremely dry before soaking in the buttermilk.
What is the secret to preventing the calamari from becoming tough and rubbery?
A short, acidic soak is essential. The 20-minute buttermilk bath tenderizes the muscle fibers through light proteolysis, ensuring the squid stays succulent when it hits the high heat of the oil.
Why do I need both flour and cornstarch in the dredging mix?
Cornstarch creates a shatter crisp texture. Using only flour allows too much gluten development, leading to chewiness; the starch interferes with this, resulting in a lighter, crispier shell.
My aioli sauce keeps breaking and looking oily; how do I fix it?
You added the oil too quickly, breaking the emulsion. To save it, start with a fresh egg yolk in a clean bowl and slowly whisk your broken sauce mixture back into it, treating the new yolk as the stable base.
What is the ideal oil temperature for frying the calamari rings?
You must maintain 185°C (365°F). If the oil is too cool, the coating absorbs fat and becomes greasy; if it’s too hot, the outside burns before the inside cooks properly in the required 2 minutes.
How should I reheat leftover fried calamari so it stays crispy?
Never use the microwave; use high, dry heat. Place the leftovers in an air fryer at 190°C for 3 minutes, or in a very hot oven (200°C) for 5 minutes until you hear it sizzle again.
What can I serve alongside this crispy fried seafood?
A sharp, acidic salad is the best palate cleanser. If you enjoy perfecting the technique of quick frying for seafood, you might also appreciate the process in our recipe for The Best Homemade Fried Shrimp Po Boys Recipe Crispy Easy.
Easy Fried Calamari With Aioli

Ingredients:
Instructions:
Nutrition Facts:
| Calories | 688 kcal |
|---|---|
| Protein | 22.3 g |
| Fat | 46.5 g |
| Carbs | 41.2 g |
| Fiber | 1.4 g |
| Sugar | 1.1 g |
| Sodium | 645 mg |
