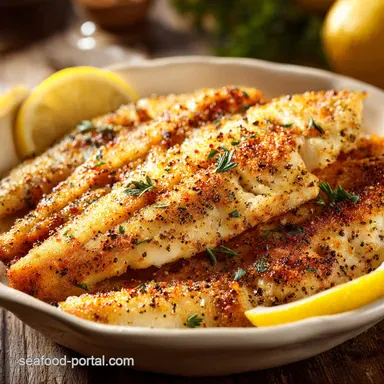
Crispy Pan Fried Tilapia with Lemon Pepper
- Time: 5 min active + 10 min cook = 15 minutes
- Flavor/Texture Hook: Zesty, mahogany colored crust with a velvety butter finish
- Perfect for: Busy weeknight dinners or beginner cooks who hate cleaning deep fryers
- Crispy Pan Fried Tilapia with Lemon Pepper
- Why the Crust Shatters
- Component Analysis
- Ingredients and Smart Swaps
- The Right Kitchen Tools
- Steps for Golden Fish
- Solving Common Pan Problems
- Troubleshooting Common Issues
- Easy Flavor Twists
- Adjustment Guidelines
- Kitchen Myths
- Storage and Waste Tips
- Best Side Dish Pairings
- Recipe FAQs
- 📝 Recipe Card
Crispy pan fried Tilapia with Lemon Pepper
I can't tell you how many times I've seen people pull fish out of a pan that looks more "boiled" than "fried." It happens when the fillets are too wet or the pan isn't hot enough, leaving you with a gummy, pale coating that just slides right off the fish.
It's a total mood killer when you're craving that specific, salty crunch.
This is the ultimate recipe for Crispy pan fried Tilapia with Lemon Pepper. We're fixing the sogginess by focusing on aggressive drying and a very thin dredge. You'll get a crust that actually holds onto the fish and a finish that tastes like it came from a bistro, but it only takes 15 minutes.
Right then, let's get into it. We're going for a result where the exterior shatters slightly when you bite into it, while the inside stays flaky and moist. Trust me on this, the secret isn't in the flour, it's in how you handle the moisture.
Why the Crust Shatters
To get that specific texture, we have to manage a few basic kitchen rules. It's less about being a pro and more about understanding how the pan treats the fish.
- Moisture Evaporation: Water is the enemy of crispiness. By patting the fish bone dry, the heat goes straight into searing the proteins rather than wasting energy evaporating surface water.
- Fat Synergy: Olive oil handles the high heat without burning, while butter adds the richness and helps the flour brown into that deep mahogany color.
- Dredge Thickness: A thin layer of flour creates a barrier that protects the fish and browns quickly. Too much flour creates a doughy "skin" that traps steam inside.
- Natural Release: When the proteins in the fish bond with the pan and then sear, they eventually "let go." If the fish sticks, it's usually because the crust hasn't fully formed yet.
| Approach | Fillet Thickness | Pan Temp | Sear Time | Best For |
|---|---|---|---|---|
| Fast | Thin (< 1cm) | High | 3 mins/side | Weeknight rush |
| Classic | Thick (> 1.5cm) | Medium High | 5 mins/side | Sunday dinner |
Component Analysis
Before we start, it's helpful to know what each ingredient is actually doing in the pan. It's not just about flavor, it's about the structure of the dish.
| Ingredient | Science Role | Pro Secret |
|---|---|---|
| All Purpose Flour | Starch Barrier | Shake off every bit of excess for a thinner, crispier shell |
| Lemon Pepper | Acidic Flavor | Use a coarse grind for a more textured, "pop in-your mouth" feel |
| Unsalted Butter | Browning Agent | Adding it late in the process creates a nutty, toasted aroma |
Ingredients and Smart Swaps
I've listed exactly what you need below. If you're missing something, don't panic, just check the swaps.
- 4 tilapia fillets (approx 1.2 lbs) Why this? Mild flavor that takes on seasoning well
- 1/2 cup all purpose flour Why this? Creates the essential thin crust
- 1 tbsp lemon pepper seasoning Why this? All in-one zest and spice
- 1/4 tsp salt Why this? Enhances the natural fish flavor
- 1/4 tsp black pepper Why this? Adds a subtle back end heat
- 2 tbsp olive oil Why this? High smoke point for searing
- 3 tbsp unsalted butter, divided Why this? For browning and the final sauce
- 1 tbsp fresh lemon juice Why this? Cuts through the richness of the butter
- 1 tbsp fresh parsley, chopped Why this? Adds a fresh, green finish
Ingredient Substitutes:
| Original Ingredient | Substitute | Why It Works |
|---|---|---|
| Tilapia Fillets | Cod or Haddock | Similar flaky texture. Note: May require 1-2 extra mins if fillets are thicker |
| All Purpose Flour | Almond Flour | Low carb option. Note: Browns faster; watch for burning |
| Unsalted Butter | Ghee | Higher smoke point. Note: Slightly nuttier, less creamy finish |
| Olive Oil | Avocado Oil | Even higher smoke point. Note: Neutral flavor, doesn't affect the taste |
The Right Kitchen Tools
You don't need a fancy setup for this, but a few specific tools make it way easier.
First, grab a 12 inch skillet. A stainless steel or cast iron pan is the gold standard here because they hold heat consistently, which is what gives you that mahogany crust. If you only have non stick, that's fine, but you might find it doesn't brown quite as deeply.
You'll also want a shallow dish or a rimmed plate for the dredging. This keeps the flour from flying all over your counter. Finally, keep a stack of paper towels handy. I cannot stress enough how important the drying process is for this recipe.
Steps for Golden Fish
Let's crack on. Follow these steps, and pay attention to the smells and sounds - they're your best guide.
- Rinse the tilapia fillets under cold water and pat them aggressively dry with paper towels. Note: Any moisture left will steam the fish instead of searing it.
- In a shallow dish, whisk together the all purpose flour, lemon pepper seasoning, salt, and black pepper.
- Dredge each fillet in the flour mixture, shaking off any excess. Ensure the coating is thin and translucent, not cakey.
- Heat olive oil and 2 tablespoons of butter in your 12 inch skillet over medium high heat. Wait until the butter foams and the sizzle is sharp.
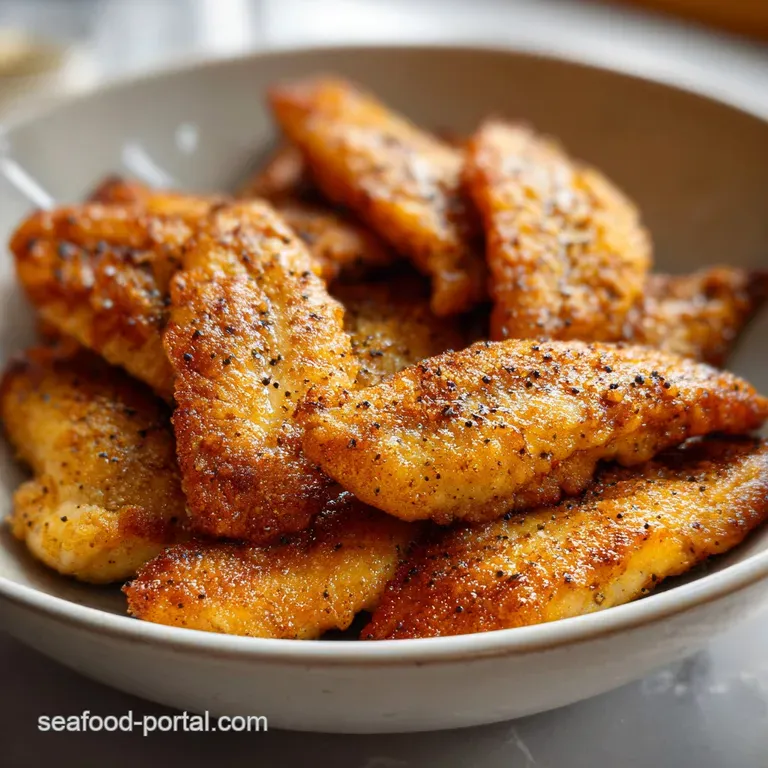
- Lay the fillets in the pan. Let them sear undisturbed for 3–4 minutes per side. Listen for a steady sizzle and look for a mahogany colored crust. The fish should release naturally from the pan when you try to lift it.
- Remove the fish to a plate. According to USDA data, tilapia is done at 145F. You can pull it off the heat once its internal temperature reaches 140 degrees, as carryover heat will finish it.
- Lower heat to medium and add the remaining 1 tablespoon of butter and lemon juice to the pan.
- Stir rapidly to scrape up the brown bits (the fond) from the bottom of the pan. Continue until the sauce looks velvety and emulsified.
- Drizzle the lemon butter sauce over the fillets and garnish with chopped fresh parsley.
Chef's Note: If the butter starts to brown too quickly during the sauce stage, add a teaspoon of water to bring the temperature down and keep the sauce silky.
Solving Common Pan Problems

Even the best of us have days where the fish just won't cooperate. Usually, it's a temperature or moisture issue.
Troubleshooting Common Issues
| Issue | Solution |
|---|---|
| Why Your Fish Sticks | This usually happens if you try to flip the fillet too early. The fish creates its own "non stick" layer as the proteins sear and harden. If it's sticking, give it another 30-60 seconds. Also, ensure |
| Why Your Coating is Gummy | A gummy crust is almost always the result of too much flour or wet fish. When the flour absorbs moisture from the fillet, it creates a paste. Shake that excess flour off like you mean it! |
| Why Your Sauce Breaks | If your lemon butter sauce looks oily instead of velvety, the heat was too high, causing the butter to separate. You can fix this by whisking in a tiny splash of water or a knob of cold butter off the |
Common Mistakes Checklist:
- ✓ Fillets are patted completely dry before dredging
- ✓ Excess flour was shaken off to prevent "doughy" skin
- ✓ Pan reached the foaming stage before adding fish
- ✓ Fillets weren't crowded (leaving room for steam to escape)
- ✓ Fish was allowed to release naturally before flipping
Easy Flavor Twists
Once you've got the basic Crispy pan fried Tilapia with Lemon Pepper down, you can start playing with the profile. If you want a more substantial crunch, try a "pan fried Tilapia Panko" version by dipping the floured fish in beaten egg before pressing it into panko breadcrumbs.
It changes the texture from a thin shatter to a chunky crunch.
For those who want something a bit more daring, try a garlic herb twist. Replace the lemon pepper with a mix of garlic powder, dried thyme, and smoked paprika. This version pairs incredibly well with a creamy fish taco sauce for a more fusion style meal.
If you're looking for a low carb or pan seared tilapia no flour option, you can skip the dredge entirely. Just season the dry fillets with the lemon pepper and salt. You won't get the same mahogany crust, but the fish will be lighter. For another fish inspiration, you might enjoy learning how to cook salmon on the stove, which uses a similar searing logic.
Adjustment Guidelines
Whether you're cooking for one or a crowd, you can scale this easily.
Scaling Down (1-2 servings): Use a smaller skillet (8-10 inches) so the butter doesn't spread too thin and burn. You can reduce the cooking time by about 20% if you're using very thin fillets. If a recipe calls for an egg (for panko), beat one and use only half.
Scaling Up (8+ servings): Do NOT crowd the pan. If you put too many fillets in at once, the temperature drops and the fish will steam, ruining the crust. Work in batches. When scaling spices, only increase the salt and lemon pepper to 1.5x initially, then taste and adjust.
If you're doing a massive batch, lower the heat by about 25 degrees to ensure the centers cook through without burning the outsides.
| Goal | Modification | Impact |
|---|---|---|
| More Crunch | Add Panko | Heavier, more satisfying crust |
| Less Fat | Use only Oil | Lacks the nutty aroma of butter |
| Extra Zest | Add Lemon Zest | More intense citrus punch |
Kitchen Myths
Let's clear up a couple of things I see people arguing about in the comments.
Myth: Searing "seals in" the juices. This is a classic. Searing doesn't actually create a waterproof seal. Moisture loss happens throughout the cooking process regardless.
What searing does do is create a flavor packed crust through browning, which makes the fish taste better, even if the "seal" is a myth.
Myth: Frozen tilapia is lower quality. Actually, many "fresh" fillets at the store were frozen at sea. As long as the fish was flash frozen and you thaw it slowly in the fridge, it's just as good. Just remember to pat it extra dry, as frozen fish tends to release more water during thawing.
Storage and Waste Tips
If you happen to have leftovers, store them in an airtight container in the fridge for up to 2 days. To reheat, avoid the microwave at all costs it will turn your crispy crust into a sponge.
Instead, pop the fillets back into a dry pan over medium heat for 2-3 minutes per side to revive the crunch.
For freezing, I don't recommend freezing the fried fish, but you can freeze the dredged, uncooked fillets for up to a month. Just freeze them on a parchment lined tray first so they don't clump together.
To keep things zero waste, don't throw away the lemon halves! Use the remaining zest in a salad or squeeze the last few drops into a glass of water. If you have leftover flour dredge, toss it it's been in contact with raw fish and isn't safe to reuse.
Best Side Dish Pairings
Because this dish is so zesty and rich, you want sides that can either balance the fat or lean into the brightness.
I love serving this over a bed of lemon garlic quinoa or a simple wild rice blend. The nuttiness of the grains complements the butter sauce perfectly. If you want something green, roasted asparagus or sautéed spinach with a squeeze of lemon is the way to go.
For a more adventurous pairing, try serving the fish with a side of Vietnamese fish sauce for dipping. The salty, umami depth of the sauce provides a brilliant contrast to the bright lemon pepper seasoning. It turns a simple weeknight meal into something that feels a bit more intentional.
Recipe FAQs
Why is my fish sticking to the pan?
Wait another 30-60 seconds. The fish creates its own non-stick layer as proteins sear and harden; flipping too early causes the fillet to cling to the pan.
Can I serve this with a different sauce?
Yes, a creamy condiment works well. This pairs perfectly with a homemade tartar sauce for added tang and richness.
How to prevent the coating from becoming gummy?
Shake off all excess flour. Ensure the fillets are patted aggressively dry before dredging so the flour doesn't absorb moisture and form a paste.
How to reheat leftovers while keeping them crispy?
Place fillets in a dry pan over medium heat. Heat for 2-3 minutes per side to revive the crunch, as microwaves will turn the crust spongy.
Is it true I should flip the fish frequently to cook it evenly?
No, this is a common misconception. Searing the fish undisturbed for 3-4 minutes per side is the only way to achieve a mahogany colored crust.
How to make the lemon butter sauce velvety?
Stir rapidly over medium heat. Use the butter and lemon juice to scrape up the browned bits from the pan until the sauce emulsifies.
Can I freeze the cooked fish?
No, avoid freezing the fried fillets. You can, however, freeze the dredged, uncooked fillets on a parchment lined tray for up to a month.
Crispy Lemon Pepper Tilapia