Classic California Roll: a Home Cook’s Guide to Sushi Delight
Look into Into Sushi: A Journey with the Classic California Roll
Let me tell you about the first time i attempted to roll sushi at home. it was a saturday night, my friends were coming over, and i thought, “how hard could it be?” with a bit of confidence and a lot of instagram scrolling, i decided on the classic california roll .
Spoiler alert: it wasn’t just about the sushi recipe ; it was a night of laughter, a few messes, and one very epic sushi party.
💥 you know that feeling when you nail the recipe and your friends are all like “whoa, when did you become a master chef?” yeah, that was me, but honestly, it came together more like a magical kitchen chaos than a michelin star affair!
A Little Sushi History
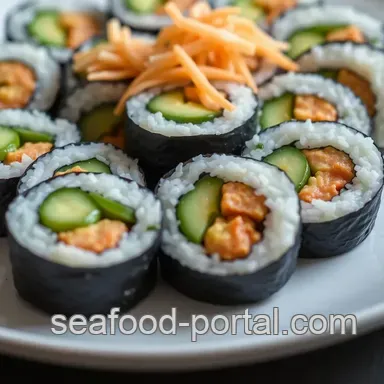
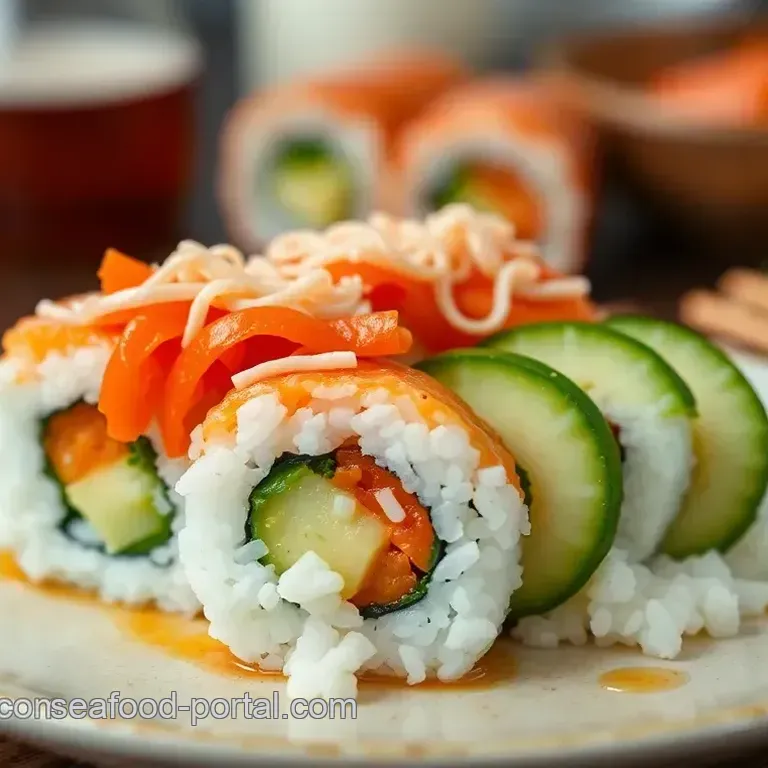
The classic california roll has its roots steeped in the vibrant culture of california from the 1970s. can you believe it? this roll shook things up and introduced so many folks to the sushi scene without the need for raw fish.
It's got that creamy avocado, sweet crunchy cucumber, and flaky imitation crab, all wrapped in perfectly seasoned sushi rice. today, it's a staple in sushi restaurants from coast to coast, and honestly, it just hits different .
It’s like the bridge between sushi newbies and sushi lovers.
Now, if you're getting overwhelmed by the thought of sushi making, don’t. this recipe is pretty doable . with about 50 minutes of your time, you can serve up a delightful dish that feeds four people.
And while the technique takes a little practice, trust me it's all about getting that rice just right, which means the rolls come together beautifully.
Plus, what’s better than impressing your pals with your homemade sushi? 🙌
Crunchy Benefits of the California Roll
Alright, let’s break down why this Cali Roll Bowl is a hit.
First off, health wise, it packs a punch. there’s fiber from the avocado and cucumber, plus a decent protein boost from imitation crab.
It's like a mini nutrition victory on a plate! 🌟 you can customize it to fit your dietary needs too.
Swap in shrimp for those who want a little kick. a spicy california roll bowl? yes, please!
This dish is perfect for all those gatherings and special occasions from birthday parties to casual get-togethers. and can i just say? it’s way easier to make than you think.
Plus, you get to be the sushi master, which is definitely a notch above that takeout box you’d usually go for.
When compared to similar recipes like the crunchy roll bowl or even those fru-fru sushi rolls that everyone thinks they need, the classic california roll keeps it simple.
It’s classic for a reason, and honestly, you can't go wrong here.
Let’s Get Rolling
Now that you're pumped about making your own sushi, let's transition smoothly into the ingredients you’ll need, shall we? get ready to gather some sushi rice, nori, fresh veggies, and a sprinkle of kitchen joy.
You’re about to create your own california rice bowl that’ll have everyone talking!
So, roll up those sleeves, grab your bamboo mat, and let’s dive into the delicious world of homemade sushi. You’re going to love every minute of it!
Essential Ingredients Guide for Your Sushi Adventure

Hey there, sushi lovers! if you're diving into the world of sushi making, you’re in for a treat! today, we’re gonna chat about the essential ingredients you need for your sushi recipe, especially if you’re tackling something like a classic california roll or maybe a crunchy roll bowl .
Premium Core Components
First things first, let's get to the nitty gritty. quality matters ! when you’re working with ingredients, always check for freshness.
For example, sushi rice should be short grain that’s the stuff that gets all sticky and lovable when cooked. you'll need 1 ½ cups (300g) for your rolls!
Measurements:
- US: 1 ½ cups sushi rice
- Metric: 300g sushi rice
Now, storage is key, my friends. sushi rice? keep it cool and dry in an airtight container it’ll stick around for about 6 months.
If you’re wondering how to tell if your rice is fresh, just give it a look: no weird smells or colors, alright?
Signature Seasoning Blend
Next up, let’s talk flavor! A California Roll livens up with that classic sushi vinegar blend . You’ll need:
- ¼ cup (60ml) rice vinegar
- 2 tablespoons (25g) sugar
- ½ teaspoon (3g) salt
Blend these babies together until dissolved. it’s what transforms your cold rice into something magical! feeling adventurous? experiment with herbs like cilantro or chives in your mixes.
Oh, and pro tip: sprinkle a little sesame oil or chili flakes for that extra oomph!
Smart Substitutions
You know those moments when you’re ready to roll but realize you're out of something crucial? fear not, i’ve been there! sometimes, you can swap out for what you have handy.
No nori? use rice paper instead; it’ll work just fine!
If imitation crab doesn’t float your boat, try cooked shrimp or any kind of flaky white fish. look into into creativity! you can even make a spicy california roll bowl if that tickles your fancy.
Kitchen Equipment Essentials
Here comes the fun part your sushi making tools! Here’s what you need:
- A medium saucepan for the rice
- A bamboo sushi mat (get one; it’s a game changer!)
- A sharp knife for slicing those rolls perfectly
- Plastic wrap (trust me, it makes cleanup a breeze)
If you don’t have a bamboo mat, just grab a kitchen towel. It'll do in a pinch! You got this!
Benefits of These Ingredients
Knowing your ingredients can change the game. the sushi rice you make at home? way better than any takeout. you get to control the flavors, and trust me, friends will be begging for your california roll bowl easy every time it’s on the menu.
Plus, it's a delightful way to gather everyone around the kitchen. Challenge them to create their own sushi bowls! You could even throw in a Crab Bowl Sushi contest how fun is that?
So as we prepare to dive into the step-by-step instructions for our classic california roll , keep these essentials in mind.
You’re all set to create delicious homemade sushi bowl recipes that impress everyone at the dinner table!
Get your apron on because it's time to roll!
Mastering the Art of Professional Cooking: It’s All About the Preparation!
Cooking at a professional level may sound intimidating, but let me tell you it’s all about a few key steps. If you’re ready to impress with your sushi recipe or maybe whip up a California Roll Bowl Easy for your next get-together, get comfy because we're diving in!
Essential Preparation Steps
First things first, let’s chat about mise en place . you’ve probably heard this phrase tossed around. it’s just a fancy way of saying “everything in its place.
” gather your ingredients before you even hit the stove. this will save you from the kitchen chaos where you’re rummaging through pantry shelves like you’re searching for buried treasure.
Seriously, nothing slows you down like looking for that last nori sheet when you’re halfway through making sushi!
Time management is another biggie. set a timer for each step. for example, when cooking sushi rice, you get 20 minutes to simmer.
Use that time to wash up or prep your fillings. and speaking of cleanliness, remember safety first . sharp knives, raw fish don’t mix them up! always wash your hands before you start, especially after handling those ingredients.
Step-by-step Process
Alright, let’s get into the nitty gritty. Here’s how to bring it all together:
Prepare the Sushi Rice:
- Rinse 1 ½ cups sushi rice under cold water until the water runs clear.
- Put that bad boy in a saucepan with 2 cups of water . Bring it to a boil, then cover and simmer it on low for 20 minutes .
- After that, let it sit for 10 minutes off the heat. Time to mix ¼ cup rice vinegar with 2 tablespoons sugar and ½ teaspoon salt . Fold that into your rice.
Temperature Control Points: Keep an eye on your rice! It should be fluffy, not sticky mush.
Timing Precision: Perfect sushi rice should take about 30 minutes total if you include cooling time.
Visual cues for doneness matter too. You want your rice to glisten and your veggies to stay crisp. Get that avocado cut just right it’s all about aesthetics, right?
Expert Techniques
Now you’re ready to roll! when you lay down that nori, shiny side down, you’ve got to spread that rice evenly.
Tip: leave that 1 inch gap at the top! trust me, it makes sealing your roll so much easier.
Critical checkpoints include not overstuffing your roll. that’s a rookie mistake. your roll should be neatly packed, but not bursting at the seams.
If you’ve overfilled, you’ll have a mess. and we don’t want a sushi fail when making your crunchy roll bowl .
Success Strategies
Everyone makes mistakes, but you can sidestep some common ones. never fear! if your roll falls apart, just grab some rice and re-roll it like a burrito.
Seriously, no one will judge you.
Quality assurance is also essential. always taste as you go! maybe add a sprinkle of sesame seeds at the end for style and flavor.
Feeling adventurous? try a spicy california roll bowl with some sriracha for a kick!
Make-ahead Options
Sushi can actually be prepped ahead of time. just keep your rice in the fridge and roll it right before your guests arrive.
Talk about a crowd pleaser! you can whip up california sushi roll bowls while everyone else is busy chatting.
So, there you go! cooking at home, especially with sushi, doesn’t have to be a treasure hunt or a race against time.
It’s all about getting your ingredients ready, following the steps closely, and adding your own little flair just like that california roll bowl recipe you’ve been eyeing!
Additional Information
Now that you're all set to roll out these culinary delights, keep exploring additional tips and tricks for professional cooking.
Whether it's mastering the art of sushi or leveling up your homemade bowls, these lessons will transform your kitchen game.
Enjoy your cooking adventure and invite some friends for a sushi night; they’ll be so impressed with your skills! happy rolling!
Additional Recipe Information for Your Classic California Roll
Alright, my fellow food ensoiasts, get ready to up your sushi game with these pro tips and secrets ! making your own sushi at home can feel a bit intimidating at first, but trust me, it’s like having a mini sushi party right in your kitchen.
Pro Tips & Secrets
First off, let’s talk rice. use short grain sushi rice because it’s super sticky and helps your sushi hold up. rinse the rice until the water runs clear; this removes excess starch so your rolls won’t turn into a mushy mess.
When mixing the rice vinegar, sugar, and salt, go with a light hand . you want it flavor packed, but don’t drown the rice.
Time savers? trust me on this prep everything beforehand. slice your avocado and cucumber, flake that imitation crab while the rice cools.
It gives you a smoother flow when it’s time to roll. bonus: serve it chilled! it makes the flavors pop in the warm weather.
Perfect Presentation
Now, plating your sushi bowl can be where the magic happens. when you’re assembling, layer those colors like a pro! i love adding a sprinkle of black sesame seeds on top for that gourmet touch.
You could also throw on some wasabi dots or a little soy sauce drizzle to make it artsy.
For garnishing, don’t sleep on microgreens or edible flowers . they not only look fabulous but also add a touch of sophistication.
And while we’re at it, don’t forget to mix up that color palette. a green veggie here, a pink pickled ginger there, and you’re all set to impress.
Storage & make-ahead
Let’s face it, sometimes you might not finish all those rolls. if you’ve got leftovers, wrap them tightly in plastic wrap and pop them in the fridge.
The rice will lose a bit of its texture, but you can still enjoy it within a day or two.
Just keep in mind if you let those rolls sit too long, they’ll no longer be a crunchy roll bowl but a soggy disappointment.
Creative Variations
Oh, the possibilities! you can totally switch things up with this classic california roll. feeling spicy? try a spicy california roll bowl instead! just drizzle some sriracha on your crab mixture and kick it up a notch.
Or, for a seasonal twist, try adding cucumber in the winter and a sprinkle of fresh chives in the spring.
Complete Nutrition Guide
Here’s the scoop! this california roll bowl is not just tasty; it’s also balanced. not only do you get that gorgeous creamy avocado for healthy fats, but you also load up on carbs from the rice, giving you some serious energy.
It’s low in calories too, around 250 per serving , leaving room for an extra bowl of sushi goodness .
If you're considering dietary modifications, swap in some cooked shrimp or even tofu for that Insta famous Cali Roll Bowl vibe.
Wrapping It All Up
So, whether you’re whipping up this california roll bowl easy for a cozy night in or a dinner party with friends, do it with love and a bit of flair.
Sushi making isn’t just about food; it’s about the experience! share your unique creations.
So roll up your sleeves, gather some friends, and get sushi rolling! You got this trust me, with each roll, you’ll be one step closer to being a sushi master! 🎉 Enjoy every bite, and don't forget to bring the soy sauce!
Frequently Asked Questions
What is a sushi recipe and how do I get started?
A sushi recipe typically includes sushi rice and a variety of fillings, wrapped in seaweed or rice paper. To get started, focus on mastering the rice preparation first, as it’s crucial for a delicious sushi experience. Once you have that down, you can explore different fillings and styles!
Can I use regular rice for making sushi rolls?
While you can use short grain rice if sushi rice isn’t available, it’s best to use authentic sushi rice for that signature sticky texture. Regular long grain rice won’t yield the same results, as it won’t hold together when you roll it up.
How can I make my sushi rolls look professional?
To make your sushi rolls look professional, use a sharp knife dipped in water to cleanly slice the rolls, and ensure even filling distribution for a neat appearance. Additionally, practice using the bamboo mat to roll the sushi tightly without overfilling or spilling ingredients.
How do I store leftover sushi?
If you've got any leftover sushi, cover it tightly with plastic wrap and store it in the fridge not for more than 24 hours, though! Sushi is best enjoyed fresh, and the rice may lose its texture over time, but this method will help maintain its quality.
Are there any nutritional considerations for sushi?
Yes, sushi can be a nutritious option! It typically contains healthy fats from fish, vitamins from veggies, and carbohydrates from rice. For a healthier twist, you can use more vegetables or opt for brown rice instead of white rice for added fiber.
Can I customize the fillings in my sushi rolls?
Absolutely! One of the best parts about making sushi at home is the freedom to customize it. You can use whatever fillings you like, such as shrimp tempura, avocado, or even cream cheese, which some folks in the UK enjoy. Don’t be afraid to get creative!
Classic California Roll A Home Cooks Guide To Su