Fried Fish: the Proper Pub-Style Crunch

- The Proper Pub-Style Crispy Fried Fish Fillets (The Secret to a Perfect Crunch)
- Hooking the Reader: Achieving the Ultimate Pub-Style Crispy Fish
- Essential Components: Selecting Your Fillets and Frying Oil
- The Science of the Crisp: Why This Breading Never Fails
- Mastering the Technique: Step-by-Step Guide to Frying Fish
- Avoiding the Soggy Sin: Chef’s Essential Tips and Troubleshooting
- Proper Preservation: Storing Leftovers and Reheating for Crispness
- The Perfect Chippy Dinner: What to Serve Alongside Your Crispy Fillets
- Recipe FAQs
- 📝 Recipe Card
The Proper Pub-Style Crispy Fried Fish Fillets (The Secret to a Perfect Crunch)
That smell. The moment you pull a fresh piece of Fried Fish out of the oil, steam gently rising, crackling just begging to be bitten. The scent of hot oil, sea salt, and perfect, flaky fish is pure magic; it instantly transports you to a windy beachside or your favourite local pub.
Honestly, people think a proper crispy fillet is reserved for the seaside chippy, but I’m telling you, it’s one of the easiest, fastest dinners you can make right in your own kitchen.
Forget ordering takeout; this homemade Fried Fish is cheaper, cleaner, and absolutely superior when done correctly.
I’ve had my share of soggy, greasy disasters (we’ve all ruined a batch or two), but after years of testing and burning myself a few times along the way I’ve cracked the simple code to shatteringly crunchy batter.
This method guarantees truly outstanding Fried Fish every time you make it. Let’s crack on with the details.
Hooking the Reader: Achieving the Ultimate Pub-Style Crispy Fish
What Defines Truly Crispy, Pub-Quality Fish?
When we talk about "pub-quality," we mean a batter that is golden, full of air pockets, and structurally sound enough to maintain its crunch for several minutes after frying. It shouldn’t taste oily; it should shatter like thin glass when you bite into it, protecting the beautiful, steamy, flaky fish inside.
This texture difference is what separates merely cooked fish from glorious Fried Fish .
The Difference Between Lightly Coated and Crunch Factor Fillets
Many home recipes call for a simple flour and egg wash, but that gives you a thin, often slightly soft crust. Our recipe uses a secret weapon: baking powder and icy-cold carbonation. The combination of chemical leavening and the instant expansion of CO2 gas when hitting the hot oil gives us maximum lift.
This is how you achieve a genuine crunch factor fillet, which is essential for proper homemade Fried Fish .
Quick Overview of the Frying Process
The whole operation moves quickly once the oil is hot. We rely on a two-step coating process: a dry dredge followed by a quick dip in the icy batter. This ensures maximum adhesion.
The fish only needs 8 to 9 minutes total in the oil to cook through completely while the exterior develops that deep, beautiful golden colour. The perfect piece of Fried Fish starts with good preparation.
Essential Components: Selecting Your Fillets and Frying Oil
Which White Fish Fillets Hold Up Best to Deep Frying?
You need a firm white fish that can handle high heat without disintegrating. Cod and Haddock are the gold standard, period. They are mild, flaky, and possess a great structure that doesn't collapse under the weight of the batter or the intensity of the frying oil.
- Substitution Note: Hake or Pollock are excellent, economical alternatives. They work beautifully in this Fried Fish recipe. I recommend avoiding extremely oily or very thin fish like sole, which tends to overcook quickly.
Recommended Oils for over High heat Frying and Neutral Flavor
The oil selection is not negotiable, my friends. You need a high smoke point and a neutral flavour. Canola, vegetable, or sunflower oil are your best bets for making quality Fried Fish .
Chef's Note: Olive oil or butter will simply burn and smoke long before you hit the required frying temperature of 375°F (190°C). Don't waste your good extra virgin oil here!
The Science of the Crisp: Why This Breading Never Fails

This is where we get geeky, but trust me, understanding the "why" is the key to perfect Fried Fish .
Preparation Notes: Ensuring Your Fish Is Dry and Ready for Coating
The number one enemy of a crispy coating is moisture. I mean, it’s not even close. Take your cod or haddock fillets and pat them down vigorously with kitchen paper until they look completely matte and dry. Even better?
Pop them on a wire rack and let them chill out in the fridge for 30 minutes after seasoning. This ensures the first dry dredge clings tightly, giving the wet batter a secure base.
Achieving Optimum Moisture Content for Maximum Crunch
The batter itself must be wet, but the key is the temperature. We use icy cold liquid I prefer a pale lager, but sparkling water works just as well if you’re avoiding alcohol. The shock of the icy batter hitting the 375°F oil causes immediate, violent steam expansion.
This steam pushes the batter outward, creating that airy, hollow space that defines truly crunchy Fried Fish .
| Ingredient | Role | Substitution |
|---|---|---|
| All-Purpose Flour | Structure and body. | Rice flour or Chickpea Flour (for GF options) |
| Baking Powder | Provides lift (leavening). | N/A (Essential for airiness) |
| Icy Lager/Sparkling Water | Creates steam/puffiness. | Icy cold club soda |
The Critical Role of Oil Temperature in Flavour Development
If your oil is too cool (below 350°F), the batter acts like a sponge, soaking up fat and resulting in greasy, sad Fried Fish . If the oil is too hot (above 390°F), the exterior burns to blackness before the interior fish is cooked through. You absolutely must use a deep fry thermometer.
Temperature control is the most important tool you have.
The Secret Ingredients for a Golden, Crackling Crust
We add just a whisper of smoked paprika to the initial dry dredge. This doesn't dramatically change the flavour, but it guarantees a gorgeous golden hue that screams "eat me." Also, we use baking powder in addition to the carbonated liquid; that’s double the rising power for maximum crackle!
Achieving the right golden colour is a sign you’ve mastered homemade Fried Fish .
Mastering the Technique: step-by-step Guide to Frying Fish
Prepping the Station: Setting Up for a Clean Frying Process
Get organized before you turn on the burner. You need a heavy pot of oil heating slowly with your thermometer clipped on, two shallow dishes for the dredge and the batter, and a wire rack set over a baking sheet ready for the finished product.
Trust me, frying is a marathon, not a sprint have everything laid out so you don't panic.
The Double Dredge: Achieving Uniform and Thick Coating
- Dry Dust: Take your chilled, dry fish fillet and quickly dust it entirely in the flour/paprika mix. Shake off the excess aggressively. This is the crucial adhesion layer for the proper Fried Fish texture.
- Wet Dip: Immediately plunge the floured fillet into the icy cold batter. Don’t hesitate. Lift it out immediately, letting any thick globs drip back into the bowl. You want a uniform, slightly thick coating.
Monitoring the Heat: Achieving the Ideal Frying Temperature
Heat your oil until it reaches a stable 375°F (190° C) . Once you drop the first piece of Fried Fish in, the temperature will immediately drop. Your job is to keep that dial between 365°F and 375°F for the duration of the cook time.
If the heat drops too much, wait for it to recover before adding the next batch.
Timed Frying: How Long Until the Fillets Are Perfectly Flaky Inside
For standard 6 oz fillets, you’re looking at about 8 to 9 minutes total. Fry the fish for 4 minutes, then use tongs to gently flip it. Cook the other side for another 4 to 5 minutes until the batter is a deep, uniform gold.
The best Fried Fish is cooked by temperature, not by time alone; if it looks done, it usually is.
Avoiding the Soggy Sin: Chef’s Essential Tips and Troubleshooting
The #1 Mistake: Overcrowding the Frying Vessel
Seriously, resist the urge to drop all four fillets in at once. Overcrowding dramatically lowers the oil temperature, leading directly to a greasy, soggy crust. You should always fry in small batches usually two fillets at a time to keep the heat consistent.
This is mandatory for truly crispy Fried Fish .
Testing Doneness Without Cutting the Fillets
You don't want to slice into that gorgeous crust to check if the fish is done. If the batter is deep golden and feels rigid, the fish is usually ready. If you are unsure, gently insert the tip of your thermometer or a thin metal skewer into the thickest part of the fillet for ten seconds.
When you pull it out, it should feel hot to the touch; the internal temperature should read 145°F (63°C).
Quick Fixes for Breading that Slides Off During Frying
If your beautiful coating is slipping off into the oil, you made one of two errors:
- The Fish was wet: You didn’t pat it dry enough before the first dredge.
- The Batter was Overmixed: Overmixing develops gluten, making the batter tough and more likely to contract and detach from the fillet. Remember, a few lumps are fine! Keep that batter shaggy for perfect Fried Fish .
Proper Preservation: Storing Leftovers and Reheating for Crispness
Safe Cooling and Short Term Refrigeration Practices
Once your Fried Fish has been enjoyed, what do you do with the few pieces that are left over? Never, ever store them in an airtight container while they are still warm, or you will create a steam bath guaranteed to turn the crust into mush.
Let the fish cool completely on the wire rack before transferring it to a storage container in the fridge. It keeps well for up to three days.
The Best Way to Reheat Fried Fish for Maximum Crunch
Listen closely: the microwave is the enemy. It will turn your masterpiece into a rubbery catastrophe. The only way to restore the crunch of leftover Fried Fish is via the oven or the air fryer.
Preheat your oven to 400°F (200°C) and place the fish directly on a wire rack over a baking sheet. Heat for 10- 12 minutes until sizzling hot. The dry, high heat will reactivate the crispness in the batter.
This trick is key to enjoying excellent Fried Fish the next day.
Can You Prepare the Breading Mix Ahead of Time?
Yes, absolutely. You can whisk together all the dry ingredients (both the dredge and the batter mix) and store them in an airtight container. DO NOT add the cold liquid until you are literally ready to fry.
The carbonation and baking powder activate instantly upon contact with water, and you lose all that crucial puffiness if you wait too long.
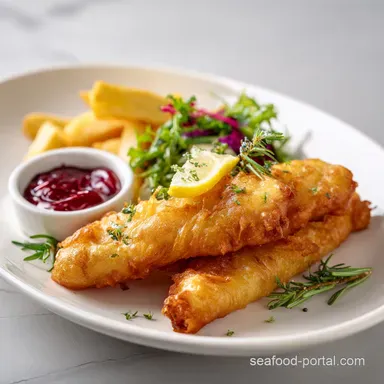
The Perfect Chippy Dinner: What to Serve Alongside Your Crispy Fillets
A proper piece of Fried Fish demands equally good side dishes. You can’t go wrong with classic chips, but here are a few ideas that really sing.
We always make double fried hand cut chips, obviously. But to cut the richness, try a simple, bright side. I often make a quick batch of Fish Taco Slaw: Zesty Baja Lime Slaw Recipe because the acidity works so well.
If you’re going for a full-on British experience, homemade tartare sauce and a wedge of lemon are non-negotiable. If you want a more substantial, comforting meal, this crispy fish is incredible served over creamy grits it’s similar to my favourite Catfish and Grits: Ultra Crispy Fish with Creamy Cheddar dish, but using the pub-style batter gives it a wonderful lightness. Seriously, a great piece of Fried Fish is the star of any meal. Enjoy!

Recipe FAQs
Why did my batter come out soggy and oily instead of light and crispy?
The oil temperature was almost certainly too low, typically below 350°F (175°C). Low heat allows the batter to soak up oil before it has a chance to crisp, resulting in a heavy, greasy coating.
Always monitor your frying oil with a thermometer, maintaining a consistent temperature between 365°F and 375°F (185°C to 190°C).
My batter keeps falling off the fish while frying. How can I fix this?
This issue usually stems from excess moisture on the fish's surface before battering. Pat the fillets thoroughly dry with paper towels before you begin the dredging process. A quick initial dusting in plain flour (the 'glue' stage) is crucial as it helps the wet batter adhere properly to the fish.
Can I use plain water instead of beer or carbonated soda water in the batter?
While you can use water, highly carbonated liquids like beer or club soda are essential for achieving the pub-style texture. The carbonation creates tiny bubbles within the batter that expand rapidly in the hot oil, resulting in that wonderfully light, airy, and porous crust.
Using still water will yield a heavier, denser coating.
What is the best way to reheat leftover fried fish to maintain crispness?
To restore the crunch, never use a microwave, which will only make the crust rubbery and soggy. Reheat the fish in a conventional oven or an air fryer set to 400°F (200°C) for about 8 10 minutes. This method evaporates residual moisture and re-crisps the batter beautifully.
Can I prepare the fish fillets and batter ahead of time?
You can prepare the dry ingredients for the batter ahead of time and store them sealed at room temperature. However, the wet batter should always be mixed just before frying to maximize the carbonation's effect. Pre-cut fish fillets should be kept cold in the refrigerator and patted dry just before cooking.
How do I know if the fish is fully cooked without cutting it open?
For standard fillet sizes (about 1.5 inches thick), deep frying for 6 to 8 minutes is usually sufficient. A fully cooked fillet will float to the surface of the oil when done and should register an internal temperature of 145°F (63°C) using a food thermometer.
The flesh should be opaque and flaky when tested with a fork.
What alternative types of fish work best for this recipe besides Cod or Haddock?
The key is using a firm, flaky, white fish that holds its structure well during high temperature frying. Excellent substitutes include Halibut, Snapper, or even large Tilapia fillets. Avoid oily fish like salmon or very delicate sole, as they tend to become overwhelmed by the heavy batter.
Pub Style Crispy Fried Fish
Ingredients:
Instructions:
Nutrition Facts:
| Calories | 520 kcal |
|---|---|
| Fat | 25 g |
| Fiber | 0 g |
