Nomayo Tuna Melt: the Grown-Up, Ultra-Crispy Healthy Tuna Sandwich
- Welcome to the Best NoMayo Tuna Melt Recipe Yet
- The Science of the Perfect Melt: Why We Ditch the Mayonnaise
- Essential Components for Your Superior Tuna Melt
- How to Assemble and Grill the Ultimate NoMayo Tuna Melt
- Mastering the Crisp: Chef's Pro Tips and Common Pitfalls
- Prepping Ahead: Storage and Shelf-Life Guidelines
- What to Serve Alongside Your Hot Tuna Melt
- Recipe FAQs
- 📝 Recipe Card
Welcome to the Best NoMayo Tuna Melt Recipe Yet
You know that perfect, sharp crunch a grilled sandwich makes? I swear, the sound is half the meal. That smell of sizzling butter and toasted bread, right as the cheese starts oozing out the sides, is just pure, unadulterated comfort food elevated.
Seriously, canned tuna is a gift. It's cheap, it’s lightning fast, and it’s always waiting in the pantry when you need a desperate, delicious lunch. This is the ultimate Healthy Tuna Melt solution, demanding zero planning and almost no cleanup, making it perfect for weeknights or lazy Sundays.
But let’s be real, the classic tuna melt often gets drowned in heavy mayonnaise, resulting in a greasy, floppy, and sometimes overly fishy mess. We are officially ditching the heavy oil binder and replacing it with something creamy, zesty, protein packed, and infinitely better.
Let’s make the best NoMayo Tuna Melt you’ve ever had!
The Science of the Perfect Melt: Why We Ditch the Mayonnaise
Reclaiming the Classic: The Problem with Traditional Tuna Melts
I used to love the old-school diner melt, but if you’re using low-quality mayonnaise, the flavor is just heavy oil and sticky sweetness. It weighs everything down! When that mayo heats up, it often separates, making the bread soggy and leaving you with a less than-ideal texture.
Quick Overview: Prep Time, Cook Time, and Yield
This isn't a complex, all-day project. We’re talking 10 minutes max for mixing the Healthy Tuna Salad filling and another 8 to 10 minutes of gentle grilling.
Since this recipe makes two extremely generous sandwiches, you can easily double it if the whole family wants in. It's the ultimate quick lunch strategy.
How Our Greek Yogurt Binder Changes Everything
This is the secret weapon: plain, full fat Greek yogurt. Because it's strained, it’s incredibly thick and creamy, giving us the luxurious mouthfeel we want without the excess fat and oil. The high protein content also makes this sandwich significantly more filling. Trust me, you won't miss the mayo one bit. If you’re already a fan of my lighter approach to sandwiches, you might want to try my version of the Panera Tuna Salad Sandwich: The Light, Fresh Copycat Recipe .
Achieving Creaminess Without Heavy Oils
The creaminess here comes from two sources: the thick yogurt binder and the generous amount of sharp, melted cheese. We use the yogurt to coat the tuna flakes and provide moisture, and then we rely on the heat activated cheese to seal it all in. This layering technique prevents the filling from escaping while grilling.
Boosting the Tang: The Power of Dijon and Lemon
Mayonnaise is flat and fatty; yogurt has a natural, lovely tang. We double down on that tang with a good dollop of Dijon mustard and a generous squeeze of fresh lemon juice. These acidic components cut through the richness of the cheese and really make the flavor pop!
This combination is key to our Mediterranean Tuna Salad profile.
Moisture Control: Preventing a Soggy Sandwich
If you take only one piece of advice from this entire article, let it be this: Drain the tuna like your life depends on it. Watery tuna means a watery filling, which leads to soggy bread when heated.
I even press mine between paper towels after draining the can it makes that big a difference.
Essential Components for Your Superior Tuna Melt
Choosing the Right Tuna and Draining Techniques
I prefer canned tuna packed in water for this particular recipe, simply because it’s easier to control the moisture levels. Flake the tuna gently into a bowl, then take a moment to really press out any lingering liquid. A chunky, oil-packed tuna can also work, but you must rinse it well first.
Selecting the Optimal Bread and Cheese for Melting
You need a sturdy bread something with structure. Sourdough is my favorite choice because of its excellent texture and mild sourness, but a thick cut wholemeal or rye works beautifully too. For the cheese, use sharp Cheddar paired with a good melt-y cheese like Gruyère or Monterey Jack.
The combination gives you both depth of flavour and that signature, stringy cheese pull.
Non-Mayo Binder Substitutions (If yogurt isn't available)
| Ingredient Needed | Viable Substitute | Notes on Flavor/Texture |
|---|---|---|
| Greek Yogurt | Crème Fraîche | Very creamy and rich, less tang. |
| Greek Yogurt | Whipped Cottage Cheese | High protein, slightly curdy texture (whip it smooth first). |
| Dijon Mustard | Whole Grain Mustard | Chunkier texture, less sharp heat. |
| Cheddar | Provolone or Swiss | Both melt beautifully and add a salty punch. |
Enhancing the Mix: Mandatory Crunch and Savory Add-ins
A great sandwich is all about texture contrast. You need that crunchy, raw element! Finely diced red onion and crisp celery are non-negotiable for me in this Healthy Tuna Salad. If you skip the crunch, the sandwich becomes uniformly soft, which is a major fail.
Chef's Note: For an extra layer of savory depth, stir in half a teaspoon of dried dill or finely chopped fresh chives right before you assemble the sandwiches. It gives the filling a beautiful complexity.
How to Assemble and Grill the Ultimate NoMayo Tuna Melt

Preparing the Flavour Packed Tuna Filling
Whisk the yogurt, Dijon, and lemon juice together first this ensures the seasonings are evenly distributed before the dry ingredients get involved. Then, fold in the dried tuna, celery, and onion gently. Remember, gentle folding is key. We want flakes, not a paste!
Season aggressively with salt and pepper now; you won’t get another chance once it’s grilled.
Structuring the Sandwich for Even Melting
The cheese serves two purposes: flavor and function. Place a layer of cheese directly on the bread slice (butter side down). This forms a crucial moisture shield. Then add your filling, and top that filling with the rest of the cheese, followed by the second slice of bread (butter side up).
This sandwich structure guarantees that all the cheese melts perfectly and holds the filling captive.
Pan-Grilling vs. Air Fryer Method: Which is Crisper?
I am a traditional pan-griller through and through, especially using cast iron. The consistent, radiant heat gives you that signature, golden brown crust. However, if you are making a larger batch, the air fryer is surprisingly effective!
Set it to 350°F (175°C) and cook for 8- 10 minutes, flipping halfway. You get fantastic crispness without the constant babysitting.
The Final Press: Ensuring Golden Brown Perfection
After two minutes on the first side, grab a smaller, heavy pan or even a foil wrapped brick. Gently press the sandwich down. This maximizes contact between the bread and the hot pan, guaranteeing edge-to-edge crispiness and speeding up the cheese melt.
Don’t press so hard that the filling oozes everywhere, just firm and steady pressure.
Mastering the Crisp: Chef's Pro Tips and Common Pitfalls
The Low and Slow Heat Rule for Perfect Toasting
This is where I messed up for years. I was impatient! If your heat is medium high, the butter browns and burns the bread in 60 seconds flat, leaving a cold, hard lump of cheese inside. You must use medium low heat.
This allows the radiant heat to slowly penetrate the filling and melt the cheese while developing a gorgeous, deep golden crust on the bread over 4– 5 minutes per side.
Troubleshooting Filling Consistency (Too Wet or Too Dry)
If you find your filling is too dry, add a teaspoon more Greek yogurt or a small splash of olive oil. If, heaven forbid, it’s too wet (meaning you didn’t drain the tuna properly!), mix in a teaspoon of breadcrumbs or a little extra grated cheese. The cheese will absorb the excess moisture when heated.
Elevating the Flavour: Adding Fresh Herbs and Spice
Don’t be shy about adding a little kick! A tiny shake of paprika in the filling is lovely, but I often include a few shakes of chili flakes for some heat. If you're feeling ambitious, thinly slice a jalapeño and sneak it between the cheese and the bread. The flavor explosion is worth the effort.
Prepping Ahead: Storage and Shelf Life Guidelines
Safely Storing Pre-Mixed Tuna Salad
This NoMayo Tuna Melt filling is perfect for meal prep. The Greek yogurt mixture holds up much better than a mayo based one in the fridge, staying firm and tangy. Store the filling in an airtight container for up to 3 days .
When you're ready to make the melt, just scoop it out, assemble, and grill.
Can I Freeze the Tuna Melt? (Spoiler: Not Recommended)
Please, for the love of all that is holy, do not freeze the assembled sandwich. Bread that has been frozen and then reheated always has a tough, rubbery texture. Plus, dairy (the yogurt and the cheese) separates when thawed, leaving you with a watery, sad mess.
Freeze the filling separately if you must, but always assemble and grill fresh.
Reheating Methods for Maximum Crispness
If you have leftovers (a rare occurrence!), skip the microwave entirely. Preheat your oven or toaster oven to 300°F (150°C). Place the melt directly on the rack for about 8 minutes.
The low, dry heat ensures the bread re-crisps beautifully, and the cheese gets molten again without burning the crust.
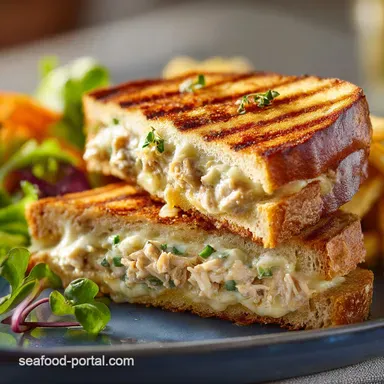
What to Serve Alongside Your Hot Tuna Melt
This sandwich is substantial, but a light side always complements the richness. A simple side salad with a bright vinaigrette is fantastic.
If you’re leaning into true comfort food territory, though, a simple side of potato chips is classic. You could also pair it with a cozy soup. Nothing beats a grilled cheese (or tuna melt) paired with a creamy tomato soup, or if you want to dial up the savory satisfaction, try serving it alongside my hearty Classic Tuna Casserole: Scratch Made Comfort, No Canned Soup .
 : PIN FOR LATER")
Recipe FAQs
What is the best substitution if I don't have Greek yogurt?
The key is using a very thick, creamy binder. Excellent non-mayo substitutes include Icelandic Skyr or high-quality, full fat mascarpone cheese for richness. If using thinner yogurt or cottage cheese, strain it first or blend it smooth to achieve that necessary thickness and structure.
Why is my tuna filling too dry or crumbly?
A dry mix often results from over draining the tuna or using low-fat yogurt that lacks structure. Ensure you are using thick, full fat Greek yogurt to bind the ingredients effectively.
If necessary, mix in a teaspoon of olive oil or another small squeeze of fresh lemon juice until the consistency is creamy and cohesive.
Can I prepare the No-Mayo Tuna filling ahead of time?
Absolutely, preparing the tuna mixture 24 hours in advance is encouraged as it allows the sharp flavors of the Dijon and lemon to fully meld. Store the filling in an airtight container in the refrigerator, and it should remain fresh and vibrant for up to 3 days.
Do not spread the mix on the bread until you are ready to cook.
Can I use this recipe for a dairy-free or vegan tuna substitute melt?
While the recipe relies on tuna, you can easily adapt the binder to be dairy-free. Substitute the Greek yogurt with a high-quality, thick cashew cream or plain, unsweetened vegan sour cream alternative. For a truly vegan melt, substitute the tuna itself with mashed chickpeas or flaked artichoke hearts.
My cheese isn't melting properly before the bread burns. What am I doing wrong?
You are likely cooking the melt on heat that is too high; the cheese requires a lower, slower heat application to soften thoroughly. Cook the sandwich over medium low heat, pressing lightly to ensure good contact with the pan.
You can also trap steam by covering the pan with a lid for the first two minutes, which drastically improves the melt.
Should I use canned tuna packed in oil or in water for this recipe?
Tuna packed in water is usually the preferred choice for this recipe, as the Greek yogurt and olive oil already provide ample richness and moisture. If you opt for tuna packed in oil, make sure to drain it exceptionally well to prevent the final filling from becoming overly greasy or runny.
Can I freeze the finished tuna melts or the tuna filling?
Freezing the finished melt is not recommended, as the bread becomes extremely soggy and the filling's texture will degrade upon thawing. While you can freeze the tuna filling alone, the high moisture content of the yogurt may cause the mixture to separate slightly when defrosted, affecting the final creaminess.
Nomayo Tuna Melt Sandwich Recipe
Ingredients:
Instructions:
Nutrition Facts:
| Calories | 504 kcal |
|---|---|
| Protein | 27.3 g |
| Fat | 41.9 g |
| Carbs | 6.4 g |
