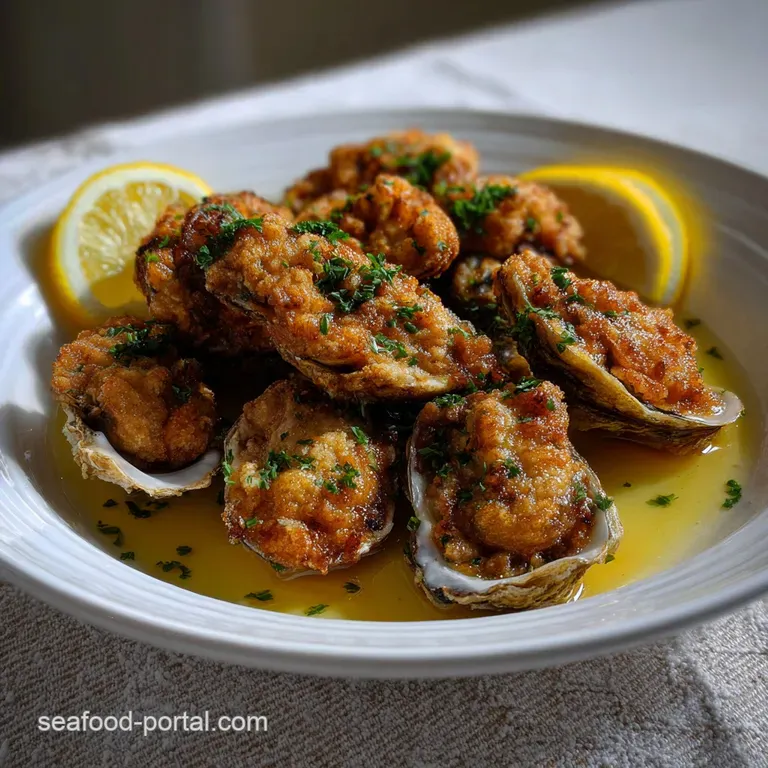
Golden Fried Oysters in Just Minutes
- Time: Active 15 minutes, Passive 5 minutes, Total 20 minutes
- Flavor/Texture Hook: Shatter-crisp exterior with a silky, briny center
- Perfect for: Quick weeknight appetizers or an impressive seafood platter
- Make Golden Fried Oysters in Just Minutes
- Scientific Reasons This Works
- Vital Recipe Statistics
- Best Ingredients and Substitutes
- Minimal Tools Required
- Step-by-Step Cooking Guide
- Troubleshooting Common Issues
- Creative Flavor Swaps
- Storage and Reheating Tips
- Favorite Serving Ideas
- Shellfish Myths and Facts
- Common Questions
- 📝 Recipe Card
Make Golden Fried Oysters in Just Minutes
Have you ever stood over a pan of sputtering oil, wondering why your home cooked seafood never quite hits that restaurant level crunch? I’ve been there, staring at a plate of limp, soggy breading that slides right off the oyster. It’s frustrating.
But the secret isn't a fancy deep fryer or a culinary degree; it’s all about the moisture balance and the heat. This recipe for Golden Fried Oysters in Just Minutes is the result of years of tinkering in my own kitchen to find that perfect, golden ratio.
We’re going for a specific sensory experience here. Think of the way a potato chip snaps, followed immediately by the velvety, salty rush of a fresh oyster. It’s a contrast that makes you want to reach for "just one more" until the plate is suddenly empty.
Most people overcomplicate the process with heavy batters, but we’re sticking to a light, seasoned dredge that lets the shellfish be the star of the show.
Right then, let's get into the specifics. We are looking at a very short window of time, literally in Just Minutes, where the magic happens. If you blink, you might overcook them. But don’t worry, I’ll walk you through the checkpoints so you can nail it on your first try.
Trust me, once you hear that first "crunch" as you bite into one of these Fried Oysters in Just Minutes, you’ll never go back to the frozen stuff.
Scientific Reasons This Works
Understanding what happens inside that sizzling oil makes you a better cook instantly. When we talk about Oysters in Just Minutes, we are dealing with two main scientific principles: the Maillard reaction and protein denaturation.
- Maillard Reaction: This is the chemical dance between amino acids and reducing sugars that creates that deep brown color and savory flavor on the crust. It happens rapidly at high temperatures, which is why our oil needs to be hot enough to brown the cornmeal before the oyster inside overcooks.
- Protein Denaturation: Oysters are mostly water and delicate proteins. If you cook them too long, the proteins tighten up and squeeze out the moisture, resulting in a rubbery texture. By flash frying in Just Minutes, we denature the surface proteins just enough to set them while keeping the interior silky.
- Surface Hydration: The buttermilk soak creates a sticky protein film. This acts as a biological "glue" that binds the dry flour and cornmeal to the slick surface of the oyster, preventing the dreaded "breading slip."
Vital Recipe Statistics
Before you start heating your oil, it’s helpful to know exactly what you’re getting into. This isn't a long haul project. It’s a fast paced sprint that rewards preparation.
| Category | Value |
|---|---|
| Preparation Style | Dry Dredge / Flash Fry |
| Batch Size | 4 Servings |
| Critical Temperature | 190°C (375°F) Oil |
| Frying Window | 90 to 120 Seconds |
Comparing the fast method to the classic long soak or heavy batter method shows a clear winner for home cooks who value texture.
| Style | Prep Method | Final Texture |
|---|---|---|
| Fast Method | Buttermilk flash soak | Airy, shatter crisp |
| Classic Method | Flour egg-crumb | Thick, heavy, and often greasy |
| Tempura Style | Wet starch batter | Light but prone to sogginess |
Best Ingredients and Substitutes
Success starts with the quality of your shellfish. I always look for a pint of fresh shucked oysters that are packed in their own liquor. They should look plump and smell like the ocean, not "fishy." If you can't find fresh, high-quality frozen ones that have been properly thawed will work, but fresh is always king for Oysters in Just Minutes.
- 1 pint fresh shucked oysters: The foundation. Why this? Fresh oysters retain their shape and moisture better than canned varieties.
- 0.5 cup whole buttermilk: The binder. Why this? The acidity tenderizes the oyster and helps the coating stick.
- 1 tsp Frank's RedHot (hot sauce): For a subtle vinegary kick.
- 0.5 tsp Diamond Crystal Fine Sea Salt: To enhance the natural brine.
- 1 cup Gold Medal All-Purpose Flour: Provides the fine base for the crust.
- 1 cup Bob's Red Mill Fine ground yellow cornmeal: The secret to that "crunch."
- 1 tbsp McCormick Old Bay Seasoning: The classic coastal flavor profile.
- 0.5 tsp freshly cracked black pepper: For a bit of back-of-the-throat warmth.
- 2 cups neutral oil: Like canola or peanut oil for over high heat frying.
- 1 fresh lemon: Essential for cutting through the richness of the fry.
- 2 tbsp fresh parsley: Adds a pop of color and freshness.
If you’re out of an ingredient, don't panic. This Quick Fried Oysters Recipe is fairly forgiving if you understand the "why" behind the swaps. For example, if you're serving these alongside a Mediterranean Fish Fillets recipe, you might want to adjust the spices to match those flavors.
| Original Ingredient | Substitute | Why It Works |
|---|---|---|
| Whole Buttermilk | Plain yogurt + splash of milk | Maintains the necessary acidity and thickness. |
| Cornmeal | Panko breadcrumbs (crushed) | Offers a different but equally pleasant crunch. |
| Old Bay | Smoked Paprika + Celery Salt | Mimics the savory, earthy notes of the original. |
Minimal Tools Required
You don't need a professional kitchen for this. Honestly, a simple setup is often better because it keeps things moving quickly.
- Lodge Cast Iron Skillet: This is my go-to. It holds heat better than stainless steel, which prevents the oil temperature from dropping when you add the oysters.
- Wire Cooling Rack: Essential! If you put fried food on a paper towel, the steam gets trapped underneath and turns the bottom soggy. A rack allows air to circulate.
- Stainless Steel Spider or Slotted Spoon: For safely lifting the oysters out of the hot oil without bringing too much fat with them.
- Three Shallow Bowls: One for the buttermilk, one for the initial flour dusting, and one for the final seasoned dredge.
step-by-step Cooking Guide

Ready to get started? This Simple Fried Oyster Recipe moves fast once the oil is hot, so have your "mise en place" (everything in its place) ready before you turn on the stove.
Preparing Fresh Shucked Oysters
- Drain the oysters. Pour the pint into a fine mesh strainer. Note: This removes excess liquid so the buttermilk isn't diluted.
- Pat them dry. Lay the oysters on a double layer of paper towels and gently pat the tops. Do this until they no longer look shiny.
Creating The Seasoned Dredge
- Set up the bowls. Put 0.5 cup of flour in bowl one. In bowl two, whisk the buttermilk and hot sauce. In bowl three, mix the remaining flour, cornmeal, Old Bay, salt, and pepper.
- Flour the oysters. Toss a few oysters in the plain flour. Note: This creates a dry surface for the buttermilk to cling to.
Coating The Oysters Properly
- Dip in buttermilk. Move the floured oysters into the buttermilk mixture. Ensure every nook and cranny is coated.
- The final dredge. Drop the oysters into the cornmeal mixture. Press the coating onto the oysters firmly. Note: Firm pressing ensures the "crunch" doesn't fall off in the pan.
Achieving The Golden Fry
- Heat the oil. Pour 2 cups of oil into your Lodge skillet. Wait until it reaches 190°C (375°F).
- Fry in batches. Carefully drop the oysters into the oil. Fry for 90 seconds until they are deep golden and crackling.
- Drain and rest. Move them to the wire rack immediately. Let them sit for 2 minutes to allow the crust to set.
- Garnish and serve. Sprinkle with fresh parsley and serve with lemon wedges while they are still screaming hot.
Troubleshooting Common Issues
Even the best cooks run into trouble sometimes. Frying can be temperamental, but most problems have a simple root cause. If you're looking for a perfect dipping companion, a Tartar Sauce Recipe can hide a multitude of minor texture sins, but let's try to get the fry right first.
Fixing Soggy Coating Problems
If your breading is limp, the oil wasn't hot enough. When the oil is too cool, the food absorbs the fat instead of the water evaporating out to create a crust. Always use a thermometer. If you don't have one, stick the end of a wooden spoon in the oil; if it bubbles vigorously, you're close.
Avoiding Tough Rubbery Results
This is caused by overcooking. An oyster only needs about 45 to 60 seconds per side. If they start to curl tightly and shrink significantly, get them out of there! They will continue to cook slightly from residual heat once removed.
Solving Gritty Dredge Issues
Sometimes the cornmeal can feel like sand. This happens if the cornmeal is too coarse or if the oysters didn't spend enough time in the buttermilk to hydrate the starches. Use "fine ground" cornmeal for the best results.
| Problem | Cause | Fix | Pro Tip |
|---|---|---|---|
| Breading falling off | Oysters too wet initially | Pat dry with towels | Use the "dry-wet-dry" method |
| Greasy texture | Oil temperature too low | Heat oil to 190°C | Fry in smaller batches |
| Burnt exterior | Oil temperature too high | Reduce heat slightly | Use oil with a high smoke point |
Creative Flavor Swaps
Once you've mastered the basic Golden Fried Oysters, you can start playing with the profile. I love to switch things up depending on what else I'm serving.
Adding A Spicy Kick
If you want Fast Fried Oysters with a bit more heat, add 1 tsp of cayenne pepper to the cornmeal dredge. You can also swap the vinegar based hot sauce for a habanero version in the buttermilk. It provides a slow burn that pairs perfectly with a cold beer.
gluten-free Flour Options
You can absolutely make this Easy Fried Oysters recipe gluten-free. Substitute the all-purpose flour with a 1:1 gluten-free flour blend (like King Arthur). Since cornmeal is naturally gluten-free, the texture remains remarkably similar to the original version.
Decision Shortcut: If you want maximum crunch, use a 60/40 cornmeal to flour ratio. If you want it spicy, double the hot sauce in the buttermilk bath. If you want a lighter, tempura like finish, use rice flour instead of all-purpose.
Storage and Reheating Tips
Let’s be honest: fried oysters are best consumed within ten minutes of leaving the pan. However, if you have leftovers, don't throw them away.
Fridge Life: You can store these in an airtight container for up to 2 days. Freezer Life: I don't recommend freezing them after they've been fried. The texture of the oyster becomes grainy once thawed.
Reheating For Best Crunch
Whatever you do, stay away from the microwave! It will turn your beautiful oysters into rubbery sponges. Instead, put them in an air fryer at 200°C for 3 minutes, or in a toaster oven. This dries out the surface oil and brings back that "shatter" crunch we worked so hard for.
Zero Waste Tip: If you have leftover cornmeal dredge, don't toss it. It's seasoned perfectly for frying green tomatoes or even thin slices of zucchini. If you have leftover buttermilk, it makes a great base for a ranch dressing or can be used in your next batch of pancakes.
Favorite Serving Ideas
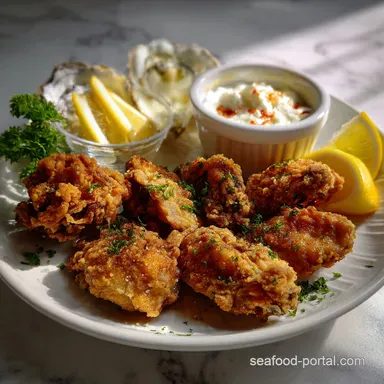
I usually serve these Oysters in Just Minutes as a standalone appetizer with just a lemon wedge and maybe some cocktail sauce. But they also make an incredible "Po' Boy" sandwich. Just pile them onto a soft French roll with shredded lettuce, tomatoes, and a heavy smear of remoulade.
If you’re feeling fancy, you can use these fried beauties as a topper for a Classic Oysters Bienville recipe. The contrast between the baked, savory topping of the Bienville and the crunch of the fried oyster is truly next level. Another "pro" move is to serve them over a cold, crisp Caesar salad. The hot and cold contrast is a classic kitchen trick that always impresses guests.
Shellfish Myths and Facts
There is a lot of "old wives' tale" advice floating around about oysters. Let's clear some of that up so you can cook with confidence.
Myth: You should only eat oysters in months that contain the letter "R". Truth: This was true before modern refrigeration and commercial farming. Today, high-quality oysters are safe and delicious year round, though they are often plumpest in the cooler months.
Myth: Frying oysters kills all the "good stuff" inside. Truth: While high heat does reduce some vitamin content, oysters are so nutrient dense (zinc, B12, iron) that a quick fry still leaves you with a very healthy protein.
Myth: You have to soak oysters for hours to get them clean. Truth: Shucked oysters from a reputable source are already cleaned. A long soak in water actually dilutes their flavor and ruins their texture.
A quick buttermilk dip is all you need for Golden Fried Oysters in Just Minutes.
Now, enough talk. Your skillet is waiting. Get that oil shimmering, grab your Old Bay, and let's get frying! Trust me, the first time you hear that crunch, you’ll know exactly why this is my favorite way to prepare them. Right then, let's crack on!

Common Questions
Can I prepare the oyster coating more than one hour in advance?
No. Oysters should not be dredged more than 30 minutes ahead. Excess time causes the coating to absorb moisture and clump.
What is the ideal oil temperature for achieving a "shatter crisp" crust?
190°C (375°F). This high temperature immediately sets the dredge via rapid moisture evaporation. If the oil is too cool, the crust absorbs excess fat, resulting in sogginess.
Should I use frozen oysters instead of fresh for this quick fry?
No. Frozen oysters release too much moisture. Thawed oysters require extensive patting to avoid diluting the buttermilk soak.
What is the primary purpose of the initial light dusting of plain flour?
It acts as a drying agent. This thin layer creates a stable, dehydrated surface for the wet buttermilk to adhere to properly.
Is it better to use a heavy batter or this light cornmeal dredge?
The light cornmeal dredge is superior. Heavy batters trap steam, leading to a doughy interior, whereas this method promotes the Maillard reaction on the surface.
Can I use a substitute for the buttermilk soak in this recipe?
Yes, you can substitute yogurt thinned with milk. The acidity is crucial for tenderizing the protein before frying, similar to how acid controls curdling when preparing our Classic Tuna Melt Sandwich: The Ultimate Crispy, Golden Grilled Recipe.
Why do my fried oysters sometimes taste tough or rubbery?
This results from exceeding the short frying window. Overcooking causes the delicate oyster proteins to contract and squeeze out moisture.
- Monitor oil temperature closely.
- Fry only for 90 to 120 seconds maximum.
- Remove immediately when the crust turns golden brown.
Golden Fried Oysters Fast
Ingredients:
Instructions:
Nutrition Facts:
| Calories | 462 kcal |
|---|---|
| Protein | 18.3 g |
| Fat | 17.2 g |
| Carbs | 58.4 g |
| Fiber | 3.2 g |
| Sugar | 1.8 g |
| Sodium | 785 mg |
