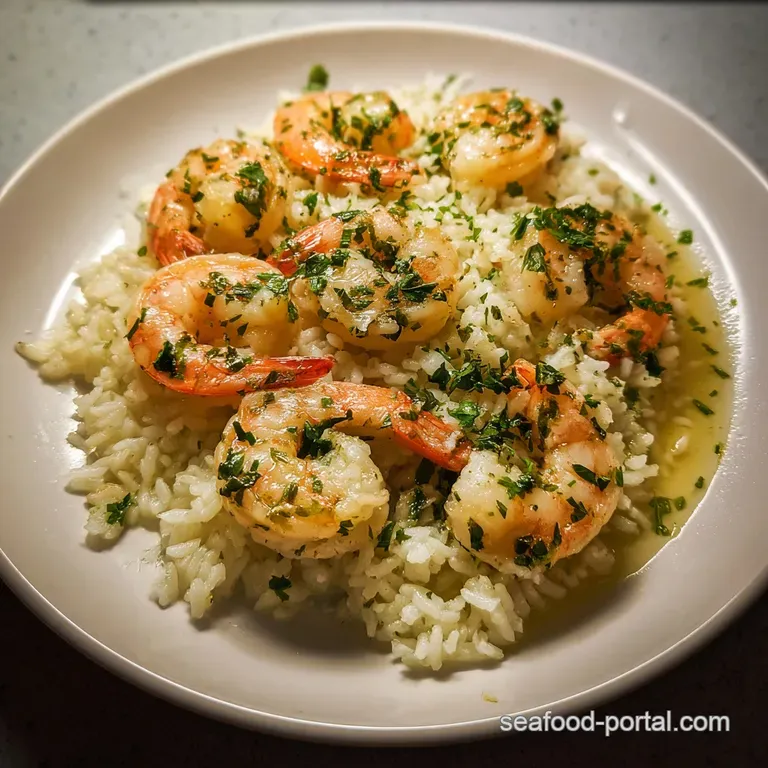
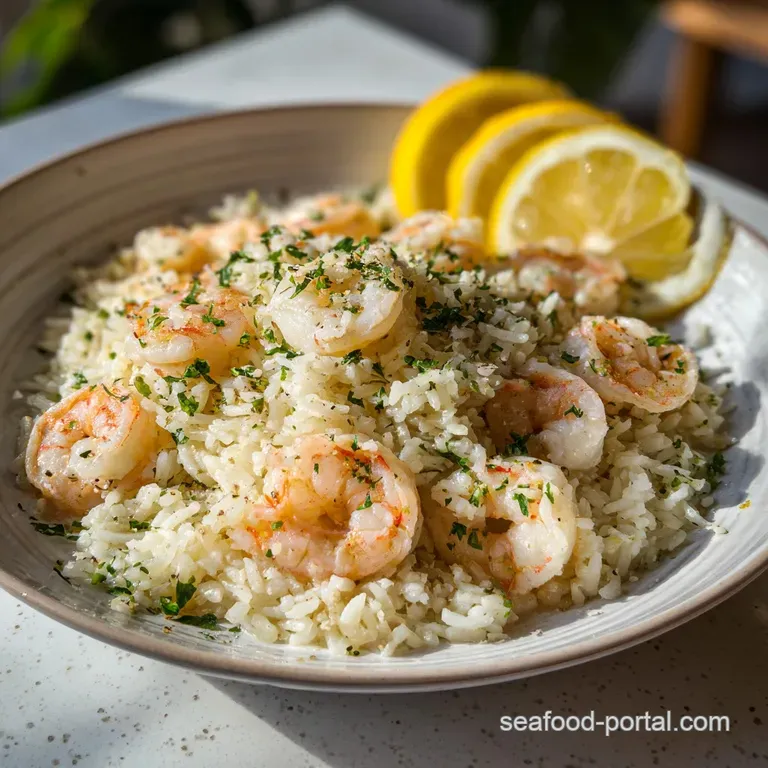
Shrimp and Rice: Zesty Garlic and Lemon
- Time: Active 10 minutes, Passive 20 minutes, Total 30 minutes
- Flavor/Texture Hook: Zesty lemon and savory garlic with fluffy, toasted grains and snap tender shrimp
- Perfect for: High protein weeknight dinners or impressive date night meals with minimal cleanup
- Create a Vibrant Shrimp and Rice Recipe with Garlic
- Building Flavor Layers with Toasted Aromatics
- Quick Performance Stats for Your Seafood Dinner
- Selecting the Best Seafood and Grains for Success
- Essential Skillet Tools for Searing and Steaming
- Precise Phases for Getting Fluffy Rice Every Time
- Common Pitfalls and Troubleshooting Your Seafood Skillet
- Clever Ingredient Swaps for Every Dietary Need
- Proper Storage and Creative Ways to Use Scraps
- Side Dish Ideas to Balance Your Garlic Plate
- Debunking Kitchen Folklore
- Recipe FAQs
- 📝 Recipe Card
Create a Vibrant Shrimp and Rice Recipe with Garlic
Ever wondered why some rice dishes feel like a soggy afterthought while others have every grain standing at attention, coated in flavor? Discover our one exceptional "Shrimp and Rice Recipe with Garlic and Lemon" for your next meal.
It all starts with that unmistakable sizzle the moment the shrimp hits the hot oil, followed quickly by the heady, punchy aroma of garlic hitting melting butter. It's the kind of scent that brings people into the kitchen asking, "What are you making?" before you've even finished chopping the parsley.
I remember the first time I tried making a version of this. I threw everything into the pot at once, thinking I was being efficient. The result was a tragic mess of rubbery seafood and mushy rice that looked more like porridge than a proper skillet meal.
That mistake taught me the most important lesson in seafood cookery: timing isn't just a suggestion, it's the entire game. We want that shrimp to have a snappy, almost "pop" texture when you bite into it, contrasted against grains that have absorbed the broth without losing their individual identity.
This isn't just a meal; it's a lesson in building layers of flavor. We’re going to use the same pan for every step because those brown bits left behind by the shrimp are absolute gold for the rice.
If you’ve been looking for a way to make seafood feel accessible and satisfying without a sink full of dishes, you’ve found it. Let's talk about why this specific method works so well.
Building Flavor Layers with Toasted Aromatics
- Maillard Magic: Searing the shrimp first at high heat creates a savory crust that leaves behind "fond" (tasty brown bits) in the skillet, which later seasons the rice from the bottom up.
- Starch Toasting: Frying the dry rice grains in butter and oil for two minutes creates a protective coating. This prevents the rice from releasing too much starch, ensuring the final texture is fluffy rather than sticky.
- Aromatic Infusion: Adding garlic to the fat rather than the liquid allows the fat soluble flavor compounds to bloom, distributing a more intense garlic profile throughout the entire dish.
- Residual Steam: Returning the shrimp to the pan only after the heat is off prevents overcooking, using the carryover heat from the rice to gently warm the protein through.
| Cook Method | Prep Time | Texture Result | Best For |
|---|---|---|---|
| Stovetop Skillet | 10 minutes | Fluffy rice with seared, snappy shrimp | Quick weeknight meals and best flavor development |
| Oven Baked | 10 minutes | Uniformly tender rice with softer seafood | Hands off cooking and larger batches |
| Rice Cooker | 5 minutes | Very soft rice, steamed (not seared) shrimp | Maximum convenience with less texture contrast |
Cooking the rice on the stovetop allows for that crucial toasting step that you just can't replicate as effectively in a standard rice cooker. That two minute window where the rice meets the garlic and butter changes the entire profile of the dish, giving it a depth that feels like it took hours to develop.
Quick Performance Stats for Your Seafood Dinner
| Component | Science Role | Pro Secret |
|---|---|---|
| Long Grain Rice | Provides structure and absorbs liquid | Always rinse until the water is clear to remove excess surface starch. |
| Grass fed Butter | Emulsifies the sauce and adds richness | Use butter with olive oil to raise the smoke point while keeping the flavor. |
| Lemon Juice/Zest | Acts as a chemical "brightener" and tenderizer | Save half the zest for the very end; heat destroys those delicate citrus oils. |
| Smoked Paprika | Provides earthy depth and vibrant color | Bloom the paprika in the oil for 10 seconds to unlock its full aroma. |
When you’re working with seafood, the quality of your aromatics makes or breaks the plate. I always suggest using a heavy bottomed skillet, like a Lodge cast iron or a heavy stainless steel pan, because it holds heat more consistently.
This prevents the temperature from dropping when you add the cold shrimp, which is the secret to getting that beautiful sear instead of just steaming them in their own juices.
Selecting the Best Seafood and Grains for Success
For this Shrimp and Rice Recipe with Garlic, you want to grab 450g (1 lb) of large shrimp. Look for the "peeled and deveined" variety to save your sanity on a Tuesday night. If you can find wild caught, the flavor is significantly more "shrimpy" and less watery than farm raised.
Just make sure they are completely thawed if you're using frozen; trying to sear a partially frozen shrimp is a recipe for a soggy skillet.
The rice choice is equally vital. We’re using 200g (1 cup) of long grain white rice, specifically Jasmine or Basmati. These varieties have a lower amylopectin content, which is a fancy way of saying they don't get as sticky as short grain rice. If you're looking for another way to use these pantry staples, you might enjoy a shrimp scampi which uses similar aromatics but swaps the grains for pasta.
| Original Ingredient | Substitute | Why It Works |
|---|---|---|
| Chicken Broth (480ml) | Vegetable Broth or Seafood Stock | Maintains the liquid ratio. Seafood stock adds a deeper oceanic flavor profile. |
| Grass fed Butter (14g) | Ghee or Coconut Oil | Ghee offers a high smoke point with nutty notes; coconut oil adds a tropical flair. |
| Fresh Parsley (30g) | Fresh Cilantro or Scallions | Both provide a fresh, green finish. Note: Cilantro changes the flavor to a Tex Mex vibe. |
Don't forget the garlic. This recipe calls for 5 cloves, minced. It might seem like a lot, but once it mellows in the butter and simmer with the broth, it becomes sweet and fragrant rather than sharp.
I always recommend using a microplane or a very sharp knife rather than a garlic press, which can sometimes make the garlic taste bitter by crushing the cells too aggressively.
Essential Skillet Tools for Searing and Steaming
You don't need a kitchen full of gadgets, but two things are non negotiable here. First, a 12 inch deep skillet with a tight fitting lid. The depth allows you to stir the rice without grains flying across your stove, and the tight lid is what traps the steam to cook the rice perfectly.
If your lid is a bit loose, you can place a piece of aluminum foil over the pan before putting the lid on to create a better seal.
Second, a fine mesh strainer is your best friend for the rice. Rinsing rice isn't just a suggestion; it's the difference between a beautiful pilaf and a sticky ball of starch. You want to run cold water over those 200g of rice until the water coming out the bottom is as clear as the water going in the top.
This removes the surface starch that causes clumping.
Chef's Tip: Pat your shrimp with paper towels until they are bone dry before seasoning. Moisture is the enemy of a good sear; if they're damp, they'll steam in the pan and turn gray instead of getting that gorgeous pink gold crust.
Precise Phases for Getting Fluffy Rice Every Time
- Rinse the rice under cold water in a fine mesh strainer until the water runs clear. Pat the shrimp completely dry with paper towels to ensure a proper sear. Note: Dry shrimp sear better, and rinsed rice stays fluffy.
- Season the shrimp with 2g smoked paprika, 1/2 tsp salt, and 1/4 tsp fresh black pepper. Heat 7ml of the olive oil in your skillet over medium high heat.
- Sear the shrimp for 60 seconds per side until just pink and opaque. Do not overcook here; they will finish later. Remove them to a plate immediately.
- Add the remaining oil and the 14g of butter to the same skillet. Toss in the 5 cloves of minced garlic and sauté for 30 seconds until fragrant and nutty.
- Add the dry rice to the fat. Stir constantly for 2 minutes until the grains look slightly translucent and smell toasted.
- Pour in the broth, 30ml lemon juice, and half the lemon zest. Bring to a boil, then immediately turn the heat to low and cover tightly.
- Simmer for 15-18 minutesuntil all liquid is absorbed. Avoid the temptation to lift the lid; you'll lose the steam needed for even cooking.
- Fluff with a fork gently. Place the seared shrimp back on top of the rice and cover (off the heat) for 2 minutes.
- Garnish with parsley and the remaining zest. Serve with an extra squeeze of lemon if you like it extra tangy.
Common Pitfalls and Troubleshooting Your Seafood Skillet
One of the biggest frustrations people have with any rice recipe with garlic is the dreaded "crunchy center." This usually happens because the heat was too high during the simmering phase, causing the liquid to evaporate before the rice was actually cooked.
If you find your rice is still hard but the liquid is gone, add 2 tablespoons of hot broth, put the lid back on, and let it sit off the heat for 5 minutes. The residual steam usually does the trick.
Another issue is the garlic burning. Garlic has a high sugar content and can turn from aromatic to bitter in a matter of seconds. This is why we add it with the butter and only sauté for 30 seconds before adding the rice.
The rice actually helps cool the pan slightly and acts as a buffer, preventing the garlic from scorching while you toast the grains.
Why Your Rice Is Mushy
If your rice ended up as a single clump, it’s likely one of two things: you skipped the rinsing step, or you stirred the rice while it was simmering. Stirring rice activates the starch (think risotto), which we want to avoid here. Once the lid goes on, leave it alone until the timer goes off.
Why Your Shrimp Is Tough
If the shrimp feels like chewing on a rubber band, it spent too much time in the heat. Remember, shrimp only need about 60 seconds per side. They should look like a "C" shape when done; if they've curled into a tight "O," they are definitely overcooked.
| Problem | Root Cause | Solution |
|---|---|---|
| Rice sticking to bottom | Heat was too high or lid wasn't tight enough | Use the lowest heat setting possible; use foil under the lid for a better seal. |
| Bland flavor | Not enough salt or low quality broth | Taste your broth before adding. If it's weak, add an extra pinch of salt to the rice. |
| Burnt garlic | Pan was too hot when garlic was added | Remove pan from heat for 20 seconds before adding garlic and butter to lower the temp. |
Common Mistakes Checklist
- ✓ Skipping the rice rinse (leads to gummy, sticky texture)
- ✓ Peeking under the lid (releases the essential steam for even cooking)
- ✓ Overcrowding the pan during the shrimp sear (they will steam, not brown)
- ✓ Using "old" garlic from a jar (lacks the vibrant oils of fresh cloves)
- ✓ Not drying the shrimp (prevents that beautiful Maillard crust)
Clever Ingredient Swaps for Every Dietary Need
If you're looking to change things up, this recipe is incredibly flexible. For a creamy shrimp sauce vibe, you can stir in a splash of heavy cream or a dollop of Greek yogurt right at the end when you're fluffing the rice. It adds a velvety richness that balances the sharp lemon beautifully.
If you need to scale this down for a solo dinner, it's easy. Just use half of everything, but keep an eye on the rice; smaller quantities can cook about 20% faster because there's less mass to heat up. If you're scaling up for a crowd, don't just double the salt and spices.
Increase them by 1.5x first, then taste at the end. For the rice, use a much wider pan (like a paella pan) to ensure the heat distributes evenly, or the bottom will burn before the top is done.
The Mediterranean Twist
Swap the parsley for fresh dill and add 50g of crumbled feta cheese at the end. The salty cheese against the lemon and garlic is a classic combination that feels like a trip to the Greek islands.
Low Carb Option
While this is a rice focused dish, you can use cauliflower rice. However, do not add 480ml of broth! Cauliflower rice only needs a splash of liquid and about 5 minutes of total cook time.
Sauté the cauliflower rice in the garlic butter, add 60ml of broth, and steam for just a few minutes before adding the shrimp back in.
Proper Storage and Creative Ways to Use Scraps
Leftover shrimp and rice will keep in the fridge for up to 2 days. When reheating, I highly suggest avoiding the microwave if possible, as it tends to turn shrimp into rubber. Instead, throw it back in a skillet with a tablespoon of water or broth, cover it, and heat over medium low until warmed through.
This "steams" it back to life and keeps the rice from drying out.
Don't toss those lemon peels or parsley stems! You can throw the lemon rinds into a jar of white vinegar for a natural kitchen cleaner, or toss the parsley stems into your freezer bag for the next time you make homemade stock.
If you have extra shrimp shells, boil them in a bit of water for 15 minutes to create a quick "shrimp tea" that you can use instead of plain water for your next seafood soup or risotto.
Side Dish Ideas to Balance Your Garlic Plate
Since this is a one pan meal, you don't need much else, but a bit of green on the side never hurts. A simple bunch of roasted asparagus or some charred broccolini with a pinch of red pepper flakes works wonders. The bitterness of charred greens cuts through the richness of the garlic butter perfectly.
You could also serve this with a crisp, cold cucumber salad. The cooling effect of the cucumber and a light vinegar dressing acts as a palate cleanser between bites of the savory, garlicky rice. Whatever you choose, keep it light.
The "Shrimp and Rice Recipe with Garlic and Lemon" is the star of the show, and you want its bright, clean flavors to shine through without being overshadowed by heavy side dishes.
The Perfection of Texture
"Searing" isn't just about color; it's about creating a contrast between the "shatter" of a well browned exterior and the "velvety" interior of the seafood. When you nail that 60 second sear, you're achieving a level of cooking that most restaurants struggle to hit.
Trust your timer, watch for the "sizzle," and enjoy the most flavorful meal you've made all week.
Debunking Kitchen Folklore
One of the most persistent myths is that searing meat or seafood "seals in the juices." In reality, moisture loss happens regardless of the sear. What searing actually does is create a complex array of new flavor compounds through the Maillard reaction.
So, we sear the shrimp for the taste, not to keep it "juicy" that part is handled by making sure we don't overcook it!
Another common misconception is that you must use a specific type of expensive "sushi rice" for it to be good. While quality matters, standard long grain Jasmine rice is actually the gold standard for this type of skillet meal because of its ability to stay separate and fluffy.
You don't need a specialty market; your local grocery store's pantry aisle has exactly what you need. Finally, don't believe the "lemon juice tenderizes" myth for long periods. If you marinate shrimp in lemon juice for too long, the acid will actually "cook" the protein (like ceviche) and make it mushy when it hits the heat.
Always add the citrus right before or during the cooking process for the best results.

Recipe FAQs
How to ensure the rice is not gummy or sticky?
Rinse your long grain white rice under cold water in a fine mesh strainer until the water runs clear. This removes excess surface starch that causes clumping during the 15-18 minute simmer.
Is it true I can save time by not drying the shrimp before searing?
No, this is a common misconception. Patting the shrimp completely dry with paper towels is essential for achieving a proper Maillard crust rather than steaming them in their own juices.
How to avoid overcooking the shrimp during the sear?
Limit the searing time to exactly 60 seconds per side. Once they are just pink and opaque, remove them from the pan immediately so they don't turn rubbery while the rice finishes cooking.
Can I use pre-minced garlic from a jar?
No, stick with fresh garlic cloves. Jarred alternatives lack the vibrant, nutty oils released when sautéing fresh minced garlic for 30 seconds in the butter and olive oil.
How to get the best flavor from the rice grains?
Toast the dry, rinsed rice in the skillet fat for 2 minutes before adding the broth. If you enjoyed learning how to toast grains for better depth here, you will love using that same logic to build flavor in our authentic shrimp etouffe.
Is it okay to peek under the lid while the rice is simmering?
No, keep the lid tightly closed until the timer goes off. Lifting the lid releases the essential steam needed to cook the rice evenly, which can lead to hard, undercooked grains.
How to heat the shrimp through without drying them out?
Place the seared shrimp on top of the finished, fluffed rice and cover for 2 minutes. This residual heat is enough to warm the shrimp perfectly without causing the texture to become tough or dry.
Garlic Lemon Shrimp Rice

Ingredients:
Instructions:
Nutrition Facts:
| Calories | 364 kcal |
|---|---|
| Protein | 26.4 g |
| Fat | 8.8 g |
| Carbs | 43.5 g |
| Fiber | 1.2 g |
| Sugar | 0.9 g |
| Sodium | 618 mg |
