The Ultimate Chocolate Butterfinger Poke Cake: a Proper Decadent Showstopper
- Why the Chocolate Butterfinger Poke Cake is Your New Favorite Decadent Dessert
- The Science of Soak: Why This Cake Stays Incredibly Moist
- Gathering Your Ingredients for the Perfect Chocolate Butterfinger Poke Cake
- A Step-by-Step Guide to Baking and Assembly
- Expert Troubleshooting and Pro Tips for Better Butterfinger Cake Results
- How to Store and Freeze Your Decadent Chocolate Butterfinger Poke Cake
- Presentation and Pairing Suggestions
- Recipe FAQs
- 📝 Recipe Card
Why the Chocolate Butterfinger Poke Cake is Your New Favorite Decadent Dessert
Wait until you pull this cake from the fridge; the aroma of rich, dark chocolate mixed with that sweet, slightly salty peanut butter is absolutely addictive. The best part is the texture contrast.
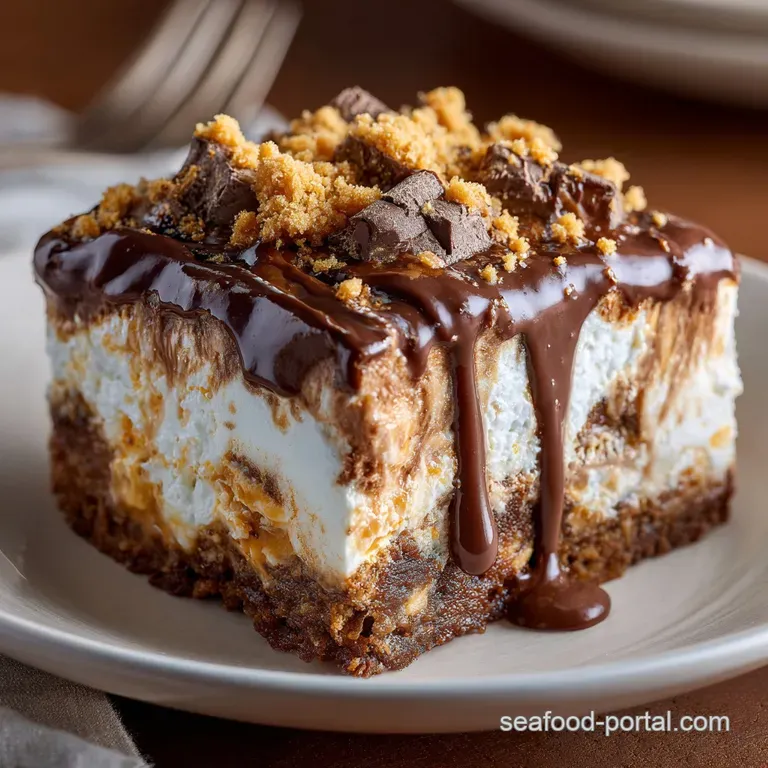
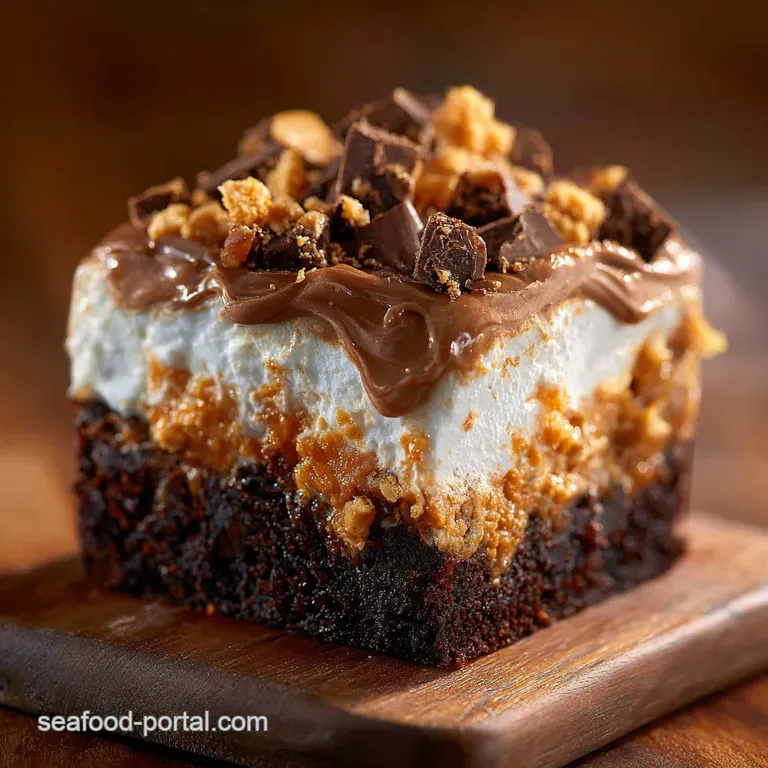
You get an unbelievably moist, fudgy cake base hiding a layer of gooey sauce, all capped with a cool, creamy frosting and satisfyingly crisp candy chunks. It truly is a textural masterpiece.
This showstopper dessert looks like you spent all day baking, but honestly, it’s a total lifesaver for last minute events. We use a couple of simple hacks (hello, boxed mix!) and the famous poke cake method to guarantee incredible flavour with minimal actual effort.
This Chocolate Butterfinger Poke Cake is fast, incredibly budget friendly, and always feeds a massive crowd happily.
I’ve made all the mistakes I’ve frosted warm cakes and ended up with a runny mess, trust me. I’m sharing every trick I’ve learned to ensure your cake is perfectly soaked, perfectly chilled, and perfectly crunchy on top. Ready to turn an ordinary sheet cake into a masterpiece?
The Science of Soak: Why This Cake Stays Incredibly Moist
Defining the 'Poke Cake' Magic: Moisture Infusion Explained
The secret to any good poke cake lies in its structure and temperature. We poke holes while the cake is still warm, and as the cake cools, it naturally draws the thick, sweet liquid deep into its structure through capillary action.
This is the difference between a dry, standard cake and this deep, incredibly moist, almost pudding like experience. It’s brilliant.
The Ultimate Upgrade: Deep Chocolate Meets Peanut Butter Candy Crunch
Why Butterfinger? It holds up better than almost any other candy bar when buried in frosting. That unique, flaky, peanut buttery crunch provides the essential texture contrast this rich, fudgy cake desperately needs.
The salty, sweet profile is the perfect counterpoint to the intense chocolate, preventing the entire thing from tasting overwhelmingly heavy.
The Fudgy Soak Layer: Condensed Milk vs. Hot Fudge
We aren't just using one liquid; we use two components for the ultimate soak. Sweetened condensed milk is the structural backbone; it seeps into the cake and sets up when chilled, ensuring the cake remains incredibly moist without being soggy.
The hot fudge adds that essential gooey decadence and that deep, intense chocolate flavour that makes this recipe shine.
Texture Contrast: Creamy Frosting and Crisp Butterfinger Bits
The heavy cake needs a light topping, which is why we skip the typical dense buttercream here. We use a stabilized cream cheese whipped frosting, which is light, airy, and slightly tangy. This cool, smooth layer acts as the perfect canvas for those crushed Butterfinger pieces. If you enjoy this kind of extreme texture contrast, you might also love my Oreo Cookie Pudding Poke Cake: The Ultimate Cookies and Cream Dessert , which also focuses heavily on soft vs. crunchy layers.
Gathering Your Ingredients for the Perfect Chocolate Butterfinger Poke Cake
Elevating the Chocolate Base: Cake Mix Hacks vs. Scratch Baking
Yes, we are using a boxed cake mix, and I’m proud of it. We hack it using instant espresso powder and hot water instead of cold; this simple trick deepens the cocoa flavour immensely. The cake will taste rich and expensive, even if you spent five minutes mixing the batter.
The Essential Candy Component: Preparing the Butterfinger Pieces
You need two different textures of crushed Butterfinger. The pieces going into the middle soak layer should be coarse, like small peas, so you get satisfying pockets of crunch inside the cake. The garnish on top should be slightly finer for a beautiful, even finish.
Use a Ziploc bag and a rolling pin; it’s far less messy than a food processor.
Substitutions and Swaps for Allergy Friendly Baking
Sometimes you need a swap! While this recipe is peanut heavy, here are some viable replacements for your other key components. Always check labels for true allergy safety.
| Ingredient | Viable Substitution |
|---|---|
| Hot Fudge Sauce | Thick Caramel Sauce or Dulce de Leche |
| Sweetened Condensed Milk | Cream of Coconut (Note: Flavor will change) |
| Heavy Cream (in frosting) | Thawed, 16 oz tub of Whipped Topping (Cool Whip) |
| Devil's Food Cake Mix | Standard Chocolate or Triple Chocolate Mix |
The Role of Sweetened Condensed Milk in Moisture Retention
This magic ingredient is non-negotiable. Don't try to use evaporated milk or regular whole milk it won't work! The high sugar content and viscosity of sweetened condensed milk are what allow the liquid to properly gel and bind inside the cake while chilling. If you love this gooey, caramel like moisture, you really need to try my Butter Pecan Praline Poke Cake: Decadent Southern Praline Sauce Recipe .
A step-by-step Guide to Baking and Assembly
Stage 1: Achieving the Perfect Chocolate Cake Base
Preheat your oven to 350°F and grease your 9x13 pan properly. First, whisk the espresso powder into the hot water until it’s fully dissolved. Now, combine the cake mix, oil, eggs, and the hot coffee water. Mix with an electric mixer for two minutes until the batter is smooth and slightly glossy.
Bake for 30– 35 minutes, or until a tester comes out clean, and let it cool on a rack for exactly 15 minutes . This waiting period is crucial.
Stage 2: The Critical Poke and Pour Technique for Maximum Absorption
While the cake is cooling, grab the handle of a wooden spoon (or a thick chopstick). Poke 20 to 30 holes evenly across the entire surface of the warm cake. Do not poke all the way to the bottom. Whisk together the condensed milk, hot fudge, and vanilla until smooth it should be thick.
Slowly pour this mixture over the cake, pausing to let it soak into the holes. Sprinkle over the coarse Butterfinger pieces and gently press them down.
Crucial Chef’s Note: The cake must be warm when poured, and then it must be covered and refrigerated for a minimum of four hours. Do not rush this chilling step, or the cake will be runny instead of fudgy.
Stage 3: Stabilizing the Vanilla Frosting Layer
Beat the room temperature cream cheese until it is light and fluffy; this takes about a minute. Gradually mix in the powdered sugar and vanilla. Once incorporated, slowly drizzle in the very cold heavy cream while beating the mixture on high speed. Keep beating until the frosting forms beautiful, stiff peaks.
Stop immediately when stiff peaks form to avoid turning it grainy.
Stage 4: Decorating and Setting the Final Cake
Once the cake is fully chilled and the soak has set (it should feel tacky, not liquid), spread the stabilized frosting evenly across the top. Sprinkle the remaining, finely crushed Butterfinger candy bars generously over the frosting.
Slice the cake into squares and serve immediately, or keep it covered in the refrigerator until party time!
Expert Troubleshooting and Pro Tips for Better Butterfinger Cake Results
Avoiding a Soggy Bottom: Hole Size and Density Matters
Don't use a toothpick! The holes must be big enough (think wooden spoon handle diameter) to accept the thick fudge sauce, but you only need about 20 30 holes. Also, never poke through to the bottom of the pan ; this prevents the liquid from leaking out and leaving a sugary crust underneath the cake.
Troubleshooting Frosting Consistency and Stability
If your frosting is too soft, your cream wasn't cold enough, or you didn't whip it quite long enough. If the frosting seems watery or loose, stop everything, add a teaspoon of instant pudding mix powder (vanilla or cheesecake), and beat again until stiff.
If it looks grainy, you over whipped it, and sadly, there’s no fixing that texture completely.
The Best Tools for Crushing Butterfinger Candy
Using a food processor often turns the flaky candy bars into a slightly sticky paste because of the peanut butter oils. I highly recommend placing the candy bars in a sturdy Ziploc bag, wrapping it in a kitchen towel, and gently smashing them with a rolling pin. This gives you that perfect, irregular crunch we want.
How to Store and Freeze Your Decadent Chocolate Butterfinger Poke Cake
Ideal Refrigeration Times and Covering Methods
Because this recipe contains dairy (the condensed milk and the cream cheese frosting), it must be stored in the refrigerator. Store the cake covered with plastic wrap or in an airtight container for up to 5 days.
Do not use aluminum foil directly on the frosting ; it will stick and tear the top layer.
Can You Freeze a Slice? Best Practices for Thawing
You bet it freezes well! Poke cakes freeze beautifully because of their high moisture content. Cut the cake into individual servings, place them on a small tray in the freezer until solid (about 2 hours), and then wrap each slice tightly in plastic wrap and aluminum foil.
To thaw, simply unwrap the foil and plastic and leave the slice in the fridge overnight. It tastes just as fresh.
Presentation and Pairing Suggestions
Serving Temperature: Chilled vs. Room Temp
This cake is definitely best served chilled. When it's cold, the fudge sauce fully sets, giving the cake that wonderful, firm, gooey texture, and the crunchy topping stays crisp. If you leave it at room temperature for too long, the frosting will start to soften and the whole thing loses its structural integrity.
Presentation Tips for a Crowd
I like to garnish the serving plate with a light dusting of cocoa powder and perhaps a simple drizzle of caramel sauce for an extra fancy touch. For another cake that impresses crowds without the effort, try my Pumpkin Poke Cake: Easy Salted Caramel Fall Dessert Recipe when fall rolls around!
Pairing Recommendations
The richness of the chocolate and peanut butter demands a strong beverage counterpart. Serve slices with a very cold glass of milk, or if you prefer a coffee shop feel, a strong espresso or a small scoop of vanilla bean ice cream provides a cool, creamy finish.

Recipe FAQs
Why didn’t the filling fully sink into my cake holes?
Ensure the cake is still warm (but not piping hot) when you poke it; a warm cake absorbs the liquid filling much more efficiently than a cold one. Use the back of a wooden spoon handle or a thick straw to create substantial holes, making sure they penetrate about three quarters of the way down the cake depth.
If the filling mixture is too thick, try slightly warming it before pouring to aid absorption.
Can I use a completely scratch made chocolate cake instead of a boxed mix?
Absolutely, provided your scratch recipe yields a dense, sturdy 9x13 inch sheet cake that can withstand the "poking" process without collapsing. Rich devil’s food or dark chocolate recipes work best for flavor alignment.
Keep in mind that a scratch cake might absorb the filling differently, so ensure the cake is adequately cooled before poking.
I don't like sweetened condensed milk. Is there an alternative for the poke filling?
If you prefer a less intensely sweet filling, you can substitute the condensed milk with a high-quality chocolate ganache (equal parts hot cream and melted chocolate) or a rich, thick pastry cream.
However, be aware that the condensed milk and fudge combo is specifically designed to create that signature, ultra moist texture traditional to poke cakes.
How far in advance can I make this cake, and how should I store leftovers?
This cake is actually best prepared 12 to 24 hours in advance to allow the liquid filling to fully absorb and chill, creating the fudgy texture. Store the covered cake in the refrigerator for up to 4 days.
Freezing the entire frosted cake is not recommended, as the high moisture content of the filling and the whipped frosting may separate upon thawing.
Can I use other chocolate bars or crunchy toppings instead of Butterfinger?
Yes, you can substitute other crunchy, chocolate coated candies; Snickers, Heath bar (Skor), or crushed Oreos are excellent choices. However, Butterfinger's unique flaky, peanut buttery texture provides the optimal contrast to the smooth, rich chocolate base.
If using softer candies, ensure you chop them coarsely and chill them well before topping.
My vanilla frosting looks wet or is separating. What went wrong?
Frosting separation usually occurs if the butter and cream cheese were not at true room temperature or if the liquid (milk/cream) was added too quickly. Ensure your stabilizing agent, like powdered sugar, is fully incorporated before introducing liquids gradually on a low speed.
If it separates, try adding a tablespoon of powdered sugar and mixing again quickly to re-emulsify the fats.
Should this cake be served cold or at room temperature?
Because this cake relies heavily on dairy components (condensed milk, cream cheese frosting), it must be stored in the refrigerator for food safety. For optimal flavor and the best fudgy texture, remove the cake and let it sit at room temperature for about 15 20 minutes before serving.
This allows the frosting and cake base to slightly soften, enhancing the decadent mouthfeel.
Ultimate Chocolate Butterfinger Poke Cake
Ingredients:
Instructions:
Nutrition Facts:
| Calories | 646 kcal |
|---|---|
| Protein | 13.5 g |
| Fat | 41.1 g |
| Carbs | 59.9 g |
