Tuna Tataki Achieve the Perfect Restaurantquality Seared Tuna Loin
- The Fine-Dining Dish You Can Master in 15 Minutes
- Defining "Tataki": Precision Slicing and the Perfect Sear
- Procurement and Prep: Sourcing the Star Ingredients
- The Secret Sauce: Crafting the Bright Ponzu Dressing
- Step-by-Step Guide to the Perfect Tuna Tataki Sear
- From Loin to Plate: The Final Assembly and Presentation
- Troubleshooting and Expert Tips for Impeccable Results
- Beyond Classic Tuna Tataki: Flavor Variations and Pairings
- Recipe FAQs
- 📝 Recipe Card
The Fine Dining Dish You Can Master in 15 Minutes
Look, if you want a recipe that makes people think you secretly trained at Nobu, but only requires fifteen minutes of pure panic followed by three minutes of glorious cooking, this is it. Tuna Tataki. It’s light, it’s refreshing, and honestly, the wow factor is off the charts.
I know the name sounds intimidating, like something you only order when someone else is paying. But trust me, making Tuna Tataki at home is just a series of quick, precise moves. It’s less about complexity and more about commitment.
Commitment to high heat, commitment to quality fish, and commitment to having a seriously sharp knife. My first attempt? I used a slightly dull knife, and the slices looked like a small child had attacked the tuna with a plastic butter knife. Lesson learned.
We are aiming for buttery perfection here, not shredded sadness. Ready to stop paying thirty bucks for four slices of fish? Let’s crack on.
Defining "Tataki": Precision Slicing and the Perfect Sear
Tataki translates loosely to "pounded" or "hit" (originally referring to how the fish or meat was often prepared with spices). In modern culinary terms, especially when referring to fish like Ahi tuna, it simply means flash seared.
We take a gorgeous, cold loin of tuna, coat it in a flavorful crust, and give it an extremely quick bath in a screaming hot pan.
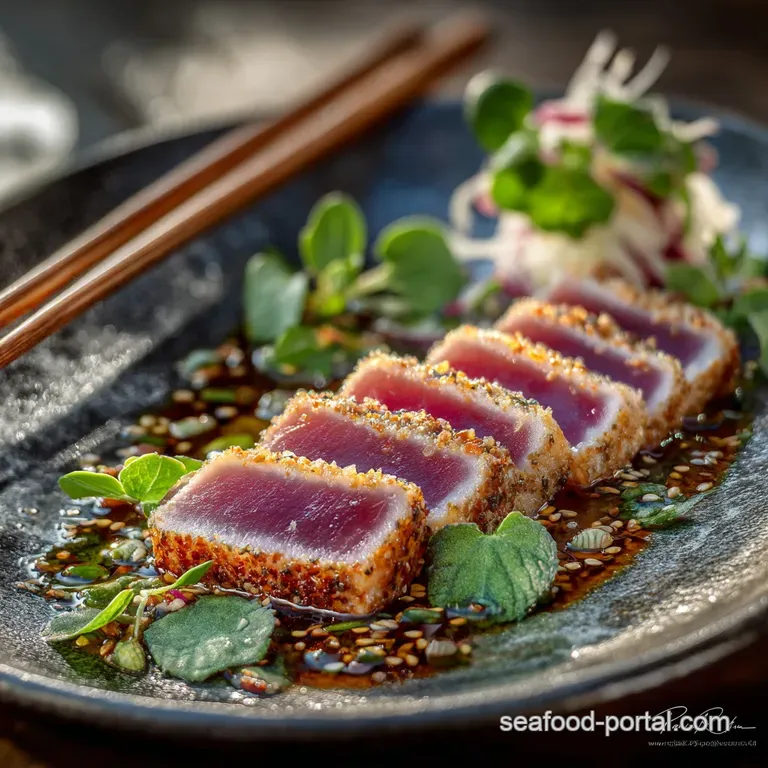
The genius of Tuna Tataki is the contrast. You get a hot, crisp, deeply savory crust, giving way immediately to a cool, buttery, raw interior. The texture difference is magical.
Why Quality Ahi Tuna Makes or Breaks This Dish
Let me be blunt: you cannot skimp here. This is not a recipe for frozen supermarket tuna fillets. The tuna is the dish. Because 90% of the fish remains raw, you absolutely must use sashimi grade or sushi grade Ahi tuna (also known as Yellowfin).
The flavor of the fish should be clean and slightly sweet. It needs to look vibrant, not brownish or dull. When you’re dealing with premium ingredients that are barely cooked, their quality shines through, or more accurately, their lack of quality will ruin your whole afternoon.
Ask your fishmonger for the best center cut Ahi loin they have. It’s worth the splurge.
A Quick Glance at the Culinary Science of the Sear
Why do we need the pan to be so hot you could practically see the heat shimmer? The goal is speed. We need the Maillard reaction (that magical chemical process that creates flavor browning) to happen on the very surface of the fish instantly. This gives us that beautiful, dark crust.
If your pan is only medium hot, the heat will creep too far into the fish before the crust develops, leaving you with an unappealing gray layer just beneath the surface. We want that razor thin line of searing, and then BAM, raw interior. No gray zone allowed.
The Essential Tools for Achieving Restaurant Textures
You really only need two things beyond your standard kitchen tools:
- A Cast Iron Skillet or Heavy Bottomed Stainless Pan. Cast iron holds and distributes intense heat like nothing else. This is crucial for that instant, uniform sear.
- A Truly Sharp Knife. I’m talking scary sharp. If you don't have one, sharpen it, or borrow one. If you saw the tuna, you tear the delicate muscle fibers. We need smooth, single cuts.
Procurement and Prep: Sourcing the Star Ingredients
Before you even think about coating the tuna, get your sauce sorted. The Ponzu needs a little time for the flavors to marry up, especially the fresh ginger and lime.
This recipe is simple because we are showcasing the fish. That means less time chopping obscure ingredients and more time securing the actual Ahi loin. Head to your trusted fish market first.
Get that gorgeous loin, bring it home, and keep it in the coldest part of your fridge until the absolute moment you are ready to use it. Cold fish sears better. Warm fish cooks faster. We want control, and cold fish gives us control.
The Secret Sauce: Crafting the Bright Ponzu Dressing
A classic Tuna Tataki is nothing without its acidic sidekick. That’s the Ponzu. It’s savory, it's sweet, and it’s gloriously tart. It cuts through the richness of the Ahi and the earthiness of the sesame seeds.
Checklist: Ensuring Your Tuna is Sushi Grade
This isn't a suggestion, it’s a health warning. When you’re eating fish this rare, you must ensure the fish has been handled and flash frozen correctly to kill parasites.
Crucial Safety Note: If your fishmonger cannot explicitly verify the tuna is "sashimi grade," or if they hesitate when you ask, do not use it for Tataki. Use it for fish tacos instead, where it will be cooked all the way through. Don't risk it for a recipe that looks this pretty.
Mastering the Ponzu Balance: Soy, Citrus, and Umami Depth
Most people think of Ponzu as just citrus soy sauce. It’s more complex than that. The addition of mirin (sweet rice wine) balances the aggressive tartness of the fresh lime juice and the salty depth of the soy sauce.
Don’t skip the mirin; it brings a subtle sweetness and an incredible glossy texture to the finished dressing. I use lime because it’s easy to find, but if you can locate Yuzu juice (it’s expensive, but oh my goodness), the flavor profile explodes.
Simple Seasoning for the Perfect Tuna Tataki Crust
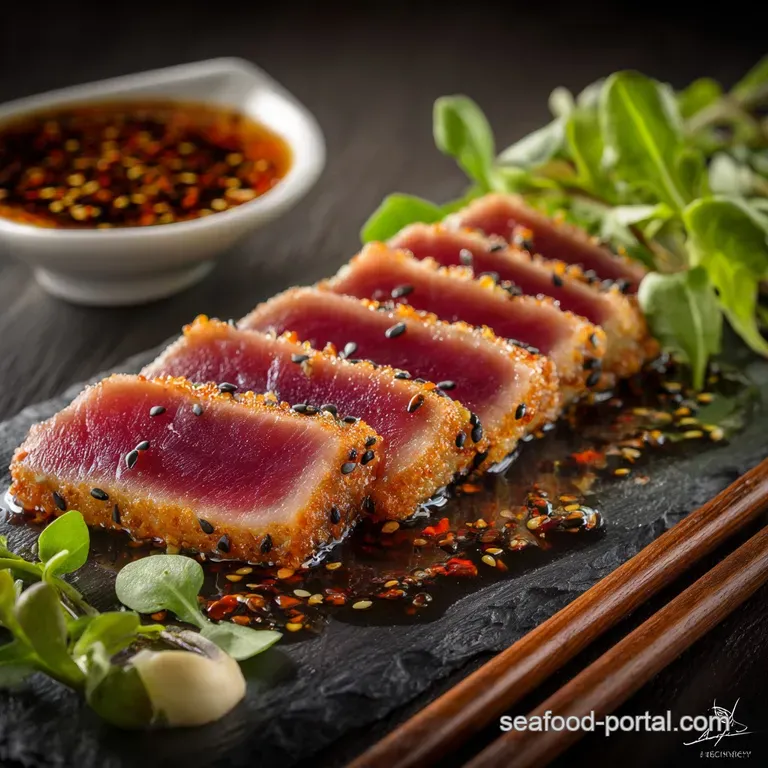
Forget twenty spices. The classic crust is about texture and salinity. We’re using a mix of black and white sesame seeds (for color contrast, mostly), good quality coarse sea salt, and a ton of freshly ground black pepper. The pepper gets beautifully toasted and almost crunchy when it hits the hot pan.
Press that crust onto every single surface of the loin until it looks like a chic, modern art sculpture.
Related Recipes Worth Trying
- LightningFast Grilled Ahi Tuna Steaks with SesameGinger Glaze — Achieve buttery restaurantquality Grilled Ahi Tuna Steaks in minutes This lightning fast recipe uses a gingersesame marinade for vibrant flavour and a...
- Foolproof Creamy Subway Tuna Salad Sandwich Recipe Just Like the Shop — Achieve that signature smooth rich texture with this foolproof Subway Tuna Salad Recipe Forget watery fillingsthis copycat formula is the best youll find...
- Creamy Zesty Tuna Macaroni Salad Recipe The Ultimate Summer Side — This proper job of a creamy Tuna Macaroni Salad is so easy its foolproof We ditch the gloopy standard for a zesty classic recipe perfect for BBQs and picnics
step-by-step Guide to the Perfect Tuna Tataki Sear
Once your loin is coated and your oil is heating, things move fast . You need to be ready to commit to the pan. Have your tongs ready and a landing plate right beside the stove.
- Pat it dry and coat it thoroughly. Seriously, dry. Like a desert.
- Heat the oil. Use grapeseed or canola (high smoke point oil is key) in your cast iron pan until it is just smoking. You might even see a little wisp of smoke curling up. That’s your cue.
- Place the tuna in the pan. It should sizzle immediately and violently. If it doesn't, your pan isn’t hot enough. Pull the fish out, wait another minute, and try again.
- Sear, turn, sear, turn. We are searing the four long sides, plus the two small end caps (if your loin has them). Thirty seconds per side is your window. Set a timer if you need to.
I’m telling you, this part is nerve wracking the first time. It feels wrong to cook something so little, but trust the process.
From Loin to Plate: The Final Assembly and Presentation
The cooking is done! Now comes the crucial step that separates the amateurs from the pros: the chill and the slice.
Achieving the "Cool Core": Timing the Intense Heat
The moment the final side is seared, the tuna must leave the pan. Immediately. That 30-45 second searing time ensures the heat only penetrates about 1/8th of an inch into the flesh. The center should still be refrigerator cold.
The Critical Chill: Firming Up the Loin for Slicing
Remember that chilling step? It's not optional. Once you remove the loin from the pan, the residual heat will continue to cook it (carryover cooking). We stop this by quickly chilling it ( 10 minutes in the freezer is perfect).
This halts the cooking and, equally important, firms up the exterior and interior, making it much easier to achieve those gorgeous, clean, thin slices.
Mastering the Diagonal Slice: Paper Thin Cuts for Texture
Why the heck bother with Tataki if you're not getting those slices right?
- Use your razor sharp knife.
- Cut on a slight diagonal (about 45 degrees).
- Aim for 1/4 inch thick slices. Think slightly thicker than a coin.
- Use a single, confident press or pull motion. Don't saw.
- Keep a damp cloth nearby and wipe the blade clean every two or three slices. This removes any sticking sesame seeds or fish residue that could tear the next slice.
Drizzling vs. Dipping: Serving Suggestions for Maximum Flavor
Do not pour the Ponzu over the whole arrangement until you are literally serving it. The acid will start to "cook" the fish (like a ceviche), and we want that fresh, pink color.
Arrange the slices, fan them slightly, then lightly drizzle the Ponzu over the top, letting it pool just slightly beneath the fish. Serve the extra dressing on the side for dipping. Garnish with those super thin diagonal scallions and the julienned daikon for crunch.
Troubleshooting and Expert Tips for Impeccable Results
Here are the things I learned the hard way (usually through scorched fish or sad, grey edges):
- Patience is key (before the sear): Don't rush the pan heating. A cold tuna loin into a hot pan is your mantra.
- Wipe it down: If you see any white residue (albumin) oozing out during the sear, your pan might have been too hot, or you cooked it for too long. Wipe the residue off quickly with a paper towel on the tongs.
- The Daikon Difference: That little pile of finely julienned daikon radish isn't just decoration. It provides a sharp, refreshing palette cleanser between bites. Do not skip the crunch factor.
- Don't slice ahead: Seriously, slice the chilled loin no more than 15 minutes before serving. It looks best immediately.
Beyond Classic Tuna Tataki: Flavor Variations and Pairings
Once you nail the classic version, you can play around endlessly with the crust and the sauce. The technique remains the same: sear fast, chill, slice thin.
Storage Safety: Keeping Unserved Seared Tuna Fresh
Because we started with sashimi grade fish and barely cooked it, it must be treated like raw fish. If you have leftovers (which is unlikely, let's be honest), store the unsliced loin wrapped tightly in the fridge for no more than 24 hours.
Once sliced and dressed, it really needs to be eaten within a few hours.
Alternative Coatings: Sesame Seeds, Togarashi, and Furikake
The sesame crust is wonderful, but you can get spicy:
- Spicy Togarashi: Mix a tablespoon of Japanese seven spice (Shichimi Togarashi) into your salt and pepper mix. It gives a beautiful reddish hue and a pleasant, low heat.
- Furikake Fun: Furikake is a Japanese rice seasoning mix often containing dried seaweed, sesame, and bonito flakes. Roll the tuna in that instead for a super savory, umami rich crust.
- The Herb Crust: Use finely chopped fresh chives and finely minced garlic pressed onto the exterior. This pairs wonderfully if you lean into a ginger heavy Ponzu.
Sides That Complement the Delicate Fish
Because the Tataki is so clean and light, you want simple, refreshing sides. A warm side will ruin the beautiful temperature contrast of the fish. Think chilled, savory salads:
| Recommended Side | Why it Works |
|---|---|
| Chilled Cucumber Salad | High water content, great crunch, cleanses the palate. |
| Simple Wakame Salad | Earthy, slightly sweet, classic pairing. |
| Edamame | Simple, salty protein pop. |
Calculating Nutritional Information Per Serving
Since this is so light on oil and starch, the main caloric content comes directly from the amazing protein (the tuna) and the healthy fats. The estimates provided in the outline are a good guide, assuming minimal oil absorption and moderate use of the Ponzu.
If you’re tracking sodium, make sure you use a low-sodium soy sauce or Tamari, because the salty hit from the Ponzu is where most of the sodium lives. Enjoy!

Recipe FAQs
Is it really safe to eat the tuna mostly raw, or am I playing with fire?
Good heavens, safety first! You must only use certified ‘sashimi grade’ or ‘sushi grade’ tuna from a reputable fishmonger, as only this grade has been correctly handled and flash frozen to eliminate potential parasites.
How do I ensure I get that perfect, thin seared edge on my Tuna Tataki without cooking the whole blooming thing?
The secret to perfect Tuna Tataki is intense heat and speed; use a screaming hot, dry pan (cast iron works a treat) and sear each side for only 30-45 seconds, then immediately transfer the loin to the freezer for 10 minutes to halt residual cooking.
Can I make the whole dish ahead of time, or is it a disaster waiting to happen if I store the leftovers?
While the Ponzu dressing and garnishes can be prepped, this dish is best enjoyed immediately after slicing; leftovers can be refrigerated and safely consumed within 24 hours, but the texture of the seared crust will inevitably soften.
I haven't got time to whip up the Ponzu dressing. What's a quick cheat's substitution?
A brilliant quick swap is combining three parts good quality soy sauce or tamari with one part fresh lime juice, a dash of rice vinegar, and a tiny pinch of sugar to balance the acidity; it gets you most of the way there.
My slicing looks dreadful like I used a butter knife. Any tips for pristine, restaurant quality cuts?
Ensuring the loin is well chilled and using a very sharp knife are absolutely critical; use a single, smooth downward motion like a guillotine and remember to wipe the blade clean after every couple of slices to prevent dragging the crust.
Tuna Tataki Quick Ponzu Recipe
Ingredients:
Instructions:
Nutrition Facts:
| Calories | 318 kcal |
|---|---|
| Protein | 2.4 g |
| Fat | 3.6 g |
| Carbs | 11.5 g |
| Fiber | 1.9 g |
| Sodium | 608 mg |
