Poke Cake Recipe with Strawberry: Velvety Finish
- Time: Active 10 minutes, Passive 30 minutes, Total 40 minutes
- Flavor/Texture Hook: Cool, velvety cream meets a burst of tangy strawberry.
- Perfect for: Backyard barbecues, summer potlucks, and beginner bakers.
- The Ultimate Poke Cake Recipe with Strawberry
- The Physics of the Infusion
- Ingredient Deep Dive
- Essential Ingredients and Smart Substitutes
- Basic Kitchen Tools for Baking
- Simple Steps for Best Results
- Solving Common Baking Problems
- Easy Ways to Adapt Ingredients
- Storing and Saving Your Cake
- Creative Ways to Present Cake
- Recipe FAQs
- 📝 Recipe Card
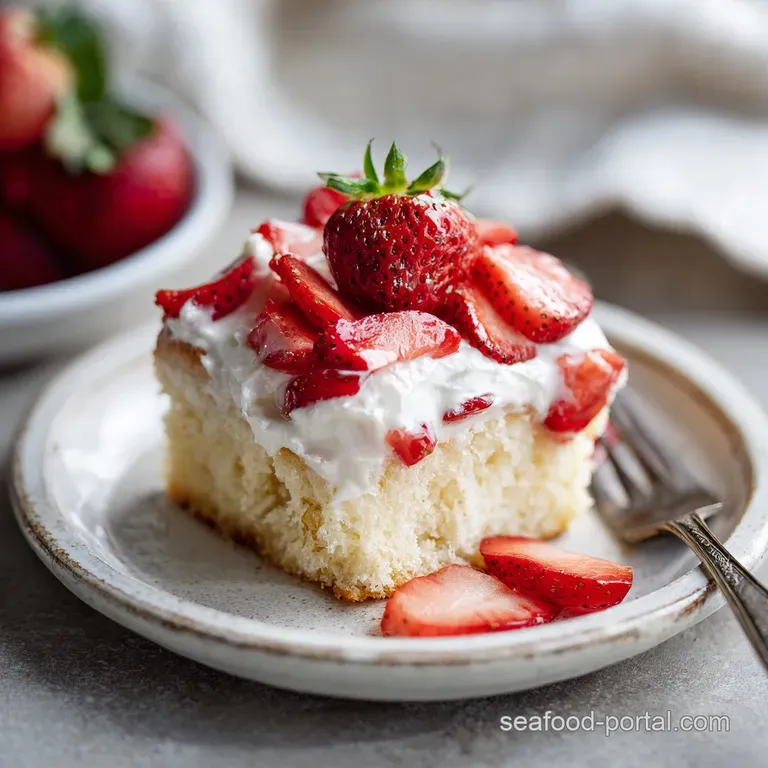
The Ultimate Poke Cake Recipe with Strawberry
The first time I attempted this recipe, I was rushing for a neighborhood block party. I remember the sound of the fork hitting the bottom of the pan - a rhythmic thwack, thwack, thwack - as I poked dozens of holes into that warm, golden cake.
I was so impatient that I poured the liquid gelatin in while the cake was still piping hot. Big mistake. Instead of beautiful red stripes, I ended up with a soggy, neon pink sponge that looked more like a science experiment than a dessert.
We still ate it, of course, because even a messy strawberry cake is hard to resist, but it taught me everything about the importance of temperature and timing. Now, I wait until that cake is just the right level of "warm to the touch" before the infusion begins.
It’s that contrast between the airy white cake and the cool, fruit filled channels that makes every bite so nostalgic.
If you are looking for that classic, old-fashioned vibe that reminds you of summer holidays at grandma's house, this is the one. We are skipping the complicated steps and focusing on what actually works: a reliable mix base, a punchy strawberry soak, and a stabilized topping that won't melt the moment it leaves the fridge.
Trust me, once you see those vibrant red ribbons inside the white cake, you'll never go back to plain sheet cakes again.
The Physics of the Infusion
Capillary Action: By creating vertical channels with a fork or skewer, you allow the low viscosity gelatin to travel deep into the cake’s crumb rather than just pooling on the surface.
Starch Stabilization: Mixing instant vanilla pudding into the whipped topping creates a structured lattice that prevents the cream from weeping or losing its airy volume.
Thermal Absorption: Using boiling water to dissolve the gelatin ensures the sugar and protein molecules are fully dispersed, allowing them to seep into the sponge pores before they begin to set.
| Method | Total Time | Texture | Best For |
|---|---|---|---|
| Standard Oven | 30 minutes | Light and airy | Classic potluck style |
| Toaster Oven | 35 minutes | Slightly crisper edges | Small batches/singles |
| Cupcake Tins | 18 minutes | Firm and portable | Kids' birthday parties |
The difference between a "good" cake and one people beg for is the texture of that soak. If you want to see how this technique translates to other flavors, you might enjoy the rich, gooey layers in my Butter Pecan Praline recipe, which uses a similar infusion method but with a southern twist.
Ingredient Deep Dive
| Ingredient | Science Role | Pro Secret |
|---|---|---|
| Large Eggs (3) | Provides structure and emulsification | Use room temp eggs to avoid curdling the oil |
| Strawberry Gelatin | Flavor and moisture binding | Let it cool slightly so it doesn't melt the cake |
| Vanilla Pudding Mix | Stabilizes the whipped topping | Whisk it thoroughly with milk to avoid lumps |
| Fresh Strawberries | Adds acidity and natural crunch | Slice them thin to ensure they sit flat on top |
When choosing your cake mix, stick to a "Premium White" version. The lack of egg yolks in the batter keeps the color stark white, which makes those red strawberry streaks look absolutely stunning when you slice into it.
Essential Ingredients and Smart Substitutes
To get started, gather your staples. We are using a 1 box (15.25 oz) Premium White Cake Mix Why this? It provides a neutral, airy canvas for the fruit flavors. For the base moisture, you'll need 1 cup Water and 0.5 cup Vegetable Oil, plus 3 Large Eggs to bind it all together.
I always add 1 tsp Pure Vanilla Extract to give the box mix that "from scratch" aroma.
The magic happens with 1 package (3 oz) Strawberry Flavored Gelatin dissolved in 1 cup Boiling Water. For that cloud like finish, we use 1 tub (8 oz) Thawed Whipped Topping, 0.5 cup Cold Milk, and 1 package (3.4 oz) Instant Vanilla Pudding Mix.
Finally, don't forget the 1 lb Fresh Strawberries for that fresh, tart finish on top.
| Original Ingredient | Substitute | Why It Works |
|---|---|---|
| Vegetable Oil | Melted Butter | Adds a richer, dairy forward flavor to the sponge. |
| Strawberry Gelatin | Strawberry Pie Filling | Creates a thicker, chunkier fruit layer inside. |
| Whipped Topping | Heavy Cream | Provides a more natural, less sweet mouthfeel. |
If you decide to swap the whipped topping for real heavy cream, make sure you beat it to stiff peaks before folding in the pudding. It won't be quite as stable in the heat, but the flavor is undeniably velvety.
Basic Kitchen Tools for Baking

You don't need a professional pastry kitchen for this, but a few specific tools make the process much smoother. A standard 9x13 inch baking pan is the gold standard here. I prefer glass or ceramic because they distribute heat evenly and look great when you're serving directly from the dish.
A sturdy whisk or a hand mixer will help you get that pudding topping perfectly smooth. And for the "poke" part? A large tines fork works well for many small holes, but I actually prefer using the rounded end of a wooden spoon.
It creates larger "wells" for the gelatin to pool into, resulting in those iconic, thick red stripes.
Simple Steps for Best Results
Phase 1: Golden Sponge
Preheat your oven to 350°F (180°C). In a large bowl, combine the cake mix, 1 cup water, 0.5 cup oil, 3 eggs, and vanilla. Whisk for about 2 minutes until the batter is smooth and pale. Pour into your greased 9x13 pan.
Phase 2: The Bake
Bake for 30 minutes until a toothpick comes out clean and the edges pull away. You are looking for a light golden hue on the surface, but don't overbake, or the sponge will become too dense to absorb the liquid.
Phase 3: Precision Poke
Let the cake cool for exactly 10 minutes on a wire rack. Use the handle of a wooden spoon to poke holes across the entire surface, spacing them about an inch apart. Note: Go about three quarters of the way down, not all the way to the bottom.
Phase 4: Infusion Soak
Whisk the 3 oz strawberry gelatin into 1 cup boiling water until the crystals completely disappear. Carefully pour this liquid over the cake, making sure to target the holes. The liquid will vanish into the sponge almost instantly.
Phase 5: Chilled Set
Cover the pan and slide it into the fridge for at least 2 hours. This is non negotiable! The gelatin needs to set, and the cake needs to be cold before you even think about the topping.
Phase 6: Velvet Topping
In a medium bowl, whisk 0.5 cup cold milk with the instant vanilla pudding mix for 1 minute. Let it sit for a moment to thicken, then gently fold in the 8 oz thawed whipped topping. The mixture should look like a thick, fluffy cloud.
Phase 7: The Spread
Smooth the pudding mixture over the cold cake using an offset spatula. Ensure you cover the edges to "seal" in the moisture. The topping should be about half an inch thick across the entire surface.
Phase 8: Fresh Finish
Hull and slice your 1 lb fresh strawberries. Arrange them in overlapping rows or a random pattern across the top. Press them gently into the cream so they don't slide off when you slice the cake.
Solving Common Baking Problems
Why Your Cake Is Soggy
If the bottom of your cake feels like a wet sponge, you likely poured the gelatin in while the cake was too hot, or you used too much liquid. The 10 minute cooling window is the "sweet spot" where the crumb is open enough to absorb but firm enough to hold its shape.
Avoiding Clumpy Topping
Pudding mix can sometimes seize up if the milk is too cold or if you don't whisk fast enough. If you see yellow lumps, your topping won't have that velvety mouthfeel.
| Problem | Root Cause | Solution |
|---|---|---|
| Gelatin pools on top | Holes are too small or shallow | Use a wider tool like a wooden spoon handle. |
| Topping is runny | Pudding didn't set before folding | Let the pudding sit for 2 mins after whisking. |
| Cake sticks to pan | Didn't grease enough | Use a baking spray with flour for an easy release. |
Chef's Tip: If you want even more fruit flavor, pulse half of your strawberries in a blender and stir them directly into the gelatin before pouring. It adds a "shattered fruit" texture that is incredible.
Common Mistakes Checklist
- ✓ Never use hot cake for the topping (it will turn into a puddle)
- ✓ Whisk the gelatin until no grains remain at the bottom of the bowl
- ✓ Pat the sliced strawberries dry with a paper towel before topping
- ✓ Use "Instant" pudding, not the "Cook and Serve" variety
- ✓ Let the cake chill for the full 2 hours before slicing
Easy Ways to Adapt Ingredients
If you are cooking for a larger crowd, scaling this recipe is quite simple. To double it, use two 9x13 pans rather than one deep one. This ensures the gelatin distributes evenly. For the spices and vanilla, you only need to increase them by 1.5x to keep the flavors balanced.
If you are looking for a richer, more decadent vibe, you can swap the white cake for a dark cocoa base. For a guide on how that turns out, check out my Death By Chocolate recipe, which uses a similar "poke" method but with a fudge filling instead of fruit.
| Feature | For 6 People | For 24 People |
|---|---|---|
| Pan Size | 8x8 inch square | Two 9x13 inch pans |
| Cake Mix | Use half (approx 7.5 oz) | Two full boxes |
| Bake Time | Reduce by 5-7 minutes | Keep at 30 minutes (per pan) |
When scaling down for a small family, beat one egg in a small bowl and use half of it to keep the moisture to flour ratio accurate. You can also use the leftover gelatin to make small fruit cups for the kids.
Storing and Saving Your Cake
This cake actually tastes better on the second day. The flavors have time to mingle, and the cake reaches a consistent level of moisture. Keep it covered in the fridge for up to 4 days. After that, the fresh strawberries on top will start to lose their "shatter" and become a bit soft.
I don't recommend freezing this cake once the whipped topping and fresh fruit are added. The pudding and cream can change texture and become grainy upon thawing. However, you can bake the sponge, poke it, add the gelatin, and freeze that part for up to 2 months.
Just add the fresh topping when you are ready to serve.
Zero Waste Tip: If you have strawberry scraps or tops, don't toss them! Toss them into a jar of water for a refreshing infused drink, or simmer them with a bit of sugar to make a quick strawberry syrup for your morning pancakes.
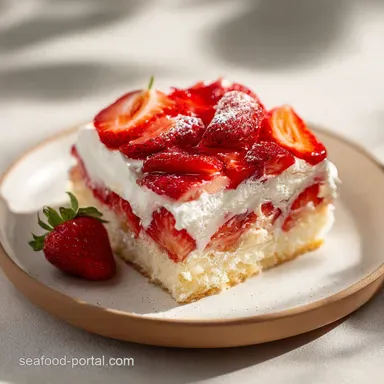
Creative Ways to Present Cake
To get those clean, sharp slices you see in bakeries, wipe your knife with a warm, damp cloth between every single cut. This prevents the white cream from smearing into the red strawberry channels. It takes an extra minute, but the visual "wow" factor is worth the effort.
For a summer social, I like to serve this in clear glass bowls to show off the layers. You can even crumble the cake into a trifle dish, layering it with extra whipped cream and toasted almond slivers.
- For a Summer Social: Garnish with fresh mint leaves for a pop of green.
- For an Indulgent Plate: Drizzle with a little bit of dark chocolate sauce just before serving.
- The "Shortcut" Method: If you're in a total rush, use a jar of strawberry jam thinned with a little water instead of the gelatin.
Kitchen Myths Debunked
Many people think you have to use a fork to get the "authentic" look. That's a myth! A fork creates tiny holes that can lead to a more uniform pink color, but a wooden spoon handle creates the distinct "stripes" that make the cake look professional.
Another common misconception is that you need to use "lite" whipped topping to keep the cake from being too heavy. Actually, the full fat version holds up much better against the moisture of the gelatin and keeps its shape for hours on a serving table. Trust the fat! It's what carries the flavor.

Recipe FAQs
What is the ideal temperature of the cake before pouring the gelatin?
It should be warm to the touch, not hot. Allow the cake to cool for exactly 10 minutes after removing it from the oven before poking holes and adding the liquid gelatin.
Can I use fresh strawberries instead of the gelatin mix for the infusion?
No, you must use the gelatin mix for the infusion step. Fresh berries do not provide the low viscosity liquid needed for capillary action to draw the flavor deep into the crumb.
How do I ensure the whipped topping doesn't weep or collapse on the cake?
Whisk instant vanilla pudding mix into the cold milk before folding into the whipped topping. The starches in the pudding create a stable structure that holds the aeration much longer.
Is it necessary to use a white cake mix, or can I use chocolate?
It is highly recommended to use white cake mix for best visual results. The stark white canvas maximizes the contrast with the red strawberry infusion; for a dark base, see how we use a similar infusion technique in the Butter Pecan Praline recipe.
How long must the finished poke cake chill before serving?
Chill for a minimum of 2 hours, but 4 hours is preferable. This time allows the gelatin to fully set within the sponge and for the flavors to marry.
How do I make the slices look neat and show off the red stripes clearly?
Wipe your cutting knife with a warm, damp cloth between every slice. This prevents the creamy topping from dragging and smearing the clean lines of the strawberry channels.
What is the best way to transport this cake to a picnic without the topping melting?
Transport the cake completely chilled in an insulated cooler packed with ice packs beneath the serving tray. Keep it in the shade until just before serving to maintain topping stability.
Strawberry Poke Cake Recipe 2
Ingredients:
Instructions:
Nutrition Facts:
| Calories | 363 kcal |
|---|---|
| Protein | 3.4 g |
| Fat | 14.2 g |
| Carbs | 56.4 g |
| Fiber | 1.2 g |
| Sugar | 39.8 g |
| Sodium | 415 mg |
