Ninja Creami Peanut Butter Ice Cream: the Proper Job Silky Smooth Recipe
- The Quest for Perfect Creaminess: Introducing Ninja Creami Peanut Butter Ice Cream
- The Science of Bliss: Achieving Ultra-Dense Peanut Butter Texture
- Essential Components for the Ultimate Ninja Creami Peanut Butter Ice Cream
- Substitutions and Flavor Variation Notes
- Mixing, Freezing, Spinning: The Four Steps to Peanut Butter Perfection
- Troubleshooting Your Creami: Expert Tips for a Non-Powdery Result
- Storing and Reviving Leftover Ninja Creami Peanut Butter Ice Cream
- Recipe FAQs
- 📝 Recipe Card
The Quest for Perfect Creaminess: Introducing Ninja Creami Peanut Butter Ice Cream
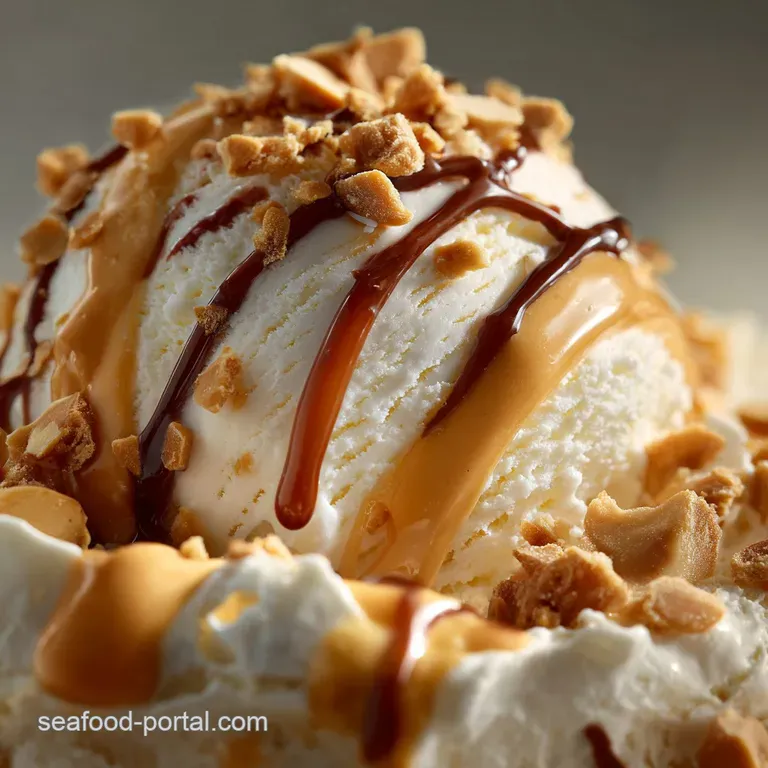
When that Ninja Creami lid pops off after the final spin, you get hit with the most incredible, dense cloud of roasted peanut aroma. Forget that weak, watery, icy sorbet texture so many homemade frozen desserts deliver.
This recipe yields a deeply satisfying, velvety mouthfeel that genuinely rivals the super premium gourmet tubs from the fancy scoop shops.
Honestly, this Ninja Creami Peanut Butter Ice Cream has been a total game changer for my late night sugar cravings. It only takes five minutes of active prep work before freezing, you control exactly how much sugar and fat go in, and it's infinitely cheaper than buying a whole pint of Ben & Jerry's.
Plus, it's easily adaptable into a high protein dessert, which is basically cheating, right?
I’ve absolutely messed up my share of Creami recipes too slushy, too powdery, or tasting suspiciously like frozen cardboard but after dozens of trials, I finally nailed the exact ratio required for peanut butter bliss.
We're talking maximum nutty flavor and zero powdery chalkiness . Let's crack on and get this frozen gold sorted.
The Science of Bliss: Achieving Ultra Dense Peanut Butter Texture
What Makes This Recipe a ‘Proper Job’?
The secret sauce here is balancing three things: fat, protein, and stabilizers. We use a small amount of cream cheese for that creamy background richness, which sounds bonkers but trust me, it’s brilliant for density.
Unlike standard churn ice cream, we don't rely on aeration; we rely on the stabilizer (instant pudding mix) to prevent massive ice crystal formation during that crucial 24 hour freeze.
Why the Ninja Creami Changes Everything for Frozen Desserts
The Creami doesn't churn; it essentially shaves and pulverizes a rock solid block of frozen mixture at high speed. This process rearranges the fat and water molecules so tightly that the result is instantly dense and smooth.
You simply cannot get this texture, especially with a low-fat or low-sugar base, using a traditional ice cream maker.
Mastering the High Protein Base Ratio
If you’re aiming for a high protein version, you must manage your liquid volume. When substituting some of the milk with a pre-made protein shake (like Fairlife or a vanilla protein powder mixed separately), the total liquid volume must remain consistent.
Too much liquid, and you end up with a slushy; too little, and you get a dry, powdery brick.
The Magic of the Re-Spin Cycle
This is where beginners panic, but the Re-Spin is the hero. The first time you spin the pint, it usually looks like frozen sand or powder, especially around the edges. This is totally normal!
The Re-Spin allows the machine to work that mixture again, resulting in that unbelievably silken, thick texture we are striving for. Don't skip it.
Essential Components for the Ultimate Ninja Creami Peanut Butter Ice Cream
| Ingredient | US Customary | Why We Use It | Substitution Suggestion |
|---|---|---|---|
| Milk (2% or Whole) | 1 ½ cups | Primary liquid/protein base. | Oat Milk or Creamy Soy Milk for dairy-free. |
| Cream Cheese (Softened) | 1 Tbsp | Adds richness and inhibits large ice crystals. | 1 Tbsp Full Fat Greek Yogurt (plain). |
| Smooth Peanut Butter | 4 Tbsp | Provides intense nutty flavor. | 4 Tbsp PB2 Powder mixed into a paste with a splash of milk. |
| Maple Syrup/Honey | 2 Tbsp | Natural sweetener and necessary solids. | 2 Tbsp Allulose or Monk Fruit Syrup for keto/low-sugar. |
| Instant Vanilla Pudding Mix (SF/FF) | 1 Tbsp | CRUCIAL Stabilizer. Prevents iciness. | 1/4 tsp Xanthan Gum (use sparingly!). |
| Salt & Vanilla Extract | ½ tsp each | Flavor enhancement. | N/A |
Substitutions and Flavor Variation Notes
Choosing the Best Peanut Butter (Natural vs. Stabilized)
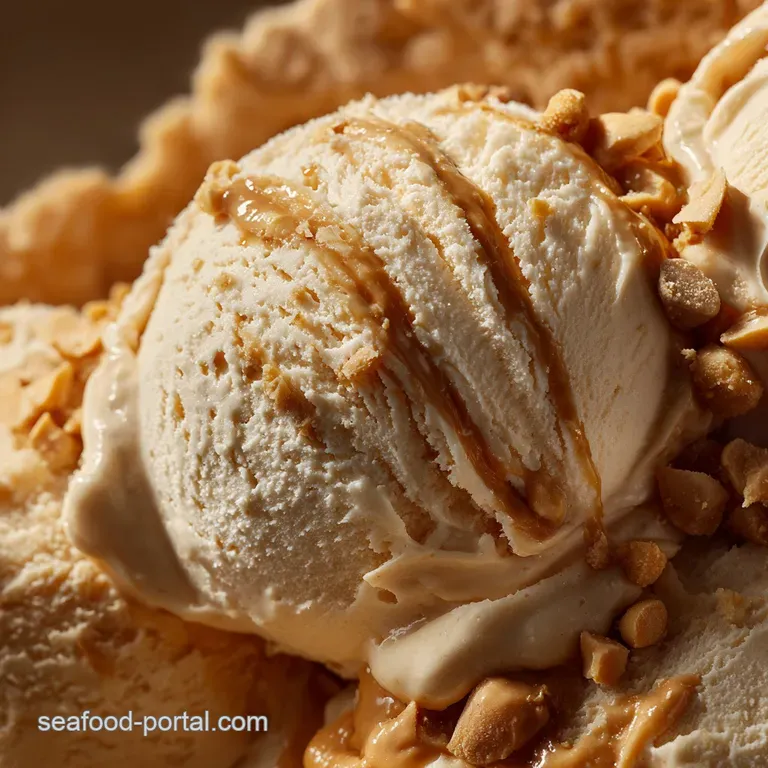
I prefer a slightly processed, emulsified peanut butter (like Jif or Skippy) for the best texture in the Creami. If you use natural, oily peanut butter, you need to make sure it's stirred perfectly before incorporating it, otherwise, the oils separate, which can mess with the final texture.
If you are counting calories, use high-quality PB2 Powder mixed to a thick paste instead.
Dairy and Protein Base Alternatives (Skim Milk, Fairlife, Protein Powder)
If you use skim milk, you must compensate with more stabilizer (like an extra half teaspoon of pudding mix) or add a richer dairy element, like the cream cheese. If you swap 1 cup of the milk for a high protein pre-made shake (like Fairlife), you are setting yourself up for an incredibly creamy, protein packed result.
Sweeteners That Prevent Icy Crunch (Erythritol, Maple Syrup)
Sugar (or sugar alcohols like erythritol) lowers the freezing point, which helps prevent rock solid ice. Maple syrup is excellent because it has some invert sugar content and dissolves instantly.
If you go entirely sugar-free, make sure you use a liquid based sweetener or a finely powdered version of something like erythritol.
Adding a Chocolate Swirl or Crunch Element
The Creami is fantastic for mix-ins, but you must add them after the initial spins. I love using mini chocolate chips or broken-up peanut butter cups. If you wanted a warm drizzle, like a fudge ripple, you should prepare a well in the center of the finished pint and then use the Mix-In function.
Chef’s Note: While I appreciate the savory contrast this dessert offers after a rich dinner like my Baked King Crab: Effortless Legs with Lemon Garlic Butter Recipe , remember that the success of this ice cream hinges entirely on the mix dissolving perfectly before the freeze. Lumps equal failure!
Mixing, Freezing, Spinning: The Four Steps to Peanut Butter Perfection
1. Creating the Base Mixture (Prep)
In your Creami pint, whisk together the milk and softened cream cheese until totally smooth a hand blender works wonders here. Next, add the peanut butter, maple syrup, instant pudding mix, vanilla, and salt. Whisk aggressively for at least 60 seconds until everything is fully dissolved.
You should see no streaks of pudding powder remaining.
2. Deep Freeze for 24 Hours
Pour the mixture into the pint, secure the lid, and place it level in the coldest part of your freezer. This 24 hour minimum freeze is non-negotiable. I once rushed it at 16 hours, and the texture was dreadful, resulting in a thin, slushy mess instead of a solid block. While waiting for the deep freeze, I usually distract myself by prepping something for dinner the next day, like my quick Mediterranean Lemon Dill Basmati Rice Pilaf: Bright, Easy, 35 Minute Side .
3. Initial Spin and Assessment
Remove the pint, remove its lid, and lock it into the outer bowl. Use the 'Ice Cream' setting for the first run. When the cycle finishes, assess the texture; it will almost certainly be crumbly or powdery. That’s okay!
Scoop out the very center to check the density, but leave the rest alone.
4. The Essential Re-Spin
Place the lid back on the outer bowl and select the 'Re-spin' function. This is the transformation cycle. It usually takes another 2- 3 minutes, and when it’s done, you should have that beautiful, creamy soft serve texture ready to scoop.
If it's still slightly powdery, proceed to the fixing stage below.
Troubleshooting Your Creami: Expert Tips for a Non-Powdery Result
Preparing the Base and the Required Freeze Time
If your base looks grainy before freezing, it will taste grainy after spinning. Ensure the peanut butter and pudding powder are completely smooth and emulsified before the 24 hour freeze.
Also, if your freezer temperature fluctuates or if the pint is placed near the door, it won't freeze hard enough. A truly solid pint prevents the powdery effect.
Initial Spin Settings (Light Ice Cream vs. Sorbet)
For this high fat/protein peanut butter base, the 'Ice Cream' setting is the best starting point. Do not use the Sorbet setting unless you specifically used a water based, high sugar mix.
When and How to Add Mix-Ins (The Hollow Well Method)
Do not put mix-ins into the base before freezing! They will ruin the blade. After your final Re-spin, use a spoon to dig a small, hollow well straight down the center of the finished ice cream.
Drop your chocolate chips or chopped nuts into this well, secure the lid, and hit the 'Mix-In' setting.
How to Fix an Icy or Crumbly Pint
If, after the first Re-spin, the ice cream is still crumbly, put the pint back in the outer bowl. Add just 1 tablespoon (15 ml) of milk directly into the center of the pint. This added liquid gives the blade something to incorporate, creating moisture and cohesion.
Select Re-spin once more. Do not add more than one tablespoon, or it becomes soup.
Flavor Intensification: Extracting Maximum Nutty Taste
Salt is your secret weapon here. The small amount of fine sea salt not only balances the sweetness but also dramatically enhances the roasted flavor of the peanut butter. Don't be shy with the salt; it makes all the difference. Sometimes, just a simple flavor profile is best, similar to how straightforward and delicious a good appetizer should be, like the great texture found in my Imitation Crab Dip Recipe: The Easiest, Creamiest Cold Dip Ever .
Storing and Reviving Leftover Ninja Creami Peanut Butter Ice Cream
Best Practices for Long Term Freezer Storage
If you don't eat the whole pint (unlikely, but possible), use a flat spatula to level the top surface perfectly smooth before putting the lid back on. Return it to the freezer. If you leave peaks and valleys, those areas will crystallize and turn icy faster.
Re-Spinning a Hardened Pint the Next Day
Your leftover ice cream will freeze rock solid again. Do not try to scoop it directly! When you want to eat the leftovers, take the pint out, put it directly into the Creami outer bowl, and select the Re-spin setting.
You won't need to add milk unless the texture is dry and chalky after the re-spin.
The Chocolate Shell Advantage (DIY Magic Shell)
For the ultimate nostalgic treat, melt one cup of chocolate chips (semisweet is great) with two teaspoons of coconut oil. Drizzle this quick "magic shell" over the cold ice cream right before serving.
It hardens immediately, giving you a wonderful, crackable shell that perfectly complements the creamy peanut butter underneath.
Best Toppings for an Extra Protein Boost (Powdered Peanut Butter Dust)
Want more peanut flavor without adding fat? After scooping, use a fine mesh sieve to dust the top of your ice cream with plain powdered peanut butter (like PB2). It looks professional, adds intense peanut aroma, and gives you a tiny protein boost without adding extra volume or calories.
It's the perfect finishing touch.

Recipe FAQs
Why is my ice cream crumbly, powdery, or icy after the first spin?
This is the most common Ninja Creami issue, often indicating the base needs more moisture or fat. Try adding 1 2 tablespoons of additional milk, water, or heavy cream directly to the center of the dry mix and running the "Re-Spin" function.
If the texture remains poor, check your ingredient ratios, as the volume of the frozen base is critical to the machine’s operation.
Can I use natural, oily peanut butter instead of a commercial creamy variety?
Yes, natural peanut butter can be used, but it might slightly affect the final texture due to its higher oil separation and lower stabilizer content. If you use natural peanut butter, ensure it is stirred very thoroughly before mixing into the base to distribute the oils evenly.
You may find the resulting ice cream is slightly softer than standard recipes.
How can I make this peanut butter ice cream entirely vegan or dairy-free?
Easily substitute the dairy components with high fat, non-dairy alternatives to maintain creaminess. Use full fat canned coconut milk or cashew cream in place of heavy cream, and substitute the milk with a high protein oat or soy milk. Ensure your protein powder choice is also plant based and suitable for freezing.
My base tastes great before freezing, but bland after churning. What went wrong?
Freezing significantly dulls the perception of both sweetness and flavor intensity, meaning your liquid base must be slightly oversweetened before going into the freezer. If the flavor is flat, ensure you added a generous pinch of salt, as salt is essential for brightening and enhancing the peanut butter flavor profile.
Is the protein powder essential for the recipe, or can I omit it?
While not mandatory for taste, the protein powder is critical for achieving the dense, creamy texture this recipe aims for. It acts as a stabilizer, binding the liquid and preventing the formation of large, icy crystals during freezing.
If omitting, substitute with 1 tablespoon of low-fat cream cheese or a stabilizing agent like guar gum to maintain structure.
How long can I store leftover Ninja Creami ice cream, and what is the re-freezing procedure?
Leftovers can be stored in the sealed Ninja Creami pint container in the freezer for up to two weeks. However, storing it results in a rock solid block due to the lack of commercial stabilizers. You must run a mandatory "Re-Spin" cycle before serving the leftovers to achieve the smooth, scoopable texture again.
When should I add mix-ins like peanut butter cups or chopped nuts?
Mix-ins must always be added after the initial processing and any subsequent "Re-Spin" cycles are complete. Dig a narrow well into the center of the creamy ice cream, add your inclusions, and then run the dedicated "Mix-In" function to thoroughly blend them without over processing the frozen ingredients.
Proper Ninja Creami Peanut Butter Ice Cream
Ingredients:
Instructions:
Nutrition Facts:
| Calories | 182 kcal |
|---|---|
| Protein | 7.2 g |
| Fat | 11.7 g |
| Carbs | 12.3 g |
