Seared Tuna the Perfect Sesame Crusted Ahi Steak Recipe
- Mastering the Moment: Why Confidence is Key to Perfect Tuna
- Essential Pantry Staples for the Soy and Ginger Glaze
- The Right Equipment: What You Need for a over High heat Sear
- Prepping the Tuna: Seasoning, Sealing, and Chilling
- Achieving the Perfect Rare Centre: The Seared Tuna Timing Matrix
- Elegant Plating and Suggested Pairings for Seared Tuna
- Recipe FAQs
- 📝 Recipe Card
Mastering the Moment: Why Confidence is Key to Perfect Tuna
Listen, I need you to forget every lukewarm, grey and banded, overcooked tuna steak you’ve ever had. We're chasing perfection here. The kind of perfection that makes you want to spontaneously applaud yourself.
And the thing that trips people up the most isn't the ingredients or the technique, it's the sheer terror of turning the hob up to high heat.
When you’re making seared tuna (or seared tuna steaks, as we often call them), you need to commit. You need that pan absolutely smoking hot. If you hesitate, if you use medium heat "just in case," you won't sear, you'll simmer.
You'll end up with a dull, thick grey ring around the outside, and the interior won't be that beautiful, cool red we’re aiming for. It’s about heat. Pure, absolute heat. Right?
Identifying True Sashimi and Grade Ahi Steaks
This is where you absolutely cannot cheap out. If you’re going to eat fish that is raw on the inside, it has to be top and tier, handled properly, and meant for raw consumption. Period. We are looking for "sashimi and grade" or "sushi and grade" Ahi (Yellowfin) tuna.
How do you spot the good stuff? It should be vibrant ruby red, almost glossy, and uniformly coloured no brown spots, no dull patches, and definitely no iridescent shimmer (which can indicate additives). Buy it from a fishmonger you trust.
If you see it pre and wrapped in plastic and looking suspiciously pale, walk away. Trust your gut. I once tried to save five bucks and bought "just regular" tuna. Disaster. It was stringy and dry, even though I cooked it for thirty seconds. Learn from my financial foolishness!
The Secret to the Ultimate Sesame Crust Adhesion
Have you ever done a stunning sesame crust, only to have 80% of it slide off the moment the tuna hits the pan? Ugh. Frustrating. The key is two small steps done right before the seeds even come near the fish.
First, you have to ensure the tuna is bone dry (more on that later). Second, you use a minimal amount of neutral oil (rapeseed or canola is perfect) just to bind the seasoning and act as the glue for the crust. You lightly brush the oil on, season with salt and pepper, and then you press.
Press the sides and edges firmly into the seeds. Don't sprinkle. Don't gently roll. Press it hard. You want those seeds embedded in the flesh, ready to crisp up.
Balancing the Glaze: Sweetness Meets Umami
This soy and ginger glaze needs to sing. It should be punchy, acidic, a touch sweet, and deeply savoury (umami). People often make one of two mistakes: either they use too much sugar/honey and it becomes a sticky syrup, or they use too much soy sauce and it's overwhelmingly salty.
The rice vinegar and the fresh lime juice are the unsung heroes here. They cut through the richness of the tuna and the saltiness of the soy. They make your mouth water. When you taste the glaze before dressing the fish, it should taste almost too strong on its own that’s how you know it’s ready to stand up to the rich ahi tuna.
Essential Pantry Staples for the Soy and Ginger Glaze
You’ve got the fresh components (ginger, lime, garlic), but the backbone of this seared tuna recipe is the supporting cast of liquid gold.
This recipe relies on a precise balance. I know some cooks like to wing it, but for a dressing that coats raw fish, precision matters. We need a quality soy sauce and a clean source of acid and sweetness.
If your honey is super floral, it might interfere with the ginger, so opt for something relatively neutral, like maple syrup, if you're worried.
The Right Equipment: What You Need for a over High heat Sear
You might think you can get away with a thin stainless steel pan here. You cannot. This is a job for the heavyweights.
Choosing the Right Soy Sauce (Low Sodium vs. Traditional)
I know the purists will argue, but for cooking especially when making a dipping sauce that doesn't get reduced low and sodium soy sauce is your friend. Why? Control.
Traditional soy sauce is so intensely salty that it’s easy to overshoot and ruin the flavour balance, especially since we’re adding additional salt to the fish itself.
| Attribute | Low Sodium Soy Sauce | Traditional Soy Sauce |
|---|---|---|
| Flavour Control | Excellent (allows easier flavour balancing) | High Risk (can quickly become too salty) |
| Texture | Thinner, better for glazes | Thicker, good for marinades |
| Ideal Use | Glazes, dressings, dipping sauces | Marinades, reducing sauces |
Preparation Tips for Fresh Ginger and Garlic
Use a microplane or the finest side of your box grater for the fresh ginger. You want it to melt into the glaze, not leave chunky, fibrous bits in your teeth. For the garlic, mince it truly finely. If you have time, let the minced garlic sit for five minutes before mixing it into the sauce.
This helps activate its flavour compounds.
Selecting the Best Oil for a Clean, High and Temperature Finish
Forget Extra Virgin Olive Oil for this step. It has a low smoke point and will burn immediately, filling your kitchen with smoke and leaving a bitter, acrid flavour on your beautiful sesame crust. We need a over high heat warrior. Use grapeseed, avocado, or even refined peanut oil.
We’re aiming for 450°F (around 230°C).
Why a Heavy and Bottomed Skillet is Non and Negotiable
A thin pan will have hot spots and cold spots, meaning your sear will be uneven. Worse, the temperature drops dramatically the second you put cold fish in it. You need something that retains heat like a memory foam mattress retains body heat.
The heavy and bottomed skillet (cast iron or a quality clad stainless steel) maintains uniform heat and recovers quickly. It's the difference between a golden crust and a sad, thick band of overcooked grey tuna. Invest in a good one.
Related Recipes Worth Trying
- Tuna Salad MayonnaiseFree Zesty 15Minute Mediterranean Recipe — Tuna Salad MayonnaiseFree is the vibrant healthy lunch you need This Tuna Salad No Mayo Recipe uses a lemonherb vinaigrette for a fresh balanced and quick...
- Tuna Tataki Easy FlashSeared Tuna Recipe with Homemade Ponzu — Tuna Tataki is an elegant fast appetizer Master this fresh tuna recipe achieving the perfect flashseared crust and buttery raw interior Complete with a...
- LightningFast Grilled Ahi Tuna Steaks with SesameGinger Glaze — Achieve buttery restaurantquality Grilled Ahi Tuna Steaks in minutes This lightning fast recipe uses a gingersesame marinade for vibrant flavour and a...
Prepping the Tuna: Seasoning, Sealing, and Chilling
The prep work is everything here. Get your beautiful ahi tuna steaks ready. First, trim away any silver skin or connective tissue. Next, pat them dry. Pat them again. They should feel almost leathery to the touch.
Once they are dry, coat them in a whisper of oil and season. Then, apply that sesame seed crust, pressing firmly all over, especially on the thin edges. Once crusted, I like to pop them onto a plate and put them in the freezer or fridge for 10 minutes while my pan heats up.
Starting with cold, dry tuna steaks that have a solid, chilled crust helps keep the interior cool when it hits the searing heat.
Achieving the Perfect Rare Centre: The Seared Tuna Timing Matrix
This is the nail and biting part, but if you’ve followed the steps, you've cracked it. This section is about execution speed and timing.
Ensuring Maximum Dryness for a Crisp Exterior
Moisture is the enemy. It is your arch and nemesis. Seriously, use a pound of paper towels if you need to. The dryer the surface of the tuna, the faster the Maillard reaction (browning and flavour development) can occur when the fish hits the over high heat oil.
If there is residual moisture, the heat energy is wasted turning that moisture into steam instead of crisping the crust.
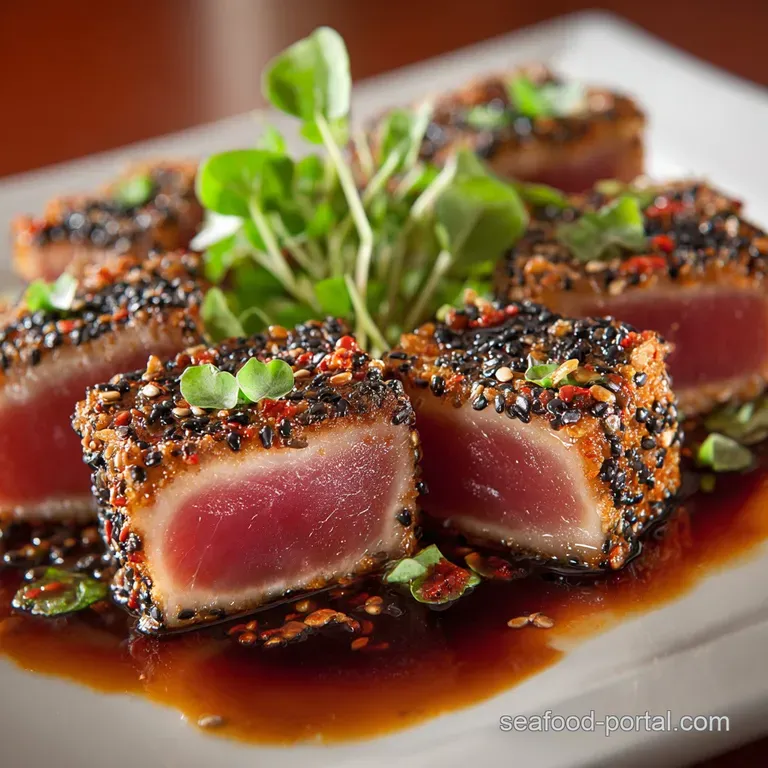
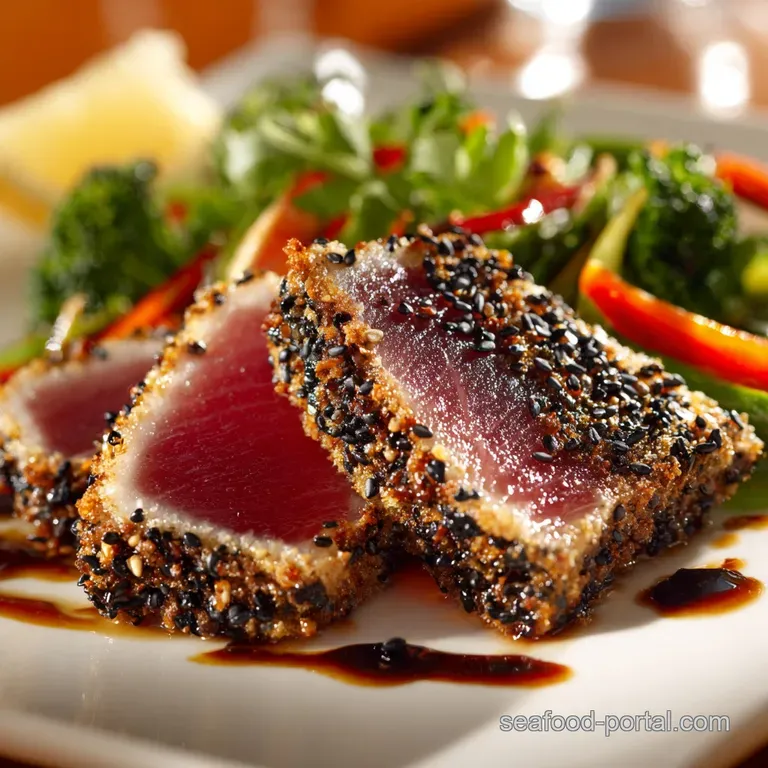
Applying the Sesame Crust Evenly and Firmly
Remember to coat the vertical edges too! This is crucial for visual appeal. When you slice the seared tuna, you want a continuous strip of crispy sesame wrapping around that shocking pink interior. Press down firmly when coating. If the seeds are loose, they will burn in the pan, leading to smoke and bitter flavours.
Constructing the Quick Glaze While the Pan Heats
Get the glaze done before the pan goes on the heat. Once that oil is shimmering, you won't have time to mince garlic or measure lime juice. You need total focus on the searing.
Construct the glaze, taste it, adjust it (maybe needs a touch more acidity?), and then set it aside, ready to be poured straight onto the finished slices.
The Crucial Importance of Resting Your Finished Tuna
When you pull that perfectly seared tuna steak out of the pan, the heat is concentrated on the edges. If you slice it immediately, all the delicious juices trapped in the rare centre rush out onto the cutting board.
Five minutes of resting allows that heat to gently redistribute, drawing the juices back into the centre of the steak, ensuring every slice is moist and tender. This is non and negotiable for any protein, but especially for expensive fish.
Elegant Plating and Suggested Pairings for Seared Tuna
Presentation matters, especially when you've gone to the effort of creating such an elegant dish. Don't just slab the whole steak down.
Slicing Against the Grain: Presentation Mastery
Tuna, like meat, has a grain (muscle fibres). Look closely at the raw edge before you slice. You need to slice perpendicular to that grain. This shortens the muscle fibres, making the slices more tender. Use a long, smooth, draw and back motion with a very sharp knife.
Don't saw at it, or you'll tear the delicate rare flesh. Aim for slices about 1/4 inch thick.
Best Side Dishes to Complement Asian Glazed Ahi
You need fresh, bright, slightly crunchy sides to cut through the richness of the fish and the savoury glaze.
- Quick Cucumber and Seaweed Salad: Tossed in a small amount of rice vinegar and toasted sesame oil. Refreshing!
- Wilted Spinach or Bok Choy: Sautéed quickly with just a hint of garlic and a splash of soy. Keep it simple.
- Ginger and Lime Infused Rice: A twist on plain jasmine rice, adding some of the glaze ingredients to the cooking water.
How Long Can Cooked Ahi Be Stored Safely?
Since we started with sashimi and grade fish and only seared the exterior, it’s best eaten fresh. Seriously, leftovers are rarely as good. If you must store them, transfer the sliced tuna (without the glaze on it) to an airtight container and refrigerate immediately.
It will be safely edible for up to 2 days, but the texture will start to change, becoming firmer and less silky. I recommend eating it cold, sliced thinly, perhaps over a salad the next day. Don't try to reheat it; you’ll ruin the interior.
Adapting the Crust: Nut Variations Beyond Sesame
If you have a sesame allergy, or just want to shake things up, the sesame crust can be easily swapped. The key is using ingredients that have been lightly toasted first to boost their flavour.
You could use a mixture of finely chopped cashews and nori flakes for a rich, umami flavour profile. Or try a delicate crust of slivered almonds blended with a little dried orange zest.
Whatever you choose, make sure it’s pulverized finely enough to adhere to the tuna when pressed.

Recipe FAQs
Is it really safe to eat Seared Tuna if the inside is still raw?
Yes, absolutely, but only if you use sushi grade (or sashimi grade) Ahi tuna from a reputable fishmonger; standard frozen or low-grade tuna is not safe to consume raw or rare. If you're going to fork out for the good stuff, make sure you treat it properly!
How long should I cook the Seared Tuna exactly to get that nice, rare centre?
For a beautifully rare centre, you're looking at searing the flat sides for 60 90 seconds each, plus 30 seconds on all four edges no dilly dallying allowed. The key is using a smoking hot pan and ensuring you let it rest for five minutes afterwards, which stabilises the temperature perfectly.
I always struggle with getting a crisp crust; what's the secret?
The trick is twofold: first, pat the fish aggressively dry before seasoning, and second, use high heat oil (like grapeseed) in a heavy, scorching hot pan (cast iron is brilliant) to ensure you sear it quickly without cooling the oil down.
Can I keep leftover seared tuna, or should I finish it all in one go?
Seared tuna is best enjoyed immediately, as reheating ruins the delicate rare core. However, leftovers can be safely stored in the fridge for 2 3 days and are marvellous sliced thinly and tossed cold into salads or layered onto crackers the next day.
I can't find Ahi tuna. Can I use frozen tuna or another fish entirely?
If you plan to eat it rare, you must use sashimi grade fish, which standard frozen supermarket tuna often isn't. If high grade tuna is unavailable, you can use this searing technique on thick swordfish steaks or salmon fillets, though they must be cooked through for safety.
Perfect Sesame Crusted Seared Tuna

Ingredients:
Instructions:
Nutrition Facts:
| Calories | 300 kcal |
|---|---|
| Fat | 10 g |
| Fiber | 1 g |
