Onigiri: Japanese Rice Balls Wrapped in Flavor
Onigiri: Japanese Rice Balls Wrapped in Flavor
Oh my gosh, let me tell you about the first time i tried onigiri ! picture this: i was chilling in a little japanese market, surrounded by all these amazing snacks.
I spotted these cute little rice balls, and i thought, “what the heck are those?” i took a bite and it was like a flavor explosion! the soft rice, a little bit of salt, and the surprise of juicy umeboshi (that’s pickled plum if you’re not familiar) made my taste buds do a happy dance.
Honestly, i was hooked. i thought, “i need to learn how to make these little treasures!”
So here we are! let’s dive into the world of onigiri , those delightful bites of japanese cuisine that are perfect for any time of day snack, lunch, or even breakfast if you’re feeling adventurous.
They’re one of the best rice recipes , and trust me, once you learn how to make these easy rice balls, you’ll want to whip them up all the time!
A Little History on These Flavor Bombs
Onigiri dates back to ancient japan, where it was a practical way to carry rice for long journeys. soldiers and travelers used them as a quick, easy meal prep option on the go.
Fast forward to today, and you’ll see these rice balls everywhere, especially as a part of traditional japanese meals or just a quick snack at your local japanese market.
They’re embraced for their versatility and, let me tell you, today’s variations are endless.
Why Onigiri is So Loved Today
So, how long does it take to make these bad boys? seriously, you’re looking at about 15 minutes . yup, i said it! that’s all it takes if you’ve got pre-cooked rice.
Not only is this recipe super quick, but it’s also super easy, making it perfect for beginners or anyone just trying to level-up their japanese cooking tips ! even the most novice cook can shape these rice balls with a few simple rice ball shaping techniques .
On the cost front, you won’t break the bank. for about $5 , you can create three solid servings. you’ll come away with a budget friendly, delicious japanese snack that’ll leave you feeling like a pro chef.
Key Benefits of Onigiri
Now, let’s chat about the good stuff the health benefits! these rice balls are usually low in calories, especially if you’re in fact watching what you eat about 200 calories per serving .
They’re packed with energy and can be filled with all sorts of healthy japanese meals . add in some grilled salmon for protein or keep it veggie with a fresh bit of cucumber.
There are so many vegetarian onigiri ideas out there!
Plus, they’re great for picking up snack ideas for picnics or just for a tasty lunch on the go. they’re like the perfect on-the-go japanese snacks ! and hey, they make a beautiful presentation at parties or gatherings.
The unique flavors like that tangy umeboshi or the crispy nori seaweed wrapping set these apart from your average snack or sushi alternatives .
Everyone knows that balancing flavors can be tricky, but with onigiri, you’re allowing the individual components to shine.
So, are you ready to make your own? Let’s jump into the ingredients! You won’t believe how simple and fun this can be. Plus, you'll impress your friends along the way!
Essential Ingredients Guide: Making Your Japanese Cooking Shine
Alright, folks! if you’re diving into japanese cuisine and want to make those delightful rice recipes pop with flavor, then you’re in the right spot! let’s break down what you need to know about the core ingredients , so you can whip up some scrumptious easy rice balls or perfect your sushi rice preparation .
Premium Core Components
First things first, let’s talk about the essentials. To make your experience seamless, having a detailed measurement guide is key.
- For Japanese rice, if you’re going for 3 cups (around 450g ), that’ll typically serve about three hungry bellies. Just remember, rice can be a bit temperamental. You know, like cooking spaghetti while trying to multitask! Keep an eye on it.
Now, let’s chat about quality indicators . Fresh rice should have a nice, shiny appearance. Give it a sniff, and it should smell like heaven or at least not like your old gym socks!
When it comes to storage guidelines , keep your rice in a cool, dry spot. if you’ve got it in bulk, consider an airtight container.
This way, it'll stay fresh for up to 1 year , which is pretty stellar!
Signature Seasoning Blend
Now, onto the fun stuff: seasoning! essential spice combinations in japanese cooking often revolve around soy sauce, mirin, and some good ol’ sake.
Those babies create a depth of flavor that makes your taste buds do the happy dance!
For herbs, go for green onions and shiso leaves. they pair beautifully with rice dishes. if you’re looking for something extra, sprinkle on sesame seeds or try nori seaweed uses to wrap those traditional japanese snacks like onigiri .
Smart Substitutions
Let’s face it: sometimes you just don’t have all the ingredients, right? maybe you’re in your kitchen late at night, and the thought of putting on pants to run to the store feels like climbing mount everest.
You’ve got to think on your feet!
Common alternatives for rice can include quinoa or even cauliflower rice for a low-carb twist. now for dietary modifications, if you’re vegan or vegetarian, swap out meats for veggies or tofu.
You could even whip up some quick japanese recipes using what you already have.
If you’re in an absolute pinch, replace umeboshi (Japanese pickled plum) with regular pickles for a quirky flair in your Onigiri variations .
Kitchen Equipment Essentials
You don’t need a boatload of fancy equipment, trust me! for shaping those adorable rice balls, rice ball molds can be a lifesaver.
And while we're talking tools, a good plastic wrap is a must to keep your creations from turning into a sticky mess!
For storage, think big. Use a mixing bowl with a lid to keep your prepped ingredients fresh until it's go-time. Less hassle means more fun!
Unleashing the Flavor!
And once you’ve gathered all your essentials, you’re ready to cook! Start by preparing your rice. You want it just sticky enough for those perfect shapes no one likes a gooey rice ball that falls apart everywhere, right?
Your rice ball shaping techniques will quickly become your party trick. Trust me, once you master how to make Onigiri, you’ll want to start throwing Japanese themed snack parties, and your friends will love it!
If you’re feeling adventurous, try making variations like adding grilled salmon, or even a bit of furikake for crunch.
And there you go! with these core components, a sprinkle of creativity, and some solid cooking hacks, you're all set to bring the vibrant flavors of japanese food culture into your kitchen.
You’re on your way to creating not just healthy japanese meals , but some serious culinary masterpieces! so, roll up those sleeves, and let’s get to the exciting part the instructions on how to create these delicious rice balls transform your kitchen into a little slice of japan!
Professional Cooking Method
Essential Preparation Steps
Before diving into the culinary arts, let’s chat about mise en place , the fancy french term that just means "everything in its place.
" it’s honestly a game changer. have all your ingredients prepped and measured before you start cooking. seriously, it’ll make your life so much easier when you’re getting into those quick japanese recipes like onigiri .
Next, time management is key. i can’t tell you how many times i’ve burnt something while scrambling around the kitchen! set a timer for each step that needs monitoring.
We’re talking 15 minutes of active prep time here, so keep an eye on things!
Organization is also crucial. i like to use little bowls for my ingredients. it's just like when you’re making traditional japanese snacks having things separated makes it less chaotic (because, boy, do i thrive in chaos).
And don’t forget about safety! always use a cutting board when chopping, and keep those knives sharp. a dull knife is a bad accident waiting to happen.
step-by-step Process
Ready to roll? Here’s your step-by-step guide.
Prepare the rice: you're gonna want 3 cups of steamed japanese rice . you can use that sushi rice if you really wanna get fancy! sprinkle a bit of salt in and mix it gently.
No aggressive stirring, please; we’re not making a mosh pit here.
Form the basic rice ball: use plastic wrap to shape your rice. place a third of the rice in the middle and mold it into a triangle or ball shape.
I know it sounds a bit tricky, but you’ll get the hang of it it’s just like forming rice snacks for the kiddos, but a little more advanced!
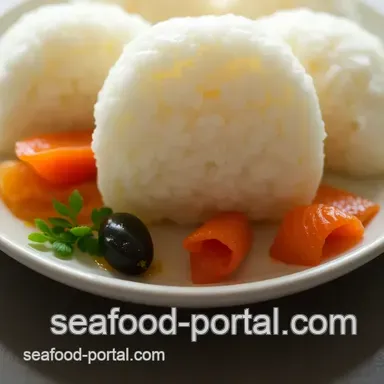
Fill her up! making umeboshi onigiri ? take that pickled plum, pit it, and shove it in the middle of another mound of rice for a flavor explosion.
For salmon lovers, just flake some grilled salmon and mix it into your rice before shaping!
Storage Tips: You can keep Onigiri stored in the fridge for about a day. Just make sure it's covered so it doesn’t dry out. No one wants a sad, dry rice ball.
Expert Techniques
Let’s talk like true pros here. pay attention to temperature control points . if you’re serving grilled salmon dishes with your onigiri, the fish should hit around 145° f for safety, but it’s all about achieving that perfect texture.
Now, for timing precision, this whole process should take about 15 minutes max if you’ve got everything prepped. keep an eye on visual cues when your rice looks shiny and a bit sticky, you’re in the right zone.
And if something goes awry? Just remember: everyone has their off days in the kitchen. If you’re struggling with shape, just mold your rice ball into something round! Who says it needs to be a perfect triangle?
Success Strategies
Let's tackle those common mistakes first. Don't over salt! You can always add more. About 1/4 teaspoon should suffice for 3 cups of rice .
Check quality too; rice should be somewhat sticky but not mushy. if you’re using a mold for that perfect onigiri shape, make sure it’s non-stick; that’ll save you from the drama of a stuck mess.
If you want to prep ahead of time, consider making some filling options like vegetarian Onigiri or quick Japanese sauces for dipping. These elements can elevate your meal prep game.
Wrapping It Up
And there you have it! making onigiri isn’t just a fun excursion into japanese cuisine; it’s a super practical meal or snack option that’s perfect for picnics or a quick bite on the go.
You’ve got those flavorful rice snacks in the bag (literally!).
Let's be real embracing Japanese food culture is about enjoying every step of the cooking experience. So, you did it! You took the leap into making easy rice balls . High five!
Now, if you're looking for additional information or inspiration in the world of Japanese cooking, look no further. Let’s keep exploring those delicious flavors together!
Additional Recipe Information for Onigiri: Japanese Rice Balls Wrapped in Flavor
Alright, let's dive deeper into the world of onigiri those adorable japanese rice balls that can turn any meal into a little celebration! they’re not just a meal; they’re art! so let’s sprinkle in some pro tips, presentation pointers, storage secrets, and ways to get a bit creative.
Ready? let’s go!
Pro Tips & Secrets
First up, chef's personal insights . onigiri is all about getting that perfect rice texture . use short grain sushi rice. seriously, it’s a game changer.
It gives you that delightful stickiness that makes molding a breeze.
Next, for some time saving techniques , if you’re in a hurry, use pre-cooked rice! it’s a lifesaver on busy days.
Just warm it up and you’re ready to roll (or mold, as it were).
Let’s talk flavor enhancement tips. if you want to elevate your rice, sprinkle in some furikake , which is a japanese rice seasoning.
It adds layers of flavor that can turn your homemade snacks into something that packs a punch!
Presentation advice is crucial, too. remember, we eat with our eyes first! feel free to dress them up with toppings like sesame seeds or colorful veggies.
It makes a big difference, trust me!
Perfect Presentation
When it comes to plating techniques , keep it simple. A clean plate or even a bamboo tray gives a nice Japanese vibe.
For garnish ideas , consider a little sliced radish or even some edible flowers if you want to impress. You can never go wrong with a splash of color.
Now, let's dive into color combinations . The contrast of the dark nori against the bright white rice, all wrapped up with vibrant fillings, is stunning. Remember, make it eye-catching!
And for those visual appeal tips , think about the shape. Triangles are traditional, but don’t be shy about trying rounded shapes. Just have fun with it!
Storage & make-ahead
You know that feeling when you want something tasty on hand? for storage guidelines , keep your onigiri in the fridge for up to two days.
Just wrap them up in some cling film to maintain their moisture and freshness.
For preservation methods , you can throw them in a bento box for an on-the-go snack! just make sure to keep any nori separate until you’re ready to eat.
Nobody likes soggy seaweed, right?
As for reheating instructions , if you want to warm them, just give them a quick zap in the microwave for about 15 seconds. Easy peasy!
Creative Variations
Now, let’s get a little wild with creative variations . if you’re feeling adventurous, swap out your fillings! you could use avocado or spicy sriracha for a kick, or even use grilled vegetables for a vegetarian take.
If you’re thinking about seasonal twists , try adding pumpkin or roasted squash in the fall. It brings a cozy touch, perfect for those chilly nights.
And don’t forget about regional variations . If you’re feeling experimental, how about mixing in some BBQ chicken for an American twist? You could even craft some sushi style Onigiri with spicy tuna!
Complete Nutrition Guide
Lastly, let’s chat about the numbers. each serving of onigiri boasts around 200 calories packed with carbs, protein, and a dose of healthy fats.
They can be a great addition to a balanced meal.
In terms of health benefits , the rice provides energy, while fillings like salmon or vegetables bring vitamins.
For those with special dietary needs, you can easily adapt this recipe: make it gluten-free by skipping the soy sauce, and for folks who prefer vegetarian options, just load up on those tasty veggies.
Wrapping Up
So, there you have it! onigiri isn’t just a recipe; it’s an experience. look into into the world of japanese food culture right from your kitchen.
Whether you’re bonding over japanese snacks for kids or enjoying a cozy dinner with loved ones, these rice balls are sure to bring a smile.
Don't hesitate to get creative and make these little bites your own. mix flavors, share with friends, and enjoy the cooking process! every time you mold that rice, you’re stepping into a delightful world of asian comfort food .
So roll up your sleeves and get ready to show off your culinary skills! 🍙
Frequently Asked Questions
What type of rice should I use to make Onigiri?
For the best results, use short grain sushi rice as it has the ideal stickiness to hold the rice balls together. Long grain rice won't work as well for this recipe, since it won’t bind properly.
Can I customize the fillings in my Onigiri?
Absolutely! Onigiri is incredibly versatile. You can substitute the traditional fillings like umeboshi or salmon with options like avocado, pickled vegetables, or even cheese for a unique twist. Just let your taste buds guide you!
How do I store leftover Onigiri?
Onigiri is best enjoyed fresh, but if you have leftovers, store them in the fridge wrapped in cling film to retain moisture. They will last for up to two days, but keep in mind that the rice may harden a bit, so a quick steam or microwave can help revive them.
Can I make Onigiri in advance for a picnic or meal prep?
Yes, you can prepare Onigiri ahead of time! Just be sure to wrap each rice ball tightly in plastic wrap to keep them fresh. They are great for picnics, but ideally should be eaten within 1-2 days for the best taste and texture.
What are some popular variations of Onigiri besides traditional fillings?
Some popular variations include adding spicy ingredients like sriracha to the rice, or using grilled chicken with teriyaki sauce. For a vegetarian option, you can fill them with seasoned tofu or even curry for an exciting flavour twist!
Are Onigiri healthy?
Onigiri can be a healthy choice, especially when made with brown rice or added vegetables. They provide a good amount of carbohydrates, are low in fat, and can be packed with protein depending on your fillings. Just be mindful of the sodium content in preserved items like umeboshi and salmon.
Onigiri Japanese Rice Balls Wrapped In Flavor
Ingredients:
Instructions:
Nutrition Facts:
| Calories | 200 |
|---|---|
| Protein | 5g |
| Fat | 3g |
| Carbs | 37g |
| Fiber | 1g |
| Sugar | 0g |
| Sodium | 200mg |
