Boiled Shrimp: the Classic 20-Minute Old Bay Recipe
- The Classic Lemon & Bay Boiled Shrimp: A Proper Seafood Feast
- The Art of Perfect Seafood: Elevating Simple Boiled Shrimp
- The Science of Seasoning: Why This Boiling Method Guarantees Flavor
- Assembling Your Feast: Ingredients and Necessary Substitutions
- Mastering the Technique: Step-by-Step Instructions for Boiled Shrimp
- Chef's Secrets and Common Mistakes to Avoid
- Beyond the Pot: Storage and Elegant Serving Suggestions
- Recipe FAQs
- 📝 Recipe Card
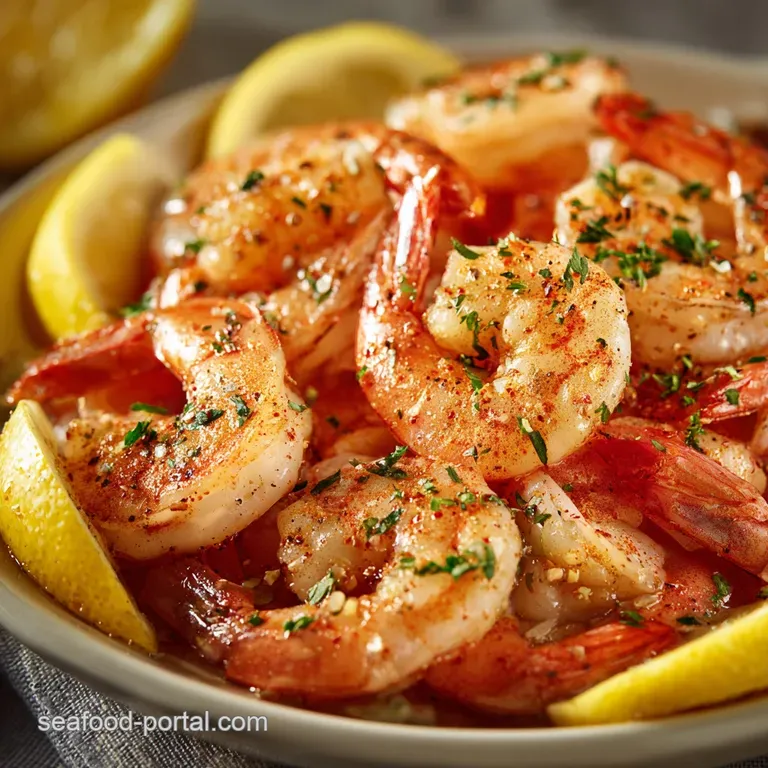
The Classic Lemon & Bay Boiled Shrimp: A Proper Seafood Feast
That aroma hits you first. It's a gorgeous mix of sunshine and sea air, lifted by spicy, smoky notes of Old Bay, all swirling up from the steam as the pot bubbles. We aren't talking about sad, grey, watery shrimp here, darling. This is bright, beautiful seafood that tastes exactly how a seaside summer vacation smells.
Honestly, this recipe is my absolute lifeline for fast, elegant protein. You can genuinely pull off a stunning appetizer or a light main course in under 20 minutes, which is ridiculously fast for how much flavor you get.
It’s cheap, incredibly versatile, and makes even a standard Tuesday night feel like a special occasion.
Forget everything you think you know about "just boiling" seafood. The secret isn't the shrimp itself; it’s the intense, highly flavored bath we create for it. We are going to treat our beautiful crustaceans to an aggressively seasoned, aromatic spa day before they hit your plate.
Trust me on this method it makes all the difference.
The Art of Perfect Seafood: Elevating Simple Boiled Shrimp
The Science of Seasoning: Why This Boiling Method Guarantees Flavor
This isn't just about hot water; it’s about strategic flavor building in a very short amount of time. Since boiled shrimp only cook for about three to four minutes, the cooking liquid needs to be overwhelmingly seasoned to ensure the flavor penetrates the meat immediately.
If the water tastes slightly salty, your shrimp will taste like nothing. The water must taste intensely salty and spiced.
The Magic of the Aromatic Boiling Bath
We are essentially creating a quick, hot brine full of acid and spice. Simmering the lemon, onion, and bay leaves releases their volatile oils and flavor compounds into the water first, maximizing infusion.
The shrimp then enters a fully prepared environment, meaning it absorbs the seasoning the second it hits the liquid.
Shrimp vs. Prawns: Choosing Your Seafood
In the U.S., we generally call these smaller, curved crustaceans shrimp, but if you’re cooking internationally (or following European recipes), you might see them labeled as prawns. The key difference for this recipe is size, not name.
Always choose large or jumbo shrimp (U15 or U10 count) because they are much more forgiving when it comes to the short cooking time required here. Small shrimp overcook in seconds, turning rubbery before you can even react.
The Quickest Path to Elegant Entertaining
What’s brilliant about boiled shrimp is that they are intended to be served cold or at room temperature, making them a perfect make-ahead appetizer. You don't need to fret about keeping anything hot while your guests arrive; you can cook them 30 minutes before the party starts and they will be perfect.
Thermal Shock: The Secret to Firm Texture
This is the non-negotiable step: the ice bath. Thermal shock is the single most important technique for perfect texture. As soon as the shrimp come out of the boiling water, their internal temperature is still rising (this is carry over cooking).
Dumping them into ice water instantly halts that process, locking in that wonderfully crisp, snappy bite that we crave in perfect seafood.
Infusion Dynamics: Maximizing Spice Penetration
The acidity from the lemon slices, combined with the high salt content, slightly changes the structure of the water, enabling the Old Bay and other spices to cling better to the shells.
Because we use shell-on shrimp, the shells act like tiny flavor sponges, soaking up the spiced liquid, which then transfers the flavor to the meat underneath when you peel them.
Acid and Salt: Building Flavor Layers
Salt opens the shrimp’s pores for seasoning, while the lemon juice brightens the overall flavor profile and counteracts the sometimes muddy taste that frozen seafood can retain. It’s a dynamic duo! Skipping the acid will leave your shrimp tasting flat, even if you use plenty of spice.
Assembling Your Feast: Ingredients and Necessary Substitutions
Sourcing the Best Raw Shrimp (Fresh vs. Frozen)
Don't let anyone tell you fresh is always better, especially for boiled shrimp! Unless you live right on the coast, the "fresh" shrimp at your counter was likely flash frozen and thawed there anyway. I always buy frozen shell-on shrimp (already deveined, if possible) and thaw them myself overnight in the fridge.
This ensures the best texture and prevents flavor loss.
The Essential Aromatic Trinity: Lemon, Bay, and Spice
| Ingredient | Why We Use It | Substitution Suggestion |
|---|---|---|
| Large Shrimp (Shell-on) | Protects the meat and enhances flavor. | Pre-peeled shrimp (reduce cook time by 1 minute). |
| Coarse Sea Salt | Crucial for seasoning penetration. | Kosher salt (use slightly less) or table salt (use half the amount). |
| Fresh Lemon | Acid for brightness and flavor extraction. | ¼ cup white vinegar (flavor won't be as bright). |
| Old Bay Seasoning | Classic coastal flavor profile (celery salt, paprika, pepper). | Equal parts paprika, celery salt, mustard powder, and black pepper. |
Alternative Spice Mixes and Flavor Boosters
If Old Bay isn't your jam, try making a more savory bath. You can skip the traditional seafood seasoning and use a mixture that leans into Mediterranean notes or a smoky Southern profile instead.
- Smoky Heat: Add 2 Tbsp smoked paprika and 1 tsp cayenne pepper.
- Mediterranean: Add 1 Tbsp fennel seeds and a handful of fresh dill or oregano sprigs.
- Umami Bomb: Drop in 1 Tbsp of liquid crab boil concentrate (if you can find it) and two stalks of chopped celery for savory depth.
Mastering the Technique: step-by-step Instructions for Boiled Shrimp
Stage 1: Preparing the Highly Seasoned Bath
- Combine the Aromatics: Grab your big stockpot. Toss in the 8 cups of water (or stock), the salt, sliced lemons, onion pieces, smashed garlic, whole bay leaves, peppercorns, and the three tablespoons of seasoning. Don't be gentle; everything just gets thrown in.
- Bring to a Roaring Boil: Cover the pot to speed things up, and bring that liquid to a rapid, rolling boil over high heat.
- Infuse the Broth: Once it’s boiling rapidly, uncover the pot and reduce the heat slightly to maintain a vigorous simmer. Simmer for a quick 5 minutes. This is where all those incredible flavors get fully suspended in the water.
Crucial Chef’s Note: Now is the time to taste the broth. It should taste strongly of salt and spices almost too salty to drink straight. If it tastes weak, add another tablespoon of salt right now.
Stage 2: Precision Timing and Adding the Shrimp
- Remove Solids (Optional): Using a slotted spoon, I like to scoop out and discard the spent lemon rinds, onion bits, and bay leaves. This ensures a clean cooking environment for the shrimp, but you can leave them in if you don't mind skimming later.
- Add the Shrimp: Make sure the broth is back at a gentle boil/rapid simmer. Add all 2 pounds of shrimp quickly and give them one good stir to submerge them completely.
- Time Precisely: The liquid temperature will drop momentarily. Once it returns to a simmer, start your timer. Cook for exactly 3 to 4 minutes . The shrimp will turn opaque pink/red and curl slightly into a loose 'C' shape. Watch them like a hawk.
Stage 3: The Essential Ice Bath Finish
- Drain Immediately: When the timer dings (or when they hit that perfect color), pour the entire contents of the pot immediately through a large colander into the sink. The cooking stops now .
- Shock Them: Promptly transfer the hot, drained shrimp into a large bowl filled with ice and just enough cold water to cover the ice (the ice bath). Swirl them around gently for about 5 minutes until they feel completely cold to the touch. This guarantees that beautiful, firm snap.
- Serve: Drain the chilled shrimp thoroughly and pat them lightly dry before serving immediately with your favorite sauces.
Chef's Secrets and Common Mistakes to Avoid
The Cardinal Rule: Never Overcook
If there is one thing that ruins boiled shrimp, it’s rubbery texture from overcooking. People often leave the shrimp in the hot water after turning off the heat, which is a mistake. The second you see that perfect pink color and the shrimp curling into a gentle 'C' shape, they are done.
A tight 'O' shape means you went too far.
Testing for Doneness Without Cutting
When shrimp are raw, they are flexible and grey/translucent. When perfectly cooked, they are opaque and white with a pink exterior. The best visual cue is the shape: it should form a loose letter 'C'. If you see that curve, pull them out. If you are ever in doubt, sacrifice one cut it in half.
If the center is still slightly translucent, keep cooking for another 30 seconds.
The Trick to Easy Peel Shrimp
Using the thermal shock (the ice bath) isn't just for texture; it helps the shell release easily from the meat. The rapid shrinking of the flesh away from the shell makes them incredibly easy to peel later.
I once skipped the ice bath when I was distracted and every single shrimp stuck to the shell it was a nightmare! Don't skip the ice bath.
Beyond the Pot: Storage and Elegant Serving Suggestions
How to Safely Store Cooked Shrimp (Refrigeration)
Boiled shrimp store beautifully, which is why this is such a great party recipe. Once cooled completely in the ice bath, transfer them to an airtight container. They will keep perfectly in the refrigerator for up to 3 days.
I don't recommend freezing cooked shrimp, as the thawing process often compromises that beautiful snappy texture we worked so hard to achieve.
The Best Cold Pairings: Sauces and Dips
- Classic Cocktail Sauce: Always a winner; use plenty of fresh horseradish for a kick.
- Remoulade: A creamy, spiced dip featuring mayo, mustard, capers, and paprika.
- Lemon Garlic Butter: Serve a small pot of melted butter infused with lemon juice, fresh parsley, and a pinch of chili flake for dipping.
You could also serve these perfect, snappy shrimp with a quick dollop of a creamy, bright dip similar to the topping in my recipe for Shrimp Bruschetta: Easy Lemon Garlic Seafood Appetizer Recipe .
Turning Leftovers into a Quick Coastal Salad
If you happen to have any leftovers (it’s rare, I know), they are fantastic tossed into a salad or repurposed for a light dinner. Peel the chilled shrimp and toss them with olive oil, lemon zest, celery, and red onion for a refreshing seafood salad. For a simple pasta dish, chop them up and add them right at the end of the cooking process for a bright, flavorful meal like my Lemon Shrimp Pasta: Easy Lemon Garlic Linguine in 30 Mins . They are already perfectly seasoned, which saves you major flavor steps later!

Recipe FAQs
Why did my boiled shrimp turn out rubbery or tough?
Rubbery texture is the classic sign of overcooking, as shrimp protein tightens very quickly under high heat. Shrimp typically needs only 2 to 4 minutes depending on size, so remove them immediately when they curl into a light C-shape and turn uniformly opaque.
For the most tender results, remove them from the water just before you think they are fully done, as the residual heat continues the cooking process.
Can I use frozen shrimp directly in the seasoned boiling water?
While possible, cooking shrimp directly from frozen is highly discouraged because it drastically lowers the water temperature and leads to uneven cooking. For optimal results, thaw the shrimp overnight in the refrigerator or immerse them in cold running water until they are completely separated before introducing them to the hot seasoned bath.
If you must boil them frozen, add an extra minute or two to the cooking time, watching carefully for the color change.
Should I peel and devein the shrimp before boiling them?
For maximum flavour infusion and superior texture, it is strongly recommended to boil the shrimp with the shells intact. The shells act as a protective layer, shielding the delicate meat from the direct heat while trapping the seasoning steam inside for a juicier result.
Peeling and deveining should be done after the boiling and cooling process.
How do I know exactly when the shrimp are perfectly cooked?
Perfectly cooked shrimp will turn from translucent grey to uniformly opaque pink and curl into a loose "C" shape. If the shrimp tighten further into a small "O" or "P" shape, they are typically overcooked and will be dry.
The moment the very center of the shrimp loses its grey tint, they are done and should be immediately strained.
How can I increase the heat and spice level of the boil?
To introduce a significant kick, add a generous amount of cayenne pepper, extra red pepper flakes, or a tablespoon of liquid crab/shrimp boil concentrate to the boiling water mixture.
For a deeper, earthy heat that permeates the shells, try splitting several dried chili peppers (like chiles de árbol) and allowing them to steep in the broth for 10 minutes before the shrimp is added.
How should I store leftover boiled shrimp and how long do they last?
Leftover shrimp should be chilled rapidly by placing them in an ice bath right after boiling to stop the cooking process, then patted dry. Store them in an airtight container in the refrigerator, where they will remain safe and fresh for up to 3 to 4 days.
If the shrimp have a slimy texture or ammonia smell, discard them immediately.
Can I freeze leftover boiled shrimp for later use?
While possible, freezing cooked shrimp can sometimes result in a slightly tougher or drier texture upon thawing. To freeze them, ensure they are fully dried, flash freeze them separated on a sheet pan, and then transfer them to a heavy duty freezer bag, ensuring all air is removed to prevent freezer burn; consume within three months for best quality.
Classic Lemon Boiled Shrimp Recipe
Ingredients:
Instructions:
Nutrition Facts:
| Calories | 220 calories |
|---|---|
| Fat | 3 grams |
| Fiber | 1 grams |
